Watercolor – Unity Stamp Company

Hi Friends! I hope you are having a great weekend! I wanted to stop in to share with you a gorgeous new release at Unity Stamp Company! It’s a beautiful release and we are celebrating Angela’s birthday too! Angela has added her favorites and has put over 100 stamps on sale! I hope you’ll check it out! I have included links below!

Stamping/Coloring

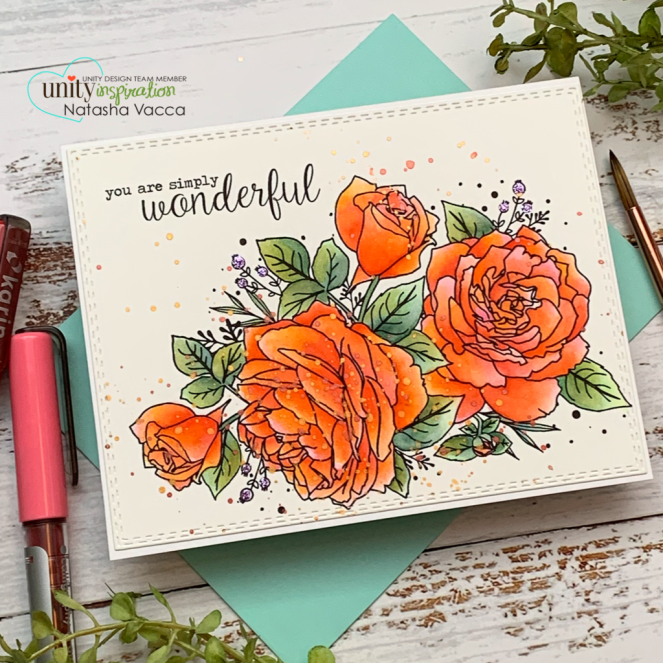
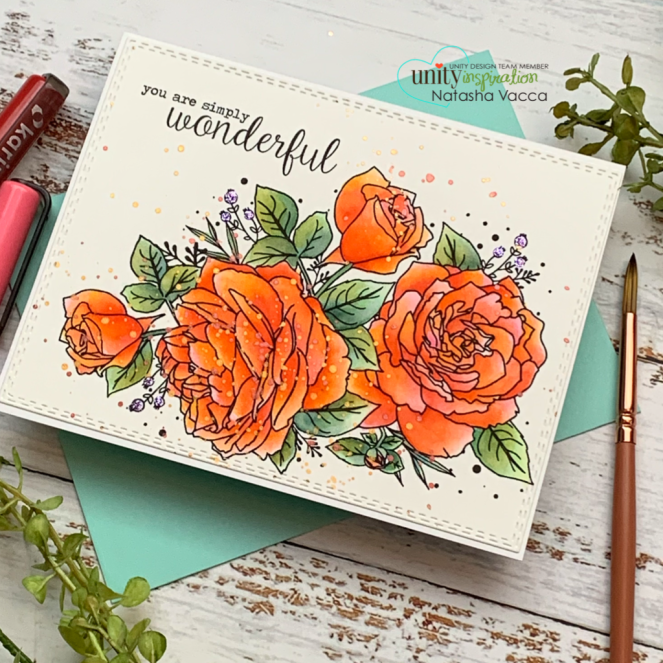
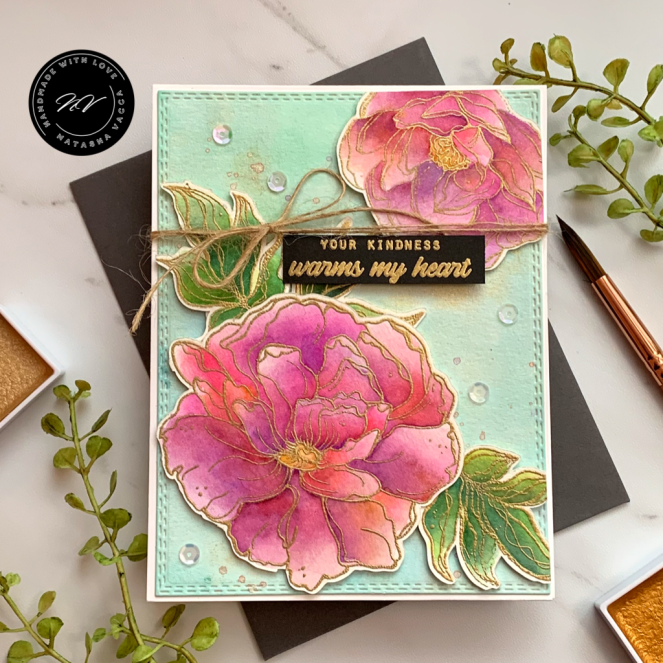
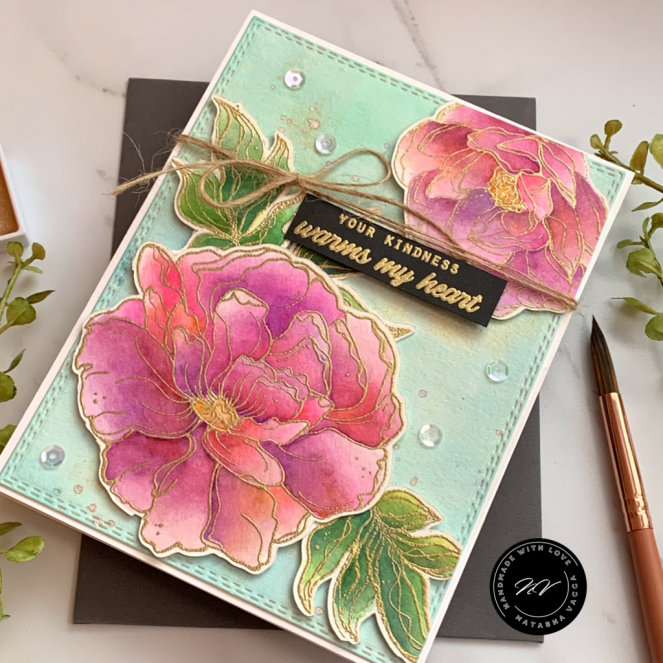
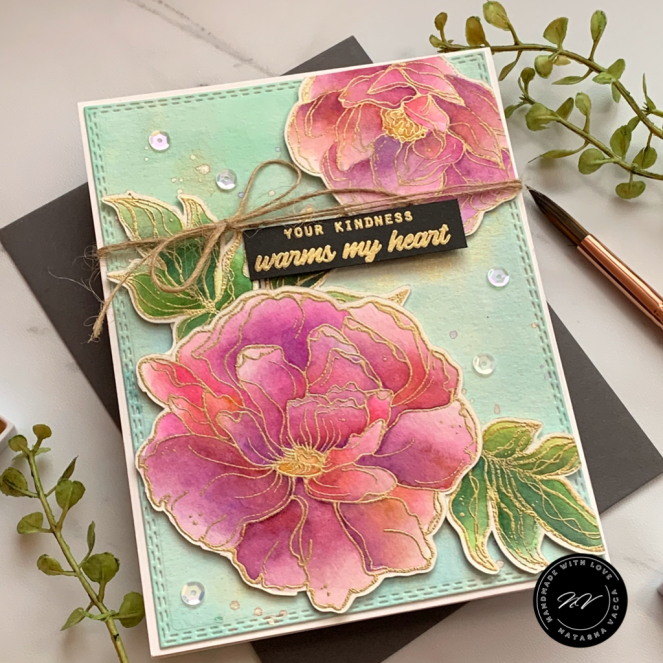
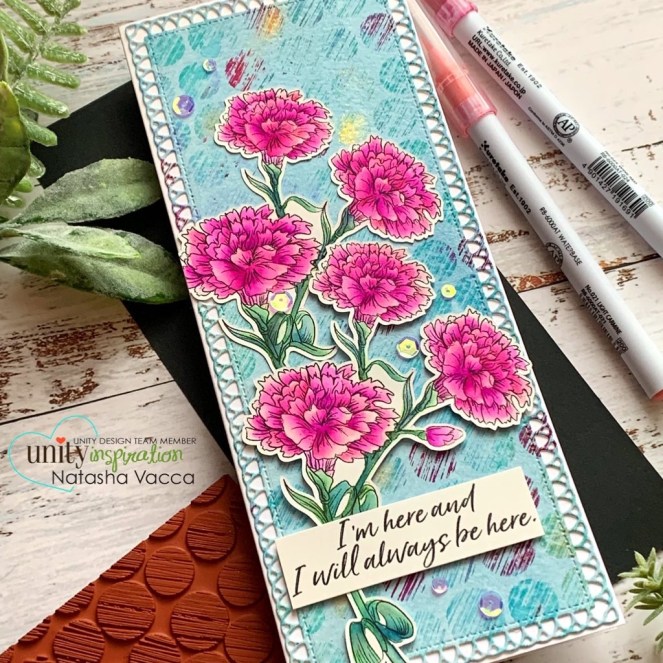
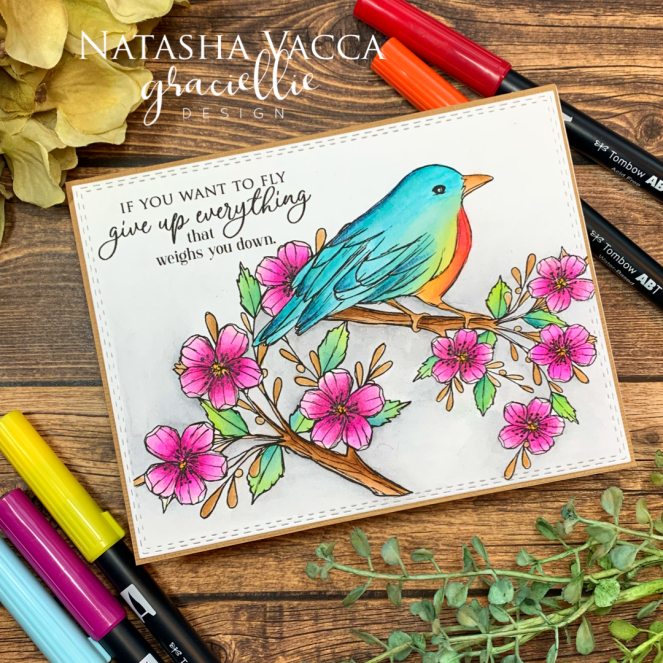
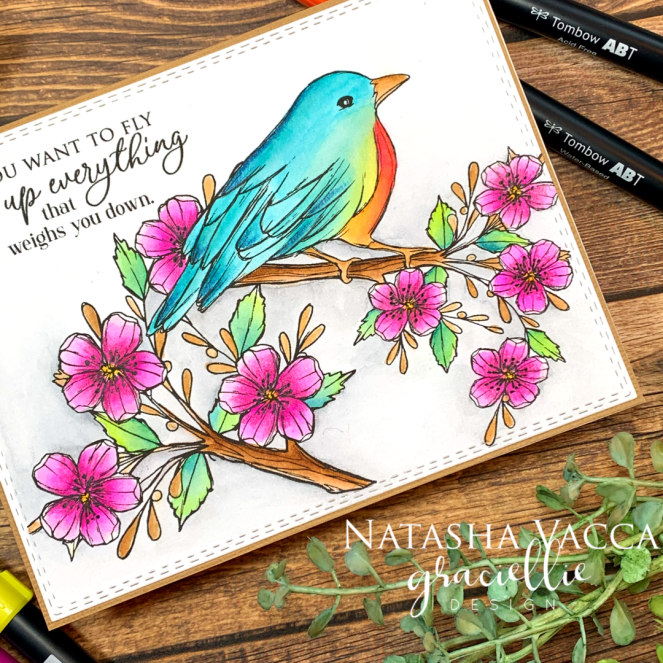
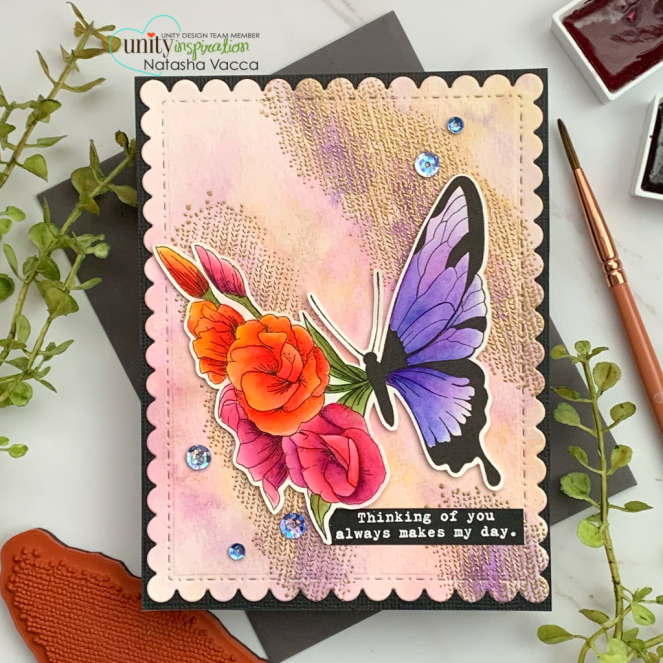
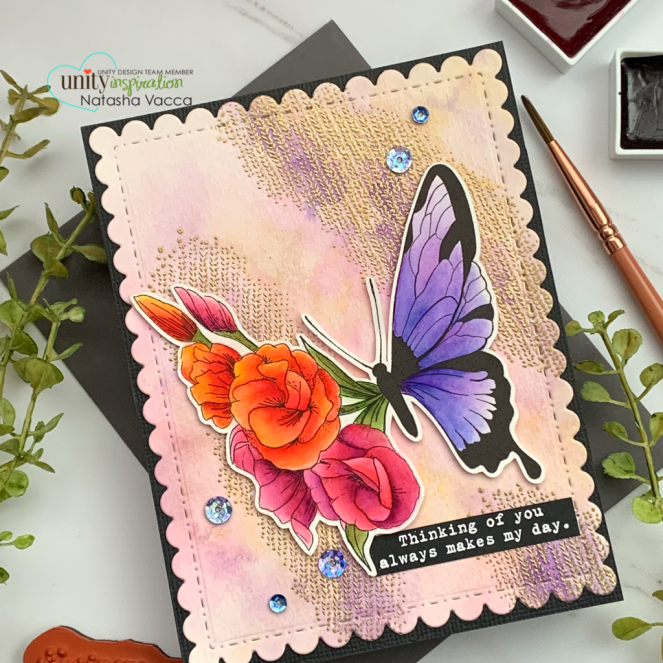
I am sharing the gorgeous new stamp Falling into Place which was designed by my dear friend Sandhya Iyer! Isn’t this stamp gorgeous! I love the large image and the beautiful florals as well! I started by stamping the large butterfly image onto Fabriano Hot Press watercolor paper. I used my Karin brush markers to color this image. I used a variety of colors and when I was done I had about 20 pens in my cup! I apologize I didn’t write the colors down this time! I continued to build color until I had the look I was going for. I then set the image aside to dry. Once it was dry I fussy cut the image using my Brother Scan and Cut.

Background

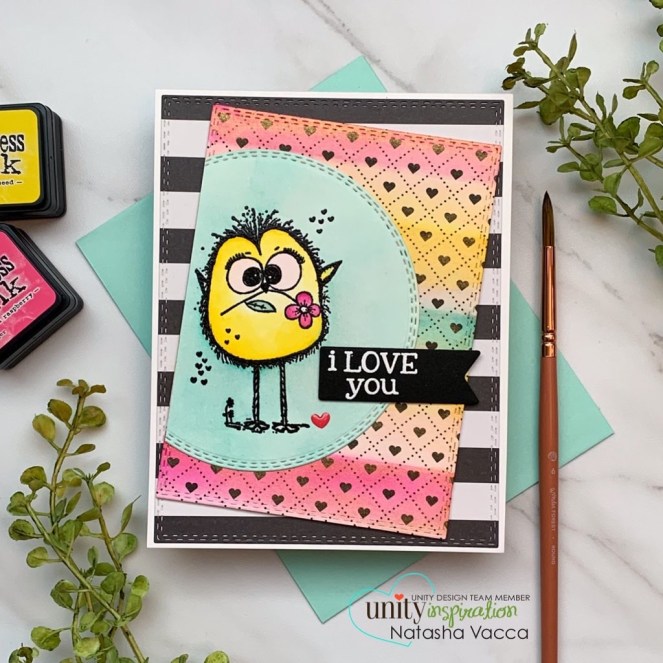
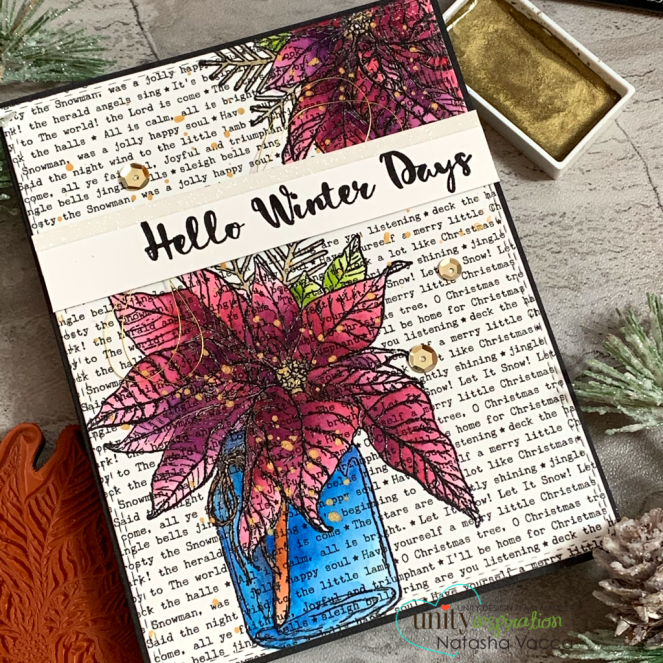
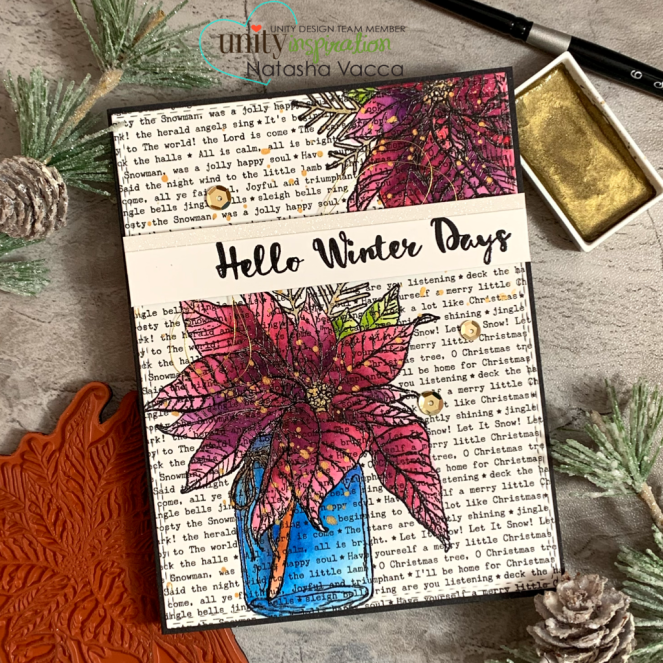
I then stamped an image from the January Kit of the Month. I love this large stamp and the distress look of it. I stamped this on a watercolor A2 sized panel. I stamped the image 3 times in various directions using WOW embossing ink and then heat embossed the image using gold embossing powder. I then chose 4 colors of Gansai Tambi watercolors to create the watercolor background. I chose 2 purples and 2 pinks. I added a bit of gold as well. I continued to build color and then set it aside to dry.

Putting it Together/Sentiment

I die cut the watercolor panel using a Gina Marie Designs scalloped rectangle die. I trimmed down a piece of black cardstock and adhered both the back panel and watercolor panel to my A2 card base. I added foam tape behind my butterfly image and adhered this to my card. I chose a sentiment from Wonderful and Simple Things September 2020 sentiment kit. (sentiment kits are a part of the mystery discount too – add them to your cart to see the discount). I heat embossed the sentiment using embossing ink and white embossing powder. I glued my sentiment strip to my card panel. I completed the card with a few sequins!

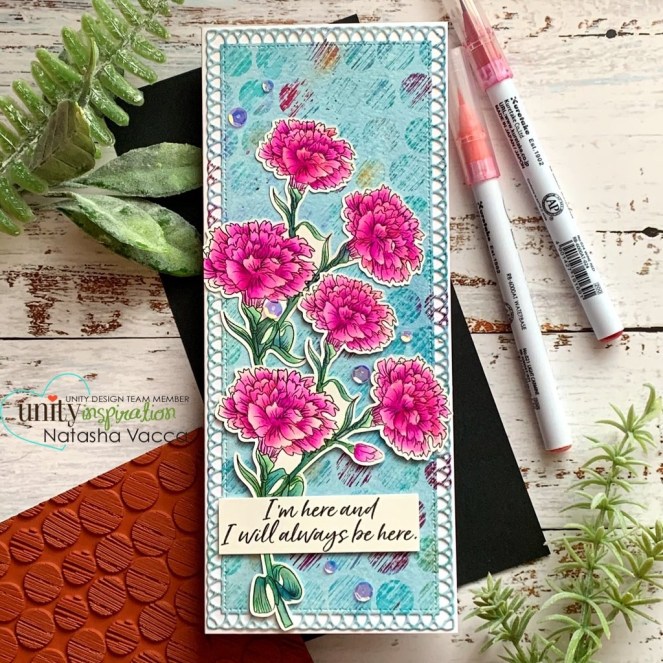
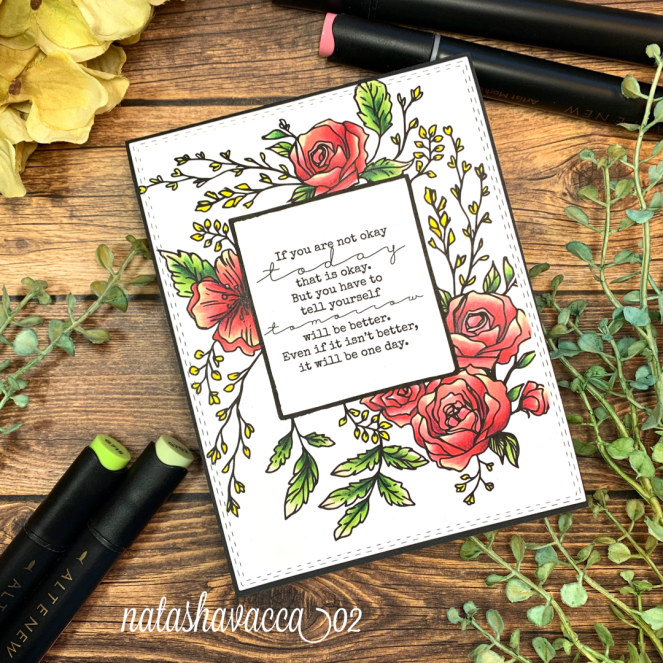
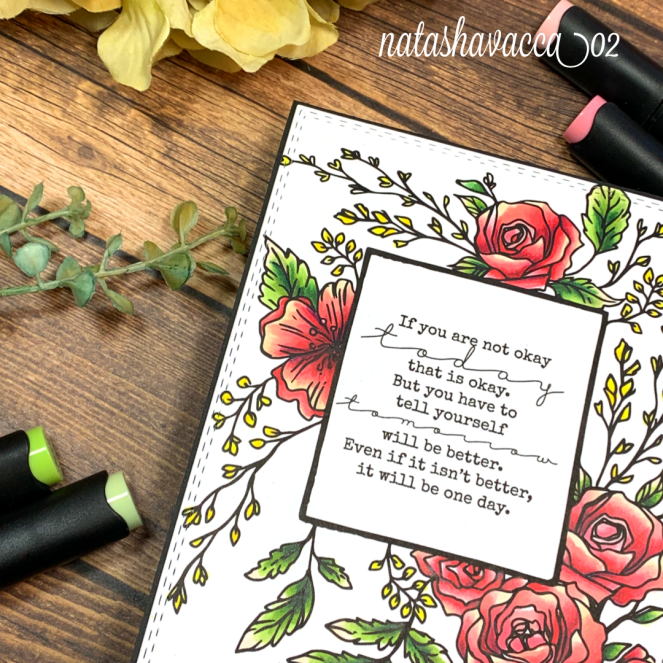
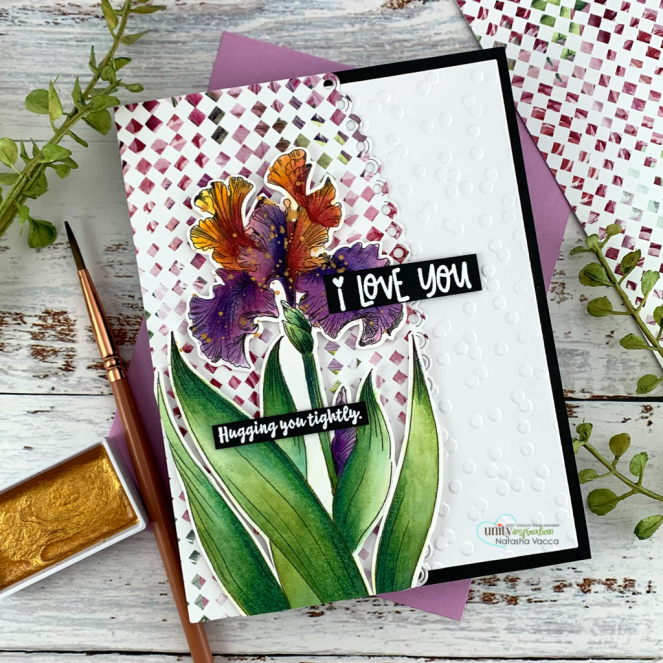
On release day, I shared on social media the beautiful new stamp kit Care and Hope Iris. This kit is also created by my dear friend Sandhya Iyer. This kit is the latest monthly floral release! I love this iris! I paired the stamped/colored image with pattern paper from Unity – Pink and Blue Watercolored paper pack.

Thank you for stopping by today! It truly means a lot to me! Here are the links to the amazing release and SALE too!

You can click on any of the links I have shared if you are interested in purchasing the products. The products listed are a compensated affiliate link, which means if you make a purchase I receive a small commission with no extra cost to you. I really appreciate your support.

I will be back soon to share more crafty inspiration!

Crafty Hugs,

Natasha

NEW Release – Unity Stamp Company

Hi Friends! I am so excited to be back and share with you the AWESOME new release at Unity Stamp Company! This release has something for everyone and I couldn’t wait to share it with you! You can see all of the new stamp kits here. There are new backgrounds – 3 new ones is this release, adorable new gnome kits, new Graciellie Design including a stamp kit and pattern paper, as well as a gorgeous new floral sentiment kit! So let’s get started with the beautiful Hello Fresh Start January sentiment kit! This kit has 14 stamps!

Stamping and Coloring

For my first card I wanted to create a one layer card. I love dimension, but thought this set was so pretty to stand alone! I started by stamping the large floral image from the Hello Fresh Start January sentiment kit on Fabriano Hot Press watercolor paper. I used my Karin markers to color this image. When I watercolor I enjoy mixing colors and adding layers to my cards! For this image, I initially had it in my mind to use soft colors, but then I got a bit carried away with adding colors, so I went with it! Has that happened to you? For this card I used the following colors: Pale Pink 220, Lipstick red 181, Gold 283, Orange Red 051, Apple 210, Curry 297, Olive Black 441, and Egyptian Blue 305. I added several layers of colors, always letting it dry in between.

Card Assembly/Sentiment

This set has AMAZING sentiments and the font is beautiful! I stamped the sentiment on my card panel using black ink. To complete the card I added splatters using Gansai Tambi Starry Colors, in #902 and Arteza metallic colors in Copper. I love adding splatters! I try to choose colors from within my images generally. I then die cut the image using a stitched rectangle die from Gina Marie Designs. I adhered my card panel to the card base. For a finishing touch I added Stickles to parts of the floral image in a purple color. I like how this compliments the orange floral image. I hope you enjoyed my first card!

For my second card I am sharing the beautiful new Criss Cross Hearts background stamp! I love background stamps and this is a perfect addition in my craft room! Today I wanted to show you how I created a watercolor striped background using this new stamp! Let’s get started!

Stamping/Coloring

To begin this card I stamped the beautiful new Criss Cross Hearts background stamp using a black ink. I wanted to create a striped watercolor background. I taped the image to a board and used washi tape to create the stripes on my background panel. I wanted the stripes to be different dimensions so I didn’t measure, I laid the tape down. I then used my distress inks to create the watercolored background. I used Picked Raspberry, Mustard Seed, and Peacock Feathers. I started by laying down water on the section of the card panel and then applied the distress ink using a paintbrush. I followed the same pattern for the other sections. I originally left a few white stripes, but I wasn’t happy with this, so I added gold Gansai Tambi over the whole panel. I completed the whole process two times. I then set it aside to dry.

I then stamped the adorable bird from One Crazy Bird on Canson watercolor cardstock. I heat embossed the image using clear embossing ink. I completed a quick watercolor using the same colors of distress inks as shared above. I added watercolor around the bird image as well and set it aside to dry.

Putting It Together/Sentiment

While everything was drying I started to work on putting the final elements of this card together. I chose a piece of pattern paper from my stash and used a die from Gina Marie Designs. I trimmed down the stripped panel and adhered this to my card base. Using the same die I trimmed down the hearts background. I used a circle die with the same outer stitching to trim down the little birdie. I decided on placement of everything and adhered down the hearts and adorable birdie! I chose a sentiment from the One Crazy Bird kit and heat embossed this on black card stock. I trimmed it down using a die cut from my stash and popped it up with foam tape!

I created a 3rd card for this awesome new release! I will share a picture with you and links to the products used!

Happy Birthday Gnome

Here is a link to the products used on this fun Birthday Gnome kit!

Unity Stamp Company is kicking 2021 off with an AMAZING new release and a HUGE Sale! Check out the sale here! There are amazing stamp sets at $10, $12, and $14! WOW!

Additional SALE……

You can click on any of the links I have shared if you are interested in purchasing the products. The products listed are a compensated affiliate link, which means if you make a purchase I receive a small commission with no extra cost to you. I really appreciate your support.

Crafty Hugs,

Natasha

Watercolor – Sketched Peony

Hi Crafty friends! Do you love to watercolor? I wanted to stop in to share a watercolor card with you using the beautiful stamp set – Sketched Peony by Alex Syberia, for Marker Forte. I have linked to all of Alex’s stamps she has designed for Marker Forte. There are so many beautiful stamp sets she created, as well as stencils, and pattern paper!

Sketched Peony

Stamping/Coloring

I started by stamping 2 of the floral images from the set, as well as 3 of the leaves from the set on Canson Watercolor cardstock. I prepped the area first with my embossing buddy and then stamped the images using my Misti and clear embossing ink from WOW. When I use clear embossing ink I like to stamp the images at least 2x to ensure I get a good impression. I then used Gold embossing powder for my images and heat set them. Then I tapped them down onto my board so I was ready to watercolor.

For my card today on the floral and leaf images I used my Mijello Mission Gold watercolors. I just enjoyed the process of watercoloring and did a lot of color mixing. I love the openness of the floral images and just had fun! I let each layer of color dry on it’s own and then set these aside to dry completely. Once they were fully dry, I fussy cut each of the watercolored images using my Brother Scan and cut. It was time to now work on my background!

Background

To create the background I used an A2 sized panel of Canson watercolor cardstock. I taped this to my wood board again. I tape down my cardstock to prevent warping. On the background I used my Gansai Tambi watercolors. I used a mix of blues to create the watercolor wash and added 2 different golds as well! I love to create a watercolor background! The results are never the same and it creates a nice focal point for your card! Once the background was dry I used a combination of metallic watercolors (Arteza) to add splatter to the background. I chose a peach shade and a metallic purple. I wanted to add colors from the floral images to the background. Once it was dry, I trimmed down the panel using a Gina Marie Designs rectangle die!

Card Assembly/Sentiment

It was time to assemble my card once I chose the placement of my flowers and leaves. I glued one of the leaves down, then all other elements were adhered with foam tape. I have a small cup of sentiments on my desk and chose one from the cup for this card! I thought it added a nice final touch. I then add May Arts twine (another favorite) to create a bow and a few sequins as well.

Thank you for stopping by today! I hope I inspired you to create a watercolor card this week and/or a fun background!

Crafty Hugs,

Natasha

Just Hold On – Monthly Floral Release

Hi Friends! I wanted to stop in to share with you the beautiful new monthly floral release from Unity Stamp Company! I am super excited for a monthly floral stamp set for each month in the coming year! Today I am sharing the first set with you called Just Hold On! This set has a beautiful carnation and 3 beautiful sentiments! I am so excited about this set! Let’s get started!

Just Hold On

Stamping/Coloring

I started by stamping two of the caranation florals on Fabriano Hot Press cardstock. I knew I wanted to create a slimline card using this beautiful new image, so I stamped 2 images. For my coloring today I am using my Zig Clean color brush markers! These markers still hold a special place in my heart, so I love to take these back out to watercolor with! I worked from lightest to darkest for all of the coloring. I had fun coloring these images. I set these aside to dry. Once they were dry I used my Brother Scan and cut to trim both of the floral images.

Background

For my background today I am using one of the newer background stamps in the Unity collection, it is called Polka Dance! I just LOVE everything about this background stamp! Be sure to check it out now – it is on sale too! To create the background I trimmed a panel of watercolor cardstock to slimline size 3.5 x 8.5 and placed this in my Misti. I inked up the background using Distress Inks: Peacock Feathers, Shaded Lilac, Gold Pigment Ink, and my zig marker. I lightly misted the stamp with water and stamped the image. I completed this several times to ensure I had the colors I was looking for. I then trimmed down the panel using a Gina Marie Designs slimline die. I also added Perfect Pearls to some of the dots for added shine.

Card Assembly/Sentiment

I always love putting the card together once all the elements are ready to go! I foam mounted the 2 flowers on the Polka dance background. I stamped a sentiment from the stamp set on white cardstock and adhered this with foam tape as well. I glued the panel down onto a slimline card base. I added a few sequins from Studia Katia – Crystal Clear Fushion.

I hope you enjoyed my new card featuring the beautiful new Just Hold On stamp set! I am so excited to see all of the beautiful monthly floral images released in 2021!

Thank you for stopping by today! Be sure to check out the SALE that is still happening at Unity Stamp Company! I have the SALE categories listed for you here as well! You can click on any of the links I have shared if you are interested in purchasing the products. The products listed are a compensated affiliate link, which means if you make a purchase I receive a small commission with no extra cost to you. I really appreciate your support.

Crafty Hugs,

Natasha

Unity Stamp Company Release

Hi crafty friends! I wanted to pop in to say hi and share a new release with you from Unity Stamp Company! Unity released 5 new sets today and they are all adorable and amazing! I couldn’t wait to stop in quickly to share them with you! I am also linking to the amazing SALE they are having as well, by artists Graciellie Designs, Phyllis Harris, Angie Blom, as well as background stamps!

A Little Christmas Carol – Background Stamp

I love a background stamp and couldn’t wait to share this one with you! I am using the new A Little Christmas Carol. I love the small font and how this perfectly pairs with so many stamps! It’s the perfect addition to your holiday stamps! I paired this beautiful background with the beautiful Poinsettia from the KOM. What will you pair this background stamp with?

Card Details:

  • Stamp background on Hot press watercolor paper
  • Emboss Poinsettia image using clear embossing powder
  • watercolor stamped image using Peerless Watercolors
  • Add metallic splatters – Gansai Tambi
  • Stamp and heat emboss sentiment using clear embossing powder
  • Gina Marie Designs stitched Rectangle die for card panel
  • Foam tape behind sentiment, as well as gold string, sequins for embellishment

Holiday Dearies

For my second card I am using the adorable Holiday Dearies set! Aren’t these deer the cutest! I am also loving the font on these sentiments! I combined my stamped images with patterned paper from my stash for a fun and festive holiday card! Unity also has their pattern paper on SALE right now! I truly love the quality of their paper – check it out here too!

Card Details:

  • stamp images on Hot Press water color paper
  • color stamped images using Karin brush markers, add color pencils to the nooks and crannies
  • Pattern paper from stash to create holiday background
  • Gina Marie Designs stitched rectangle die
  • Distress Oxide ink to add shadows around stamped images

Thank you for stopping by today! I just wanted to say hi and I couldn’t wait to share these with you! If you have any questions, please let me know! Thank you for all your support! It truly means a lot to me!

Thank you for stopping by! I have listed all the products I used within my post. You can click on any of the links I have shared if you are interested in purchasing the products. The products listed are a compensated affiliate link, which means if you make a purchase I receive a small commission with no extra cost to you. I really appreciate your support.

Here is a link to the new release, as well as the SALE! I love the Mystery SALE…. add items to your cart to see the discounts appear! Have fun shopping!

Crafty Hugs,

Natasha

Do Not Worry – Graciellie Designs

Hi everyone… I hope you are doing well and are adjusting to all the changes that are happening around us. It is so different to be home everyday and not go anywhere unless I have to (grocery store). I am enjoying my time at home with my family, my card making hobby, and I even got into the garden today! I hope you are doing well and healthy! Today I am sharing a beautiful new release from Graciellie Designs… Do Not Worry. This set is beautiful, 2 beautiful images, as well as 7 inspirational sentiments. I hope you will check it out, as well as the sale on her page! Gracie is kindly offering a free gift with an order too! You can see it here, this set is free with a $10 purchase!

I started by printing my image on Canson Mixed Media paper. This is a light weight paper, I don’t use it too often, but I wanted to give it a try. When I use a water based marker on digital images I like to set my card panel aside for 24 hours to ensure it is dry and ready for me to color. This set was so fun to color. I used both images from this set and I layered the one floral branch behind the bird. I used my Tombow dual brush pens to color my images. I used several layers of color on each section.

Once my coloring was complete I did add some colored pencils to the nooks and crannies as well. I also used a black Sakura Micron pen to add more details to the stamen of the flowers. This paper is thin and I don’t use it too often. I did find using a light touch with my markers and my water brush, the color moved really well. I wanted to try it as the paper is thinner and so much easier to print on. I will use it again for sure! I set the panel aside under heavy books for the night to flatten out. Then I cut the panel with a Gina Marie designs die. I adhered the panel to a kraft card panel, then adhered it to my card base. This card was all about the coloring, all one layer. I hope you enjoy it and be sure to check out the new release at Graciellie Designs. Be sure to visit her website as well, so many amazing and beautiful stamps on sale!

Enjoy your evening friends! Crafty Hugs,

Natasha

Jesus and Germs – Unity Stamp Company

Good morning crafty friends! I hope you are doing well! I wanted to stop in and share another beautiful limited time digital stamp release from Unity Stamp Company! Today I am sharing the Jesus and Germs stamp set! This stamp set is so beautiful and as soon as I saw it I couldn’t wait to ink it up! This beautiful set is created by artist Tierra Jackson. It has beautiful pre-made A2 panels, as well as the individual stamped imaged and sentiments to create your own designs as well! I hope you will check out this set and more of the amazing digital stamps being released! You can see them all here – Unity Stamp Company! I would greatly appreciate it if you love these stamps like I do, you would kindly use my affiliate links. Thank you!

I started by printed the floral frame on Neenh 80lb card stock. I wanted to use alcohol markers for this image and work on my coloring with these markers. I am beginning to truly love alcohol markers and now I want more markers! For todays card I used my Altenew artist markers. I am happy to share the colors I used if this interest you! I had fun coloring this beautiful stamp! I felt this stamp was so beautiful I wanted to create a 1 layer card this time and have the florals and coloring be the focal point of my card!

Once my coloring was complete I used my arteza colored pencils to add more depth to the nooks and crannies! I love this so much because it truly changes my coloring! I added shades of a dark purple and deep blue to the corners! Once my coloring was complete I used a Gina Marie Designs die cut and then adhered the panel to a black card base.

Supplies Used:

I hope you have a good day! Sending you a big crafty hug!

Natasha