Spread Joy Blog Hop… Brutus Monroe

Hi everyone! I am super excited to be participating with Brutus Monroe in the Spread Joy Not Germs Blog hop! We have over 31 sponsors and 153 bloggers in this hop! This is AMAZING! I am honored to be a part of this event! Our theme is cards that spread HAPPINESS! So sit back and enjoy this AMAZING HOP! A few details about the hop…. If this is your first stop thank you for being here! If you get lost along the way, you can start at Catherine Pooler Design. Have a great time, enjoy seeing many bloggers, cards that spread happiness, as well as many opportunities to win AMAZING prizes. I encourage you to leave as many comments along the hop as you can, you will have until April 24 to enter comments to win prizes, the winners will be announced on April 27 on Catherine Poolers blog and Alexandra’s blog from the Hedgehog Hollow. For a full list of prizes please visit their blogs to see all the amazing goodies you have a chance at winning.

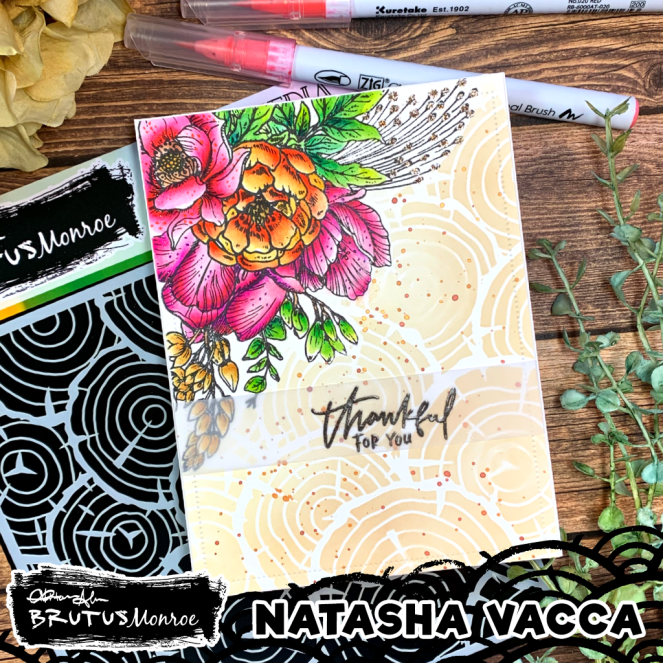
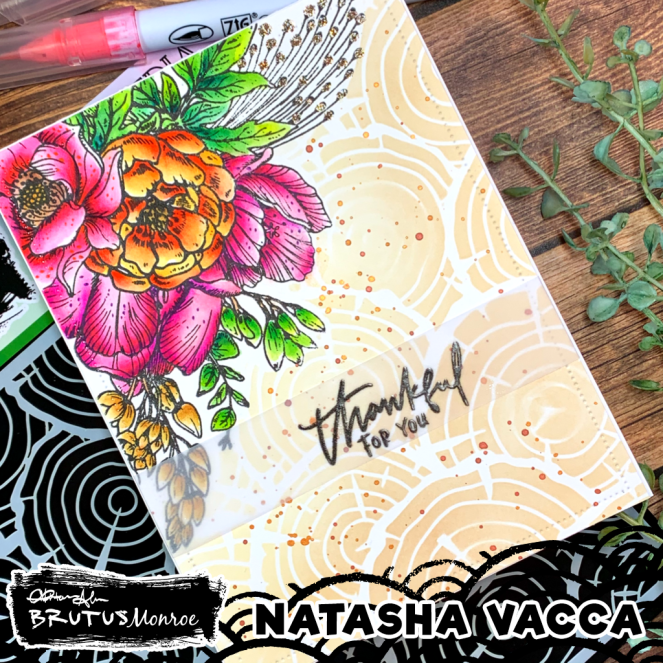
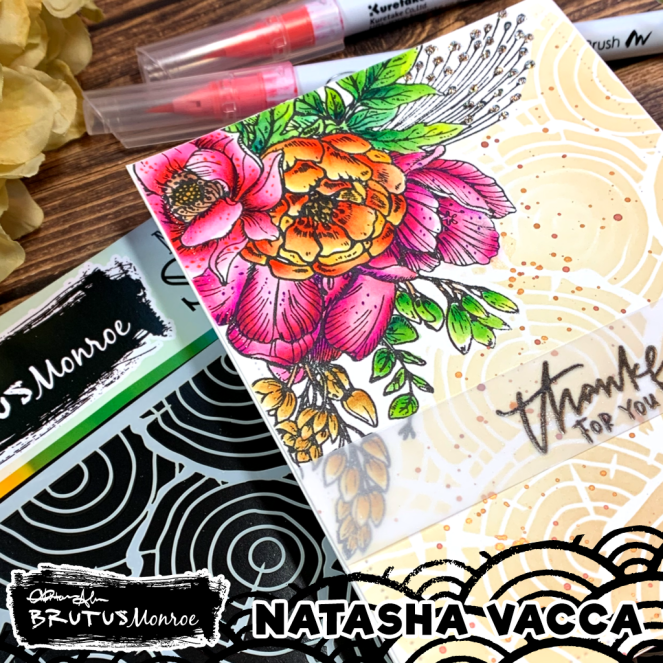
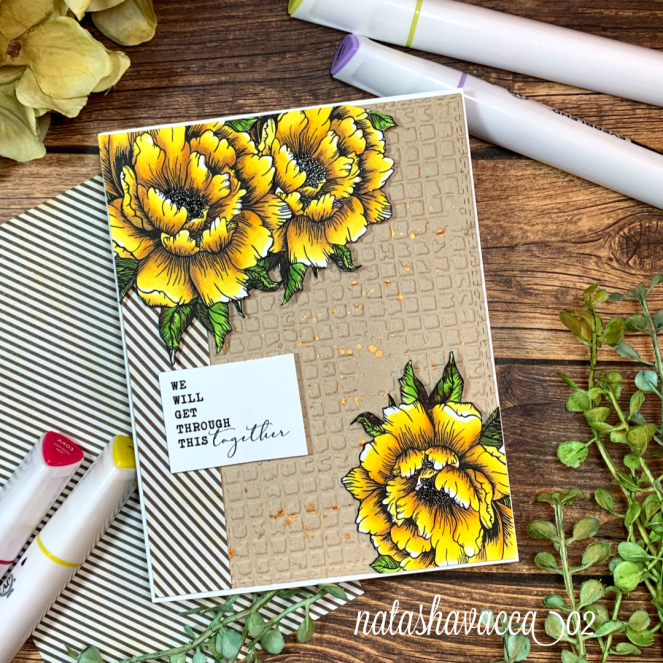
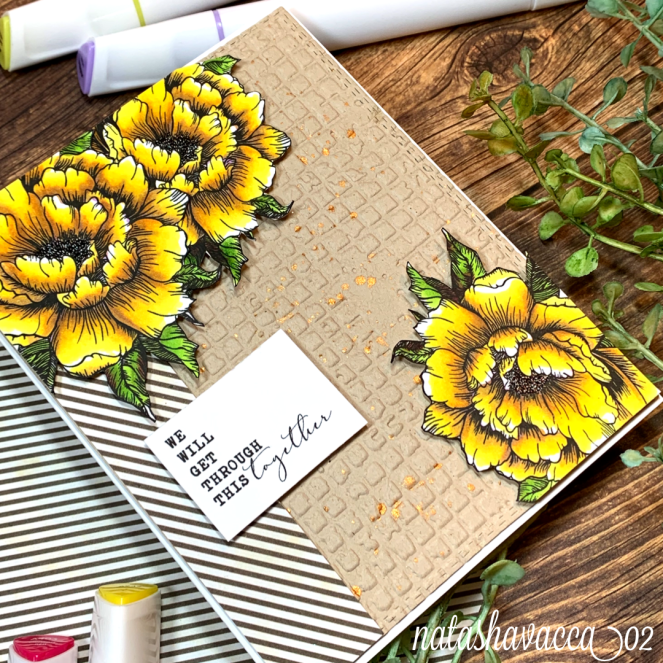
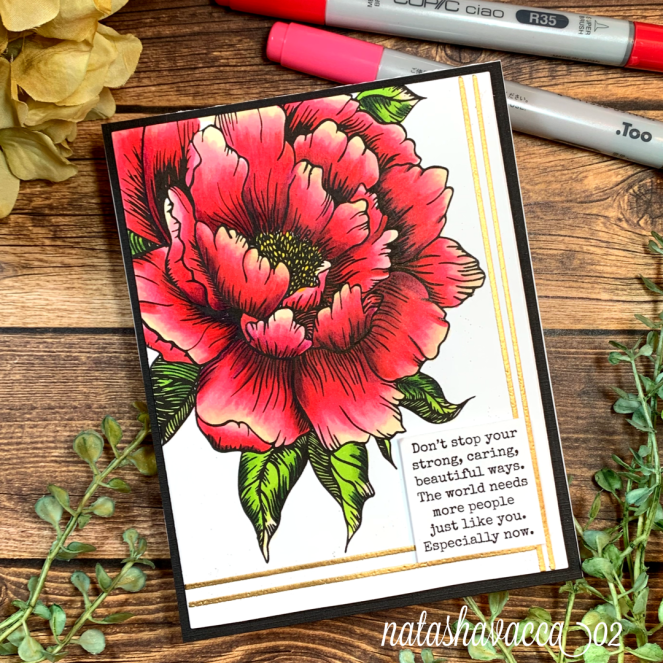
If you follow me or are new to my blog, thank you for stopping by! I am a huge fan of floral stamps and I LOVE to color! Today I am sharing the Love you Floral stamp – Brutus Monroe. This stamp is gorgeous! Flowers and color to me just say HAPPINESS! Don’t you agree….. Do you love to color flowers? What is your favorite type of card to make? I would love to know (comment below).

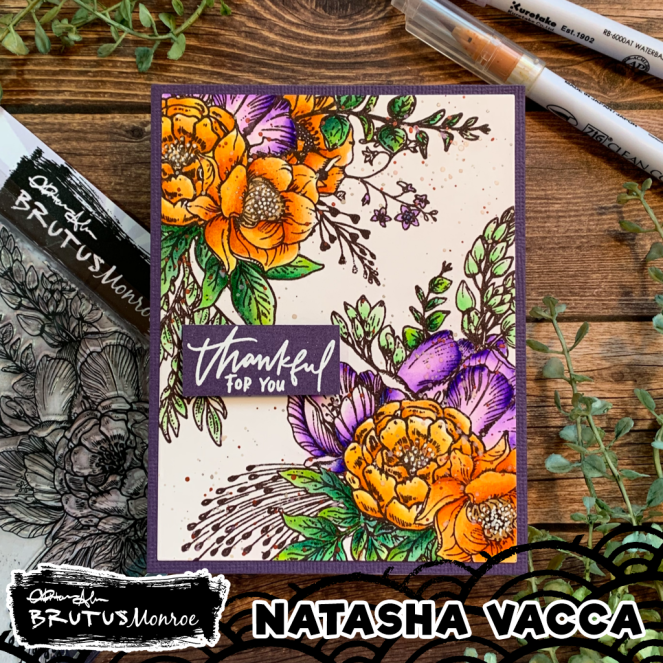
I started by stamping my floral image using Versa Fine Clair ink in Pinecone. I then used my Zig Clean Color brush markers to color in my image. I used a variety of shades of colors. I love coloring with my zigs. When my coloring was complete I used some colored pencils (Arteza) in the nooks and crannies for added dimension. In the center of each flower I added a gold Perfect pearls, and used my gel pen for added interest. I also added splatters to the floral sections of my card in gold, a light green, and a red. To complete my card I die cut the floral panel and adhered it to a purple panel, then adhered this to my card base. I used the sentiment Thankful for You – Super Sentimental Brutus Monroe. Foam mounted the sentiment and my card was complete!

I would love for you to comment below and sign up to follow my blog! I truly appreciate you stopping by and have fun on the hop!!!!!! Keep reading below …. to see where you will be going!!!!!

I hope you enjoyed stopping by and have fun on this AMAZING hop! Please visit Jane Tyrell, she is our next crafter! Click her name for a direct link! Have fun! Good luck to everyone!

Crafty Hugs,

Natasha

Brutus Monroe – Die of the Month

Hi everyone – I am back sharing the Die of the Month from Brutus Monroe! This is a beautiful die and perfect for spring! You can see the monthly subscriptions here. Crafty mail each month – how fun!!!!!! Be sure to visit the Brutus Monroe website today too – it is Christopher’s birthday and there are AMAZING sales!

I started by placing aqua pigments on a clear acrylic block. I used a large block for this. I used Turquoise and Cactus Metallic pigments. These pigments are so fun and full of so much color they are so easy to work with! I love the added sparkles in the metallics. I used an A2 sized piece of watercolor card stock and “smooshed” it against the block. I moved the paper around in different directions to achieve the colors I was looking for. Once it was done, I set it aside to dry. Once it was dry I placed it under a few heavy books to flatten out a bit. I then started to work on my sentiment. I stamped the Hello Beautiful from the Super Sentimental stamp set. I used a white embossing powder on a navy card stock from my stash. I used the same navy paper behind my butterfly die cuts.

When my panel was “flat” I ran it through my die cutting machine. It was so fun to see the beautful pattern of butterflies. These dies cut so beautifully too! I also ran it a second time on a piece of light blue card stock. I then glued the 2 pieces together. The pigment inks gave the front panel of butterflies such a beautiful look. I adhered these to my navy panel and attached them to my card base. I cut a few pieces of glitter card stock for added detail and glued these to the center of the card. I adhered the sentiment on foam tape, added a few sequins, and my card was compelte!

Supplies Used:

Crafty Hugs,

Natasha

Butterfly Kisses – Brutus Monroe

Hi everyone – Today I am stopping in to share with you some crafty inspiration using the Stamp of the Month from Brutus Monroe. The stamp this month is adorable! The best part of the membership…. it will ship to you each month! How fun! If interested in any of the products I use today, I would greatly appreciate you considering to use my affiliate links. Thank you!

To begin I started with a watercolor base panel. I wanted to create a bright background with stripes to highlight these cute butterflies. I started by taping down washi tape in different size stripes going across my panel. I then used distress oxide inks to paint the stripes. I love coloring with these inks – you get such bright color! I used picked raspberry, mustard seed, peacock feathers, and spiced marmalade. I did each stripe 3 times to ensure I had bright colors. I then carefully peeled the washi off and set it aside to dry. Once it was dry I placed this under heavy books to flatten the card panel.

I stamped several butterfly images on neenah 80lb cardstock. I used my scan and cut to die cut my images. I then used Brutus Monroe Rainbow embossing powder to add sparkles to the insides of my images. I used an embossing pen to do this and added the powder, then heat set. I did this several times to get the right amount of sparkles.

I then used Tattered Rose and Worn Lipstick to create a blended background. I blended the 2 colors until I was happy with the color. I added splatters to this using gold perfect pearls. Once dry, I used Brutus Monroe Circle Foundation dies to cut my blended piece. I adhered this to my card panel using foam tape. I also used foam tape for my butterflies. I stamped the sentiment Butterfly Kisses from the stamp set. I added a few sequins to add a little more sparkle to my card.

Supplies Used:

Have a great day crafty friends!

Hugs,

Natasha

Miss your Face – Brutus Monroe

Happy Thursday Crafty Friends! I hope you are doing well. I am stopping in to share a bright and colorful card inspired by Jennifer McQuire. She is amazing and teaches me something new all the time! I was inspired by a recent you tube video she shared using multiple colors on stencils. I had to try it and I had the perfect stencil in my stash from Brutus Monroe – Circle Tone. I hope you enjoy my card and if you see some items I use that inspire you, I would love it if you shopped using my affiliate links! Thank you!

I started by placing my stencil on bristol smooth card stock. I taped it down to ensure it didn’t move! Overall I did pretty good, but I did have some ink move to other colors, but I was still happy with this bright fun card in the end! I used a rainbow of distress oxide inks (candied apple, spiced marmalade, squeezed lemonade, lucky clover, salty ocean, and seedless preserves). I started with the red and worked my way towards the purple color. I used my blending brushes and used my hand to cover the section next to it. You can see why I had a couple go over, but that’s ok!

I set my panel aside to dry for a bit. I worked on the sentiment. I love this one – miss your face! It’s so fun! I used the Super Sentimental set. I embossed the image using Brutus Monroe embossing ink and alabaster embossing powder. I placed foam adhesive under the sentiment and set it aside.

I was so excited to add all the glitter and sparkles using – Glitter Glaze (falling Snow). It is currently sold out at the moment. They do have other ones available here, as well as a monthly subscription! How fun! I used my spatula to place the glaze over the stencil and once it was complete I removed the stencil and set the panel aside to dry. Once my panel was dry I trimmed the panel a bit, as I wanted to show the back aqua card panel. I loved the addition of the aqua color and then I added the sentiment and my card was complete!

I hope you enjoyed this card and it brings you a little bit of happiness and sparkle to your day!

Supplies Used:

Crafty Hugs,

Natasha

Thankful for You – Brutus Monroe

Hi everyone – How are you doing? I hope this post finds you doing well and healthy. I wanted to share a new card with you – I am thankful for you, your friendship, and your crafty support! It truly means so much to me! Coloring is truly an outlet for me and it relaxes me! My card today is using the stencil of the month from Brutus Monroe – Wood Slice. I love this stencil, it is full of many possibilities! If you love stencils, you may want to consider joining the stencil of the month club! How fun!

For today’s card I am using the stencil of the month, as well as the beautiful Love you Floral stamp set from Brutus Monroe. I love this stamp set! Check it out…. I used one corner of the stamp for this piece. I inked up one corner using Brutus Monroe Detail Raven ink. I love the crisp stamped image I get using this ink! I colored in my florals using my zig clean color brush markers. I then added details to the nooks and crannies using my Arteza colored pencils.

I then created a mask for the one corner floral image and placed the stencil on top of my panel. I used a combination of antique linen and Vintage photo distress oxide inks to add color to my stencil. I used my blending brushes. I concentrated the darker color on the bottom corner and went in with the lighter color as I got closer to the flowers. I then added metallic gold splatters to the panel and set it aside to dry.

I chose the Thankful for You sentiment from the amazing set – Super Sentimental, Brutus Monroe. I inked the sentiment on a piece of vellum in Detail Raven Ink and heat embossed it using a clear embossing powder. I then adhered the vellum sentiment strip to the card panel. I used clear tape on the back and did add small amounts of clear glue behind the black sentiment words. I added stickles in gold to the top right floral image for added sparkles!

Supplies Used:

I hope you enjoyed this card! I am thankful for you and your support! It means so much to me! I wish you a good and healthy week! Crafty Hugs,

Natasha

In this Together – Unity Stamp Company

Hi everyone – I hope you are having a good week. I wanted to stop in and say hello, as well as share a beautiful new release with you from Unity Stamp Company! For a limited time ONLY – Unity Stamp Co. will be offering digital stamps and they are GORGEOUS! They are truly perfect for everything that is going on right now. I am also excited to share I am an affiliate for Unity Stamp Company. If you enjoy my card and the sets I used or see other things that catch your eye on their amazing website, I hope you will consider shopping on my link. Today I am sharing 2 cards I made using the new In this Together set. This set was designed by the artist Lorica Jackson. I love this stamp, Lorica did an AMAZING job! The set you purchase contains pre-made A2 card panels, as well as individual images you can resize and create with on your own! How fun is that!

For both of my cards I started by printing various sizes of this gorgeous floral image on Neenah 80lb card stock. I wanted to use alcohol markers for both of my projects. For my first card I colored 3 of the floral images in using my arteza everblend markers. I wanted to practice using these markers. For the coloring on these 3 floral images I started by laying a shadow color down (purple), then used a light yellow, dark yellow, and continued to work to blend until I achieved the color I was going for. I then went in the nooks and crannies with colored pencils for more shadow and dimension. I added Rainbow SparkleBrutus Monroe embossing powder to the center of each flower. I love the subtle sparkle it has!

For this card I wanted to create a spring feel with a rustic twist. I went through my stash and found a kraft cardstock A2 panel that was pre made with an embossing folder. I added gold splatter to the panel and set it aside to dry. I used some black and white paper to create the strip on the left side. I used foam adhesive for the flower images and sentiment and then put my card together. I hope you like this one – it reminds me of summer with the bright yellow!

For my second card I chose to enlarge the floral image and place it in the top left corner. I do all my editing in word for my digital stamps. I printed this image on Neenah 80lb card stock as well. I loved coloring this large floral image. I used a mix of my copic markers and Altenew artist markers on this card. Once my coloring was completed I added colored pencils to the nooks and crannies. I then used a Hero Arts die to cut out my card panel, I made it slightly smaller than an A2 sized card.

I used my Ranger embossing pen to add Metallic Embossing powder – Gilded from Brutus Monroe I created vertical and horizontal lines using my T- square ruler. I love the added touch of the gold. I used foam tape to adhere my sentiment to the card panel and then layered a piece of black card stock behind the panel and adhered it to an A2 sized card.

I hope you enjoyed seeing 2 cards I created using this beautiful new set – In this Together – from Unity Stamp Company. This set is beautiful! I love how it has panels created for you that are all ready to go! Truly a great way to relax and just color, as well as individual images for you to create your own designs with! I hope you give them a try! I would appreciate you checking out my affiliate links as well if you enjoyed this stamp set, as well as other products!

Supplies Used:

I hope you are doing well! Sending you healthy and crafty hugs!

Natasha