Thankful for You – Brutus Monroe

Hi everyone – How are you doing? I hope this post finds you doing well and healthy. I wanted to share a new card with you – I am thankful for you, your friendship, and your crafty support! It truly means so much to me! Coloring is truly an outlet for me and it relaxes me! My card today is using the stencil of the month from Brutus Monroe – Wood Slice. I love this stencil, it is full of many possibilities! If you love stencils, you may want to consider joining the stencil of the month club! How fun!

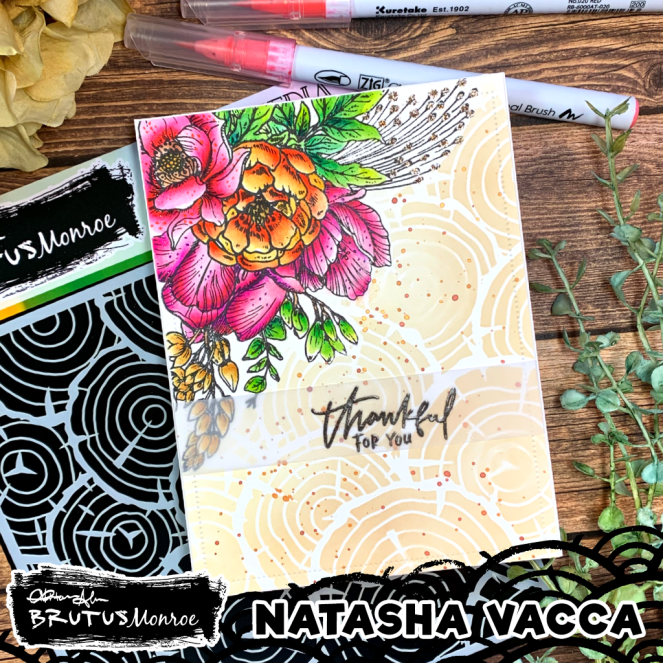
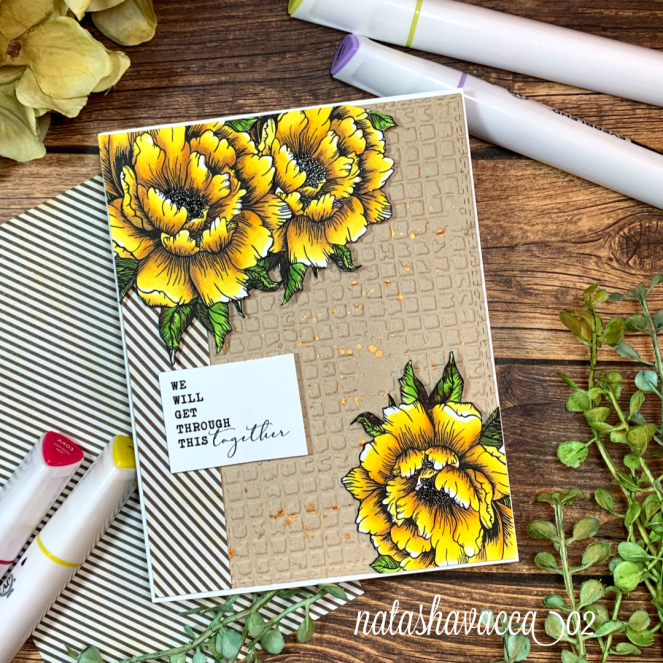
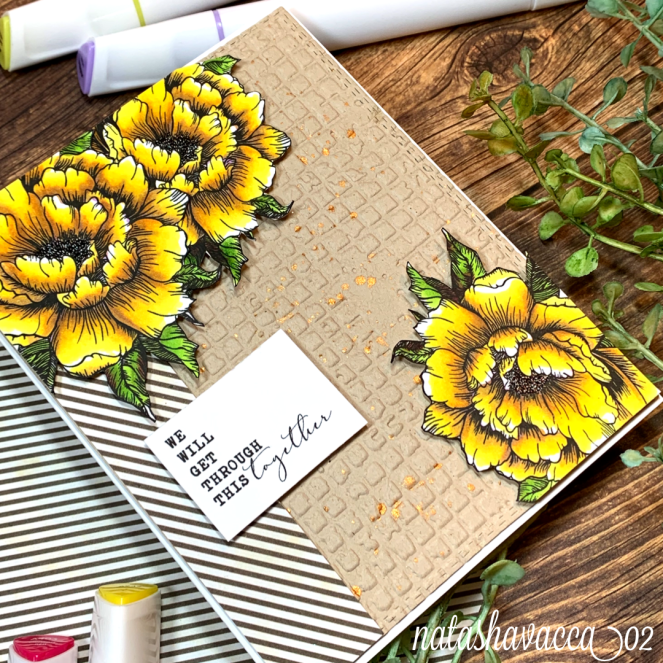
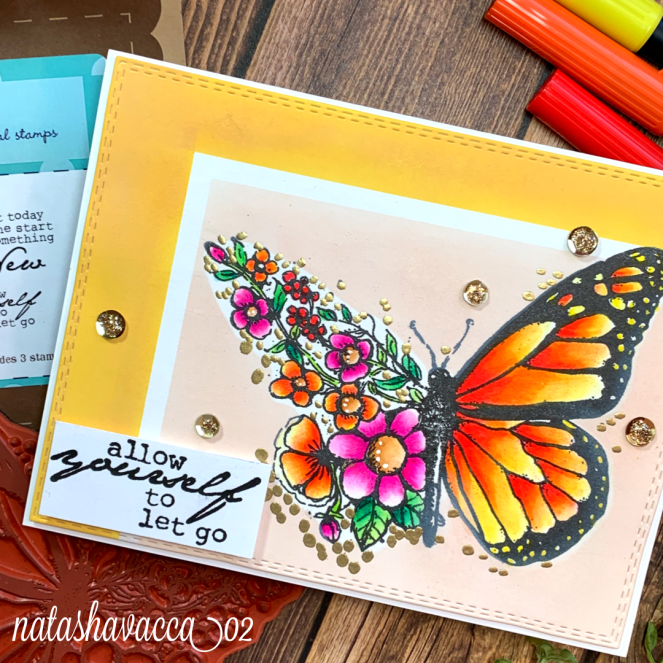
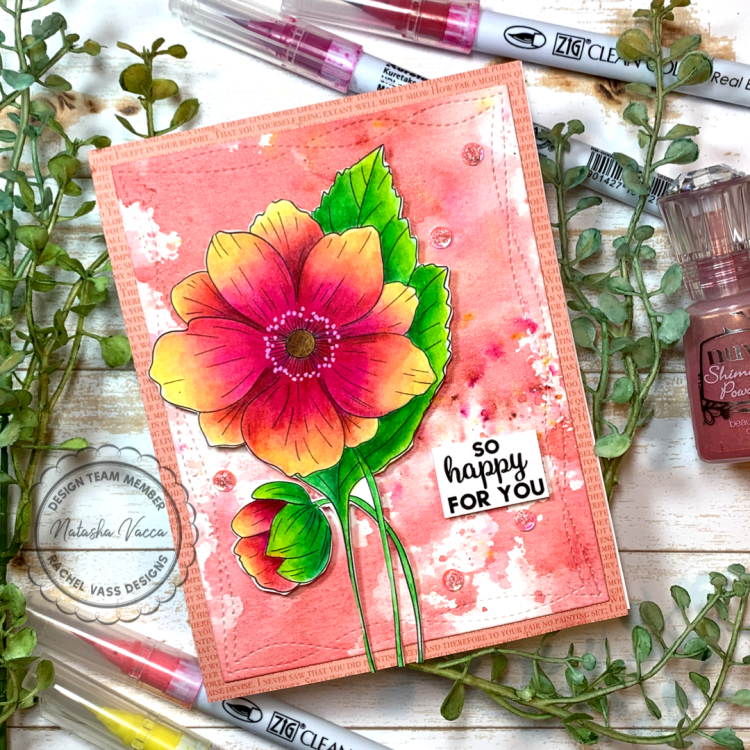
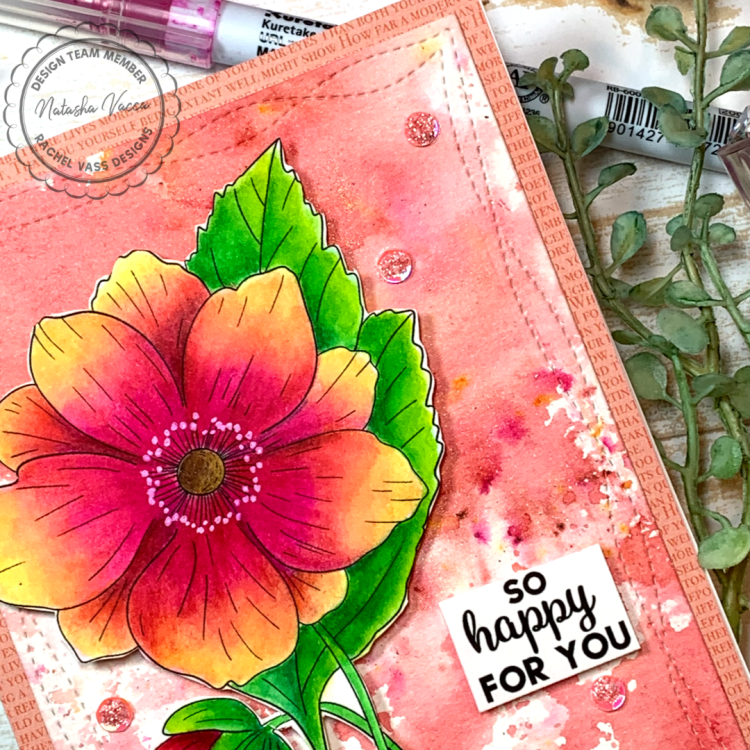
For today’s card I am using the stencil of the month, as well as the beautiful Love you Floral stamp set from Brutus Monroe. I love this stamp set! Check it out…. I used one corner of the stamp for this piece. I inked up one corner using Brutus Monroe Detail Raven ink. I love the crisp stamped image I get using this ink! I colored in my florals using my zig clean color brush markers. I then added details to the nooks and crannies using my Arteza colored pencils.

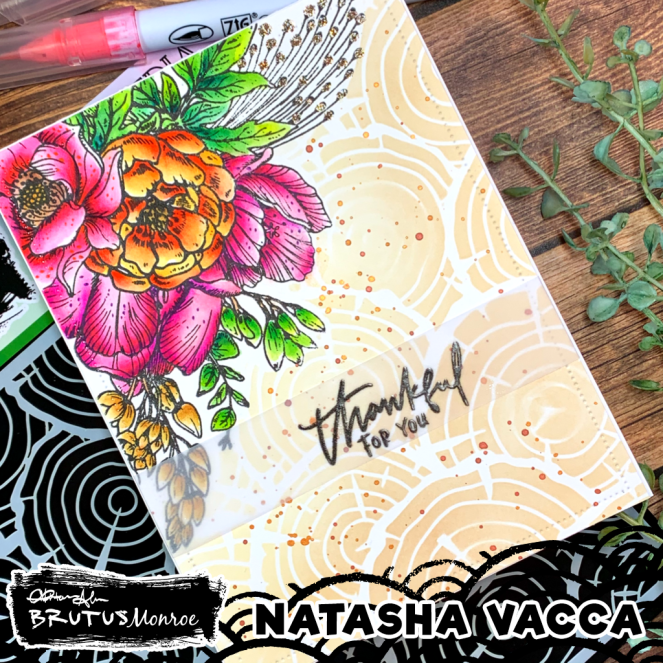
I then created a mask for the one corner floral image and placed the stencil on top of my panel. I used a combination of antique linen and Vintage photo distress oxide inks to add color to my stencil. I used my blending brushes. I concentrated the darker color on the bottom corner and went in with the lighter color as I got closer to the flowers. I then added metallic gold splatters to the panel and set it aside to dry.

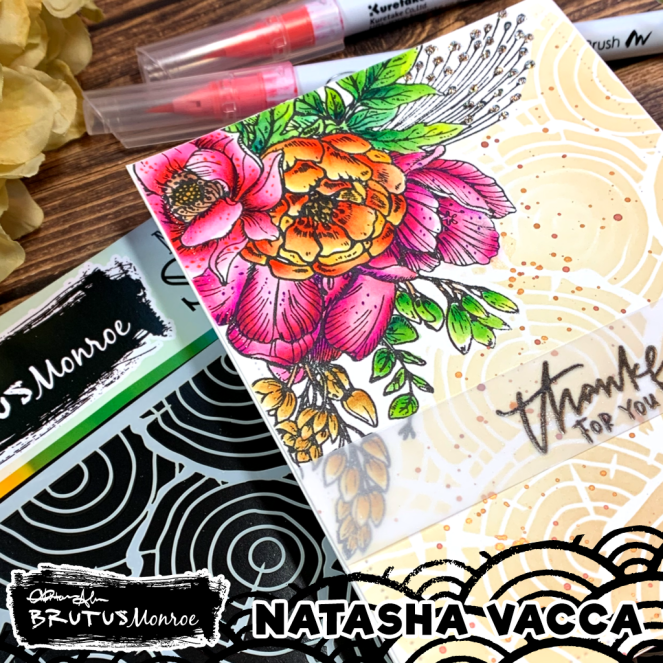
I chose the Thankful for You sentiment from the amazing set – Super Sentimental, Brutus Monroe. I inked the sentiment on a piece of vellum in Detail Raven Ink and heat embossed it using a clear embossing powder. I then adhered the vellum sentiment strip to the card panel. I used clear tape on the back and did add small amounts of clear glue behind the black sentiment words. I added stickles in gold to the top right floral image for added sparkles!

Supplies Used:

I hope you enjoyed this card! I am thankful for you and your support! It means so much to me! I wish you a good and healthy week! Crafty Hugs,

Natasha

Time to be Grateful – Unity Stamp Company

Good morning everyone! I hope this post finds you doing well. Today I am sharing another limited time digital stamp release from Unity Stamp Company – Time to be Grateful. This set is beautiful, the file you purchase has pre-made A2 panels with the beautiful girl, sentiments, and foliage. I love that they have pre-made panels, as well as individual images! It allows you to jump right in and color, as well as create your own panels! LOVE IT! If you have been following me for a little while you know I like to set crafty goals for myself. Another goal I have is to color people. I was inspired by a recent live post on the Unity Stamp Company – facebook page by Bobbie Sue McConathy. You can catch the replay of her live (click on the link)! I just adore her work, her energy, and her cards! Thank you for the inspiration and encouragement Bobbie Sue!

I started by printing my images and sentiment on Bristol Smooth card stock. I love this paper when I use my zig markers. I love this image… from her jeans, to her adorable sweatshirt, and her purse! I have to admit I want this purse in real life! I colored the image in using my zig clean color brush markers. I like to start with my lightest layer and then add more color in deeper tones to add the dimension. I was most nervous about coloring the skin, I used Bobbie Sue’s video (see above link) to help me through this part. One tip she had was to start with the skin first. This way if you use darker colors next to the skin you don’t have to worry so much about them bleeding over. Once I was happy with my coloring I added pencils in the shadow areas for more dimension.

I then fussy cut the girl out and set her aside. I chose a stencil to use for my background (Flower pattern stencil – Simon Says Stamp). I used a combination of distress oxides – Faded Jeans and Tumbled Glass. I started with deeper tones in the bottom left and worked my way to lighter tones across the panel. I then glued my girl down onto the panel and set it aside to dry.

To complete my card I adhered the panel onto a gray card base and added some enamel dots from Gina Marie designs. I hope you like this card and you check out the limited time digital stamps from Unity Stamp Company. I have linked their latest releases here! Be sure to check them out! I appreciate if you would use my affiliate link as well! Thank you for stopping by today and wishing you a nice Sunday!

Supplies Used:

  • Stamps: Time to be Grateful – Unity Stamp Company
  • Paper: Bristol Smooth Card Stock
  • Coloring Medium – Zig Clean Color Brush Markers, Arteza 120 colored pencils
  • Other: Simon Says Stamp – Flower Pattern stencil, distress oxides: Faded Jeans, Tumbled Glass, Gina Marie Designs (enamel dots)

Sending you Crafty Hugs,

Natasha

In this Together – Unity Stamp Company

Hi everyone – I hope you are having a good week. I wanted to stop in and say hello, as well as share a beautiful new release with you from Unity Stamp Company! For a limited time ONLY – Unity Stamp Co. will be offering digital stamps and they are GORGEOUS! They are truly perfect for everything that is going on right now. I am also excited to share I am an affiliate for Unity Stamp Company. If you enjoy my card and the sets I used or see other things that catch your eye on their amazing website, I hope you will consider shopping on my link. Today I am sharing 2 cards I made using the new In this Together set. This set was designed by the artist Lorica Jackson. I love this stamp, Lorica did an AMAZING job! The set you purchase contains pre-made A2 card panels, as well as individual images you can resize and create with on your own! How fun is that!

For both of my cards I started by printing various sizes of this gorgeous floral image on Neenah 80lb card stock. I wanted to use alcohol markers for both of my projects. For my first card I colored 3 of the floral images in using my arteza everblend markers. I wanted to practice using these markers. For the coloring on these 3 floral images I started by laying a shadow color down (purple), then used a light yellow, dark yellow, and continued to work to blend until I achieved the color I was going for. I then went in the nooks and crannies with colored pencils for more shadow and dimension. I added Rainbow SparkleBrutus Monroe embossing powder to the center of each flower. I love the subtle sparkle it has!

For this card I wanted to create a spring feel with a rustic twist. I went through my stash and found a kraft cardstock A2 panel that was pre made with an embossing folder. I added gold splatter to the panel and set it aside to dry. I used some black and white paper to create the strip on the left side. I used foam adhesive for the flower images and sentiment and then put my card together. I hope you like this one – it reminds me of summer with the bright yellow!

For my second card I chose to enlarge the floral image and place it in the top left corner. I do all my editing in word for my digital stamps. I printed this image on Neenah 80lb card stock as well. I loved coloring this large floral image. I used a mix of my copic markers and Altenew artist markers on this card. Once my coloring was completed I added colored pencils to the nooks and crannies. I then used a Hero Arts die to cut out my card panel, I made it slightly smaller than an A2 sized card.

I used my Ranger embossing pen to add Metallic Embossing powder – Gilded from Brutus Monroe I created vertical and horizontal lines using my T- square ruler. I love the added touch of the gold. I used foam tape to adhere my sentiment to the card panel and then layered a piece of black card stock behind the panel and adhered it to an A2 sized card.

I hope you enjoyed seeing 2 cards I created using this beautiful new set – In this Together – from Unity Stamp Company. This set is beautiful! I love how it has panels created for you that are all ready to go! Truly a great way to relax and just color, as well as individual images for you to create your own designs with! I hope you give them a try! I would appreciate you checking out my affiliate links as well if you enjoyed this stamp set, as well as other products!

Supplies Used:

I hope you are doing well! Sending you healthy and crafty hugs!

Natasha

Hello Beautiful – Brutus Monroe

Hi everyone! I am excited to share with you my 2nd post for Brutus Monroe! Today I am featuring the beautiful die of the month, Stained Glass! This die is GORGEOUS and can be used in so many ways! You can also sign up to receive the die of the month as a monthly subscription! How fun is this, a die will arrive monthly to your door step! As a monthly subscriber you receive additional discounts! Check it out here …. Die of the Month.

I started by ink blending a piece of bristol smooth card stock, cut down into an A2 sized panel. I used distress oxide ink: Picked Raspberry, Abandoned Coral, and Spiced Marmalade. Once my blending was complete and dry I used my spellbinders platinum machine and cut the panel using this gorgeous die. I decided I wanted to use the outer panel, the negative of this die to create more of a 3-d look. I glued this down onto an A2 sized black piece of card stock. With the color blending I completed, I only die cut the stained glass die one time. I loved the look and felt it had a 3-d look to it with the colors. I set the panel aside to dry. I then cut a circle out of white card stock using the circle foundation dies. I then stamped the Hello Beautiful from the Super Sentimental stamp set onto a piece of vellum. I love this set, its going to be a new favorite of mine! I used clear embossing ink from Brutus Monroe with Raven embossing powder. I then die cut the vellum using the circle foundation dies and adhered this to my white circle. I then foam mounted the circle in the center of my stained glass panel.

I then used some iridescent sequins from my stash. I added sequins to the die cut panel in various locations, and I also created a circle of sequins around the center of the sentiment. I wanted to highlight the sentiment on my card! I had so much fun creating this card and using this die! It is truly a beautiful die! The possibilities are endless and I can’t wait to see what you create!

Supplies Used:

I would truly appreciate it if you enjoyed this project/ideas if you would check out my affiliate links. Thank you!!!!

I am thinking of all of you and hope you are doing well! Be safe my friends! Many hugs,

Natasha

Change is Coming x3 – Graciellie Design

Hi everyone! I hope you are doing well and finding ways to relax and create as well! Today I am stopping in to share 3 cards with you! A good crafty friend of mine Deborah @rightbrainart (check her out on Instagram) recently posted a challenge… you choose a stamp set from your stash and create 3 cards with that set. How fun is this…. and she has prizes for the top 3 entries! You have until April 18th to post! Just be sure to tag #3xcardchallenge over on Instagram! Can’t wait to see what you make! I am also joining in on the fun… today I am sharing 3 cards using the new release from Graciellie Design – Change is Coming. Be sure to check this set out – it is BEAUTIFUL! I will share a brief description of each card, reach out to me if you have more questions!

For my first card I used the single butterfly from this stamp set. I was inspired by an image I found on the internet after searching bright colorful butterflies. I colored the image using my zig clean color brush markers. I added pearl gold sparkle embossing powder from WOW to sections of the wings. To create the polka dots on the black section of the wings I used a white gel pen. I used foam adhesive to adhere the sentiment and die cut the panel using a Gina Marie designs die. I used Nuvo Crystal Drops – in Ebony. I used a black piece of card stock on my A2 sized card for the background and adhered it all together.

For my second card I used the half butterfly again. I colored the stamped image using my zig clean color brush markers. I also added sparkles to the butterfly using a sparkle pen. I used a background I had previously created from my stash. I then die cut a circle and used an embossing folder (Jo Ann Fabrics) to add more dimension to my die cut circle. I used glitter paper to create the 3 strips across the bottom section of my card. I chose the sentiment Change is Coming. I added some drops in pink (older Stampin Up Kit), adhered it all together, and my card was complete.

In the above image you will see my 3rd card I created using the Change is Coming set. You can find more details on my previous post from March 20. I hope you enjoyed seeing 3 different ways to use this beautiful stamp set from Graciellie Designs. I encourage you to join in on the fun and create 3 cards using a stamp set of your choice! If you would like to join my design team friend Sandhya and I from Sanjus Creations , we also host a collab each month using a Graciellie Designs stamp set and we are using the Change is Coming set this month! Come join the fun! On Instagram be sure to tag us #gracielliedesigncollab

Wishing you a Happy Sunday and a healthy week! Hugs,

Natasha

Allow Yourself – Unity Stamp Company

Hi everyone! I hope your day is going well. As I have been working from home this week, I have enjoyed participating in The Daily Marker 30 day challenge. Coloring has always been an outlet for me and truly a part of my day/week I look forward to! This week as I have been coloring I have had time to think about the joys around me. I am thankful for my family, my home, my friends, and my health. I hope you are doing well too and are finding a way to relax. Today I am sharing a beautiful stamp from Unity Stamp Co called Allow Yourself. This stamp is beautiful….

I started by stamping the butterfly/floral image on Bristol smooth card stock. I knew I was going to do some ink blending, as well as use my Tombow markers. I used Detail Ink – from Brutus Monroe (Raven) I am loving this ink and the smooth crisp lines I get when I am stamping. I then colored this beautiful butterfly using my Tombow markers. I wanted to create a bright and bold butterfly. I used a variety of colors to achieve the color pallet I was going for. Once I was done coloring with my markers, I went back in and used colored pencils to achieve more dimension.

I then went around the butterfly image with my embossing pen and gold embossing powder to add more details to my card panel. I wanted to try something different on this card so I used 2 distress oxide colors: Tattered Rose and Fossilized Amber to create a border around the stamp/card. To create the border I used washi tape. It was fun trying something new, what do you think?

I chose a sentiment from the Allow Yourself stamp set… I loved this sentiment and it just reminded me that during these tough times there are some things I can’t control. I am trying to let go of the things I can’t control and take things day by day. I hope this butterfly brings you a bit of joy today! Wishing you and your family all the best and good health.

Supplies Used:

  • Stamps Used: Allow Yourself – Unity Stamp Co
  • Paper: Bristol Smooth card stock
  • Coloring Medium: Tombow markers, Arteza 120 colored pencils
  • Other: Gold embossing powder, sequins, stickles

Thank you for stopping by! Crafty Hugs,

Natasha

Change is Coming – Graciellie Designs

Hi everyone and Happy Friday! I know this has been a busy, and stressful week. I hope this post finds you and your family doing well and safe. With so many things changing each day, I hope this beautiful new release from Graciellie Designs will bring you a bright spot today! I love this new release and I am excited to share it with you! The new release is called Change is Coming. You can find this set and many more on the Graciellie Designs page. Be sure to check the website all designs on SALE 60% off! Have fun shopping!

For my card today I chose to work with the larger butterfly image in the set. I edit my digital images and sentiments directly in word. I wanted my butterfly to be large and the main focal point of my card. I printed the image and sentiment on Neenah 80lb card stock. I wanted to color today’s stamp using alcohol markers. My collection of markers is very small, but they are working for me. I did add a little to my collection earlier this week by finding some ciao markers on clearance! I was very happy! I used a variety of shades from light to dark pink, using copic and altenew artist markers. I found they blended well together. When my butterfly image was colored I added pencils, using a deep red to a light pink. If you would like to know the colors I used, let me know I am happy to share that with you! I used by Brother Scan and Cut to fussy cut my image when it was completely colored.

Once my image was colored & cut I knew I wanted to add a little foiling to this card. I used a dot stencil in my stash and used only a section of the stencil. I used foil transfer paste and once it was dry (about 1 hour) I ran it through my laminator with a piece of foil. I cut down the foiled card stock using a rectangle die from Hero Arts and then mounted it on a pink piece of pink card stock, then adhered it to my card base. I used foam tape to attach the the butterfly and the sentiment to my card.

I hope you and your family are doing well and wish you a nice weekend! Be sure to check out this new release at Graciellle Design. Thank you for stopping by today and have a nice weekend!

Supplies Used:

  • Change is Coming – Graciellie Design
  • Paper: Neenah 80 lb card stock, Recollections for card base 120 lb
  • Coloring Medium: Copic, Altenew Artist Markers

Crafty Hugs,

Natasha

Awesome Anemone – Rachel Vass Designs

Hi everyone and welcome back for another beautiful release from Rachel Vass. Today I am sharing the new Awesome Anemone – this was a fun image to work with and can be used in many ways. You will find a link to Rachel’s shop here https://www.etsy.com/shop/rachelvassdesigns I am also entering this into The Flower Challenge #42 – this months theme is Anything Goes! You could win some of Rachel’s beautiful stamps!

For my card today I went with a very bright color palette! I love bright cards and color! I printed this beautiful image on Bristol smooth card stock and colored in the stamp using my zig clean color brush markers. I did also add some colored pencils to areas of the flower where I wanted a little more color. As I was coloring, I realized that I needed to bring some more attention to the stamen of the flower, so I used my white gel pen to add some more definition. Once I did this, I felt better. I have learned there are many ways to “fix” things in stamping and coloring!

I wanted to add a lot of color to the background and so I used Nuvo Shimmer powders here to create the background on watercolor card stock. These powders are so fun to work with and a little goes a long way! I then adhered my floral to the card base using foam tape, as well as the sentiment. I added a few sequins, along with some stickles in the middle as well.

I hope you enjoyed seeing one of Rachel’s new images! Please check out her store for more beautiful florals!

Supplies Used:

  • Stamps: Awesome Anemone Rachel Vass
  • Coloring Medium: Zig markers, Nuvo shimmer powder
  • Paper: Bristol Smooth Card stock, Canson watercolor paper
  • Other: Sequins and stickles

Thank you for stopping by! Crafty Hugs,

Natasha

Sending you a Hug – Altenew

Hi everyone – I just wanted to send you a virtual hug! I wish you and your family well and hope you are all doing ok! Thinking of you and sending you a hug! Today I used the Paint a Flower – Rose from Altenew. I love these monthly subscriptions and knew I had to sign up – flowers, coloring … SIGN me up! I am also participating in The Daily Marker 30 days – are you? I love coloring and I am finding it relaxing! I am also entering this into The Flower Challenge – Anything Goes

I started by stamping the large floral cluster using WOW embossing ink and then used a gold embossing powder from WOW. I stamped the image on Stathmore Mixed media paper – in toned tan. I love this card stock, it is thick and the pencils work on it beautifully! I used my Arteza 120 colored pencils set. I am enjoying these pencils and they blend nicely. I start by using white on the base, then move from lightest to darkest. I use the pencils to blend, I do not use any other mediums to blend my colors. I used a variety of shades!

I then stamped the smaller rose cluster underneath. I was able to line them up without having to mask. I did use the packing to help me a bit. It worked out really well. I then chose a sentiment from the set – Hugs. I mounted the card panel on a piece of brown patterned card stock from my stash, then adhered it to my card base. I then added some white splatters and some iridescent sequins for added interest.

Supplies Used:

  • Stamps: Paint a Rose – Altenew
  • Paper: Stathmore Mixed Media – Toned Tan
  • Coloring Medium: Arteza 120 colored pencils
  • Other: Gold embossing powder, sequins

Thinking of you! Many hugs,

Natasha

Succulent Background – Rachel Vass Designs

Hi everyone! I am super excited to share with you a new release from Rachel Vass designs, Succulent Background! I love background stamps and this one is a beauty to color. This is one of the new release stamps – you can find this stamp, along with many other beautiful stamps at Rachel’s etsy shop https://www.etsy.com/shop/rachelvassdesigns I am also entering this into the Flower challenge #42 – the theme is Anything Goes. You could even win some of Rachel’s digital stamps! YEAH!

I started by printing this stamp on Bristol smooth paper. I usually wait for 24 hours when using my water based markers to ensure my image is dry, I generally have no difficulties using my water based markers this way! I love plants and succulents so this was so fun to color. I used my Tombow dual brush pens and using colored pencils for the nooks and crannies. I chose to color the succulents in more realistic colors, but wanted to do 2 main colored plants. Once I was done coloring I cut the image using an A2 card based panel using a Gina Marie die. I then cut my image again using the next smaller sized die. I wanted to position one layer of the background using foam tape. I then chose a sentiment from the set as well.

I mounted the card outer frame on an A2 sized card based panel in black and then used foam tape for the center portion of the card. Once this part of my card was complete I felt like I needed a little more. So I decided to add a strip of glitter card stock to the middle section of my card. I used foam adhesive on my sentiment as well and my card was completed!

I hope you enjoyed this card and seeing this beautiful new release from Rachel Vass!

Be sure to visit Rachel’s Etsy store for this beautiful new release and more.

Supplies Used:

  • Stamps: Succulent Background March Release 2020
  • Coloring Medium – Tombow Dual bursh pens, Arteza 120 colored pencils
  • Paper: Bristol Smooth, Recollections 120lb for card base

Have a great week! Crafty Hugs,

Natasha