Madame Dahila – Alex Syberia Design

Hi everyone – I am super excited to be guest designing for Alex Syberia’s newest release! I have been a huge fan of her work and to be guest designing for her, just makes so happy! This new release is full of amazing stamp sets and you will be able to shop here. In the store you can see each of the beautiful new sets being released! I created 3 cards for this release and will be sharing them with you over the next few days! Be sure to visit instagram for beautiful inspiration, as well as Alex’s blog. Be prepared to stay awhile at her blog, it is AMAZING!!!!!!!!!!

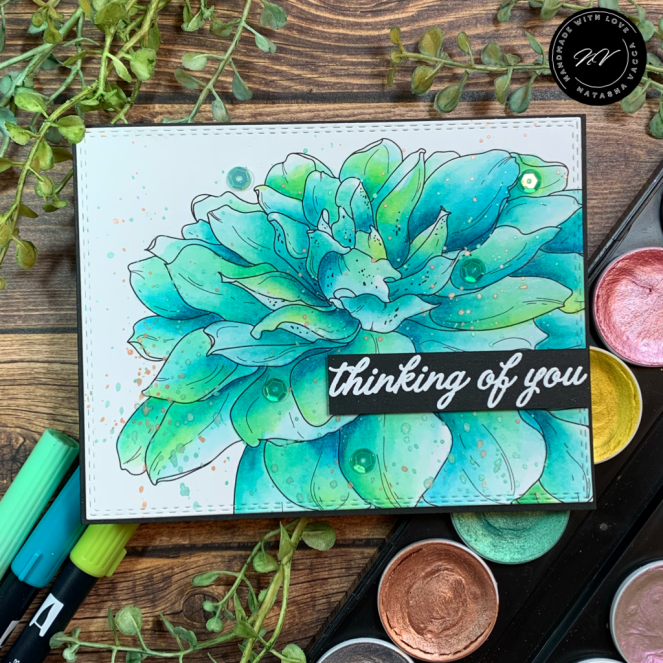
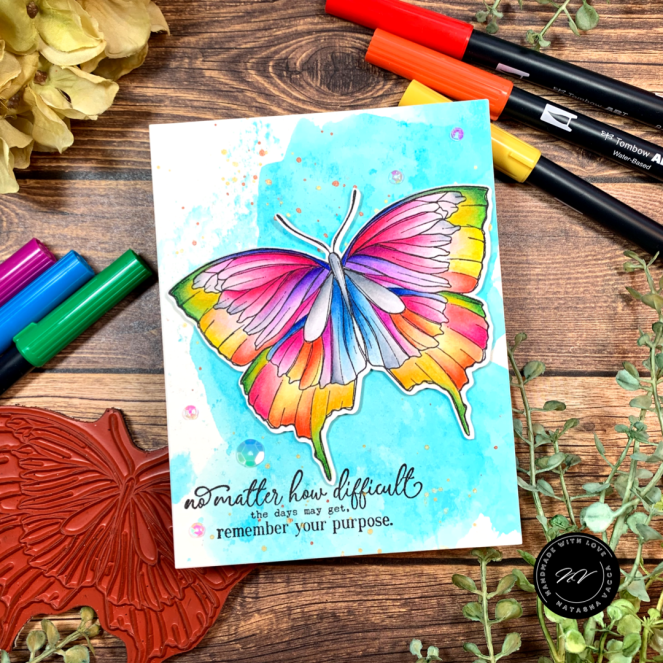
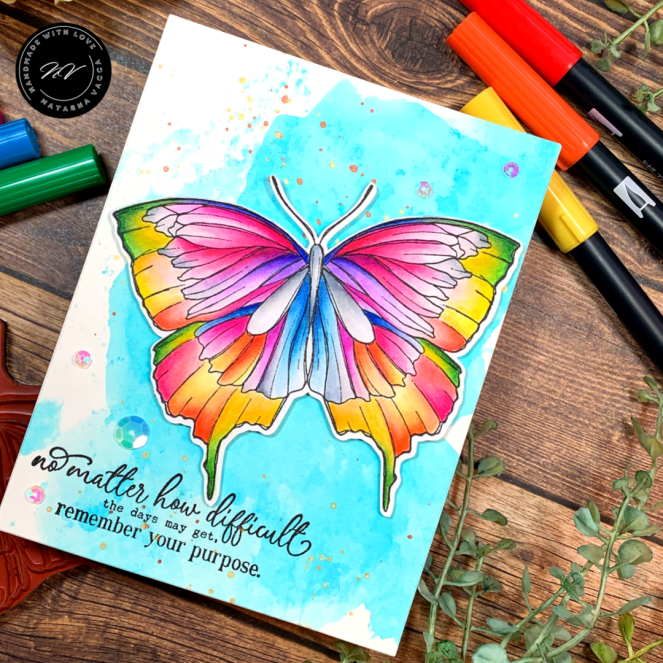
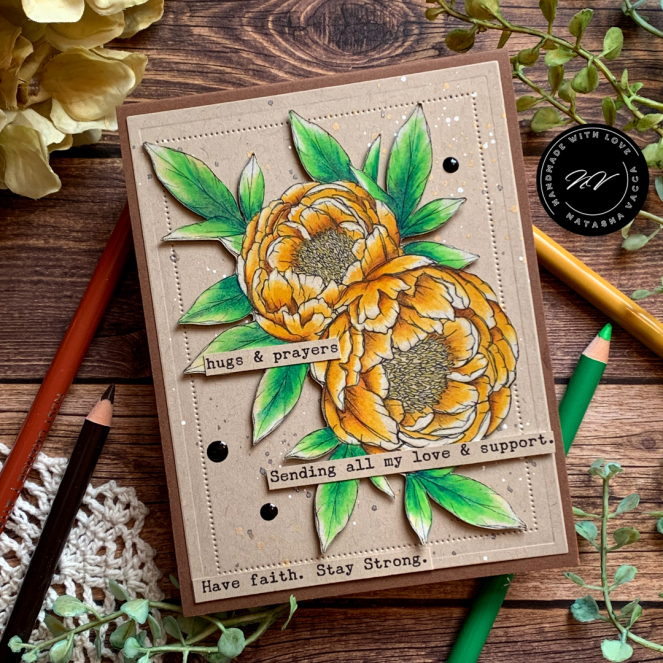
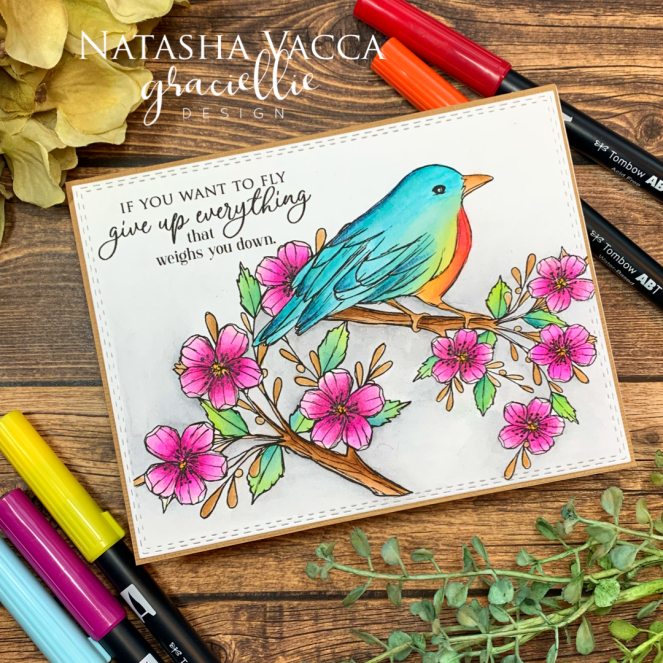
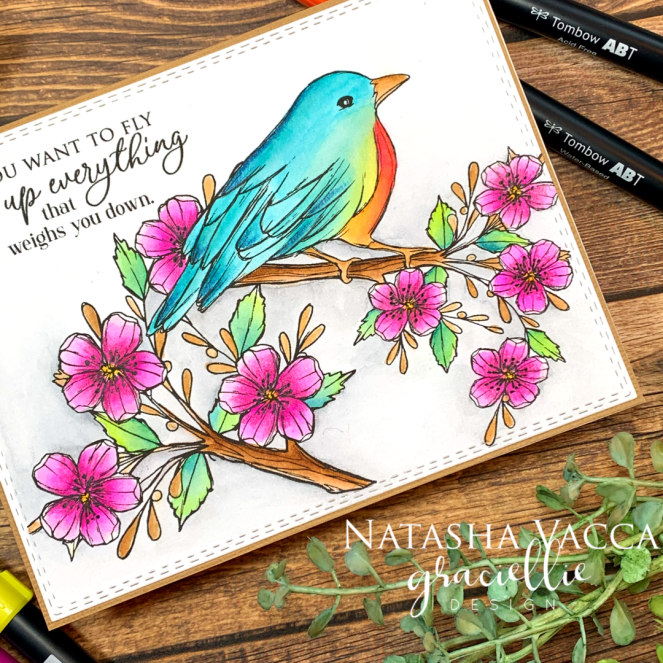
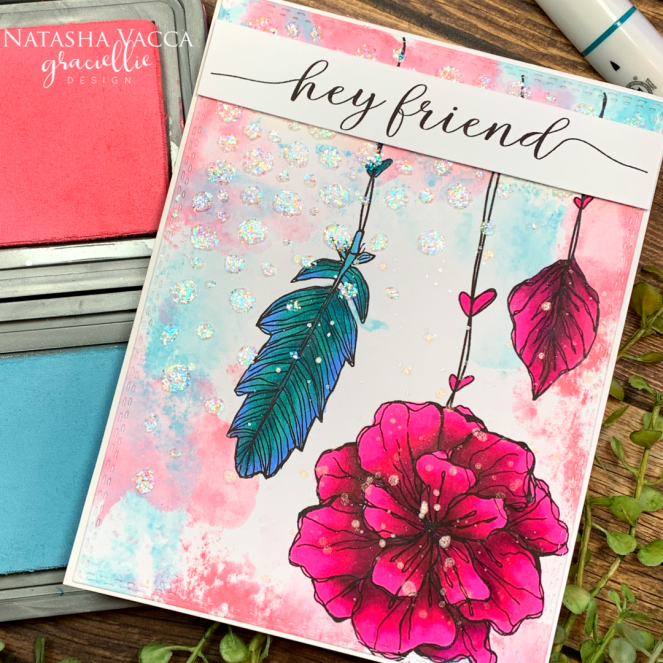
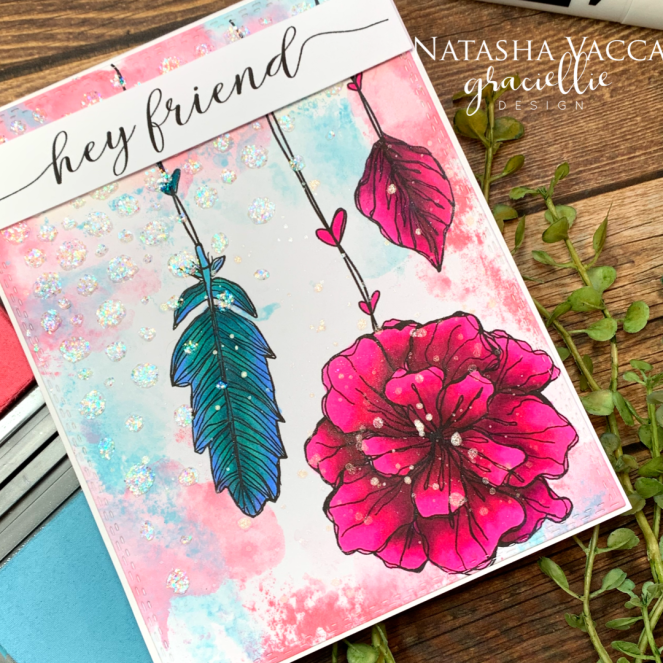
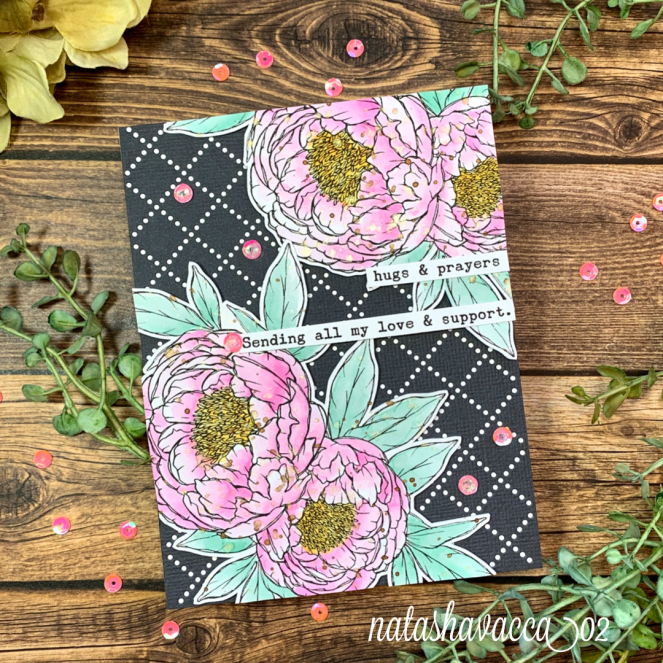
For my first card I am using the Madame Dahlia card panel from the release. I printed my stamp on Bristol smooth cardstock. I find I don’t create too many blue florals, so I wanted to try something new. I used a mix of 2 blues and a green for my floral. I continued to add color until I was seeing my vision. I then added some deep blue with colored pencils in the nooks and crannies.

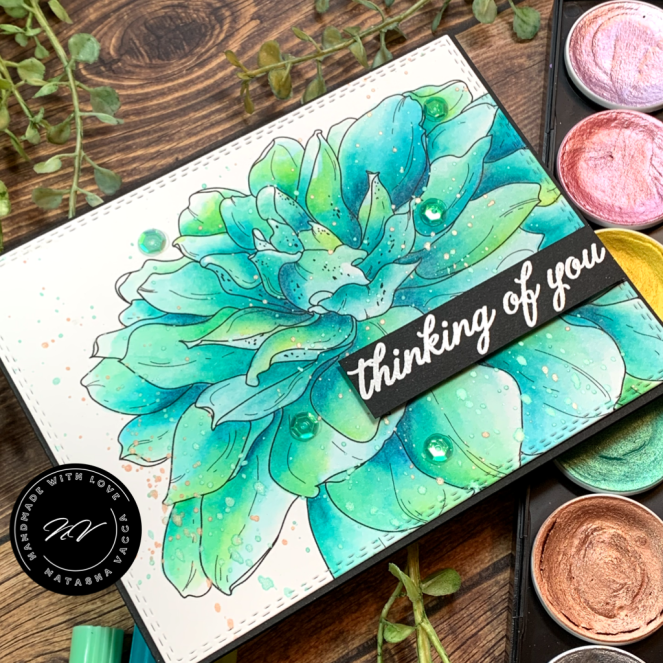
I then added splatters to the whole panel. I used blue, green, and even a little gold. I then added sentiment from a Hero Arts set I own. I stamped the image and then heat set it using white embossing powder. To complete my card I adhered the sentiment with foam tape and glued my panel onto a black card base. I added a few sequins as well.

I hope you visit Alex’s shop here to see her amazing new release! Have fun shopping!!!!!!!!!

Crafty Hugs,

Natasha

Far Away Hugs – Graciellie Design

Hi friends – I hope you are doing well and staying healthy. Today I wanted to share a beautiful new release from Graciellie Design – Far Away Hugs. This set is beatiful, it has a large sketchy floral, 2 leaves, as well as 12 encouraging sentiments. Gracie is also offering a beautiful free stamp set with purchase. Visit her shop to learn more!

For today’s card I printed 2 flowers and at least 6 leaves on Canson Mixed Media. I printed them in a pale gray. I used my zig clean color brush markers to color today. I wanted to create a loose watercoloring look. I used a pale purple and a dark purple. I loosely applied the color to the leaves and to the floral image. Once my coloring was complete I set these aside to dry, I placed them under a book to flatten a bit.

I then worked on my background. I used an A2 water color card stock for my background panel. I used aqua pigments from Brutus Monroe to create the panel. I applied the ink to my glass mat and “smoosed” the paper on top to achieve the look I was going for, I then added several colors of metallic watercolor splatter.

I then used my scan and cut to trim the images. I applied foam tape and adhered them to my card. I added a few sequins and a sentiment from the set.

I hope you have a good weeekend! Be sure to enter the giveaway on the Graciellie Design page on Instagram.

Crafty Hugs,

Natasha

Forest Butterfly – Unity Stamp Company

Hi everyone! I am stopping in with a quick post on day 1 of the coloring challenge! I am so happy to join in the next 30 days of the coloring challenge with Kathy Racoosin. This afternoon I was able to relax and color using the new release from Unity Stamp Company – Forest Butterfly. This new release is from artist Graciellie Design. I love this stamp set and I am so excited to have this in red rubber! My set arrived yesterday and I was so excited to ink it up for day 1 of the challenge! If you are interested in purchasing this set it is still on sale, I would so greatly appreciate you using my affiliate link. Thank you!

I started by stamping the large butterfly on Bristol Smooth card stock. I stamped it in Versafine black ink. I used a combination of colors on this butterfly to create a rainbow image. I had so much fun coloring and enjoyed relaxing! I used both my Zig markers, as well as my Tombow dual brush pens. I used many layers until I achieved the look I was going for. When I was done coloring I added colored pencils to my shadows for further interest and dimension. I then used my scan and cut to trim the butterfly. I added foam tape to the back and set it aside.

For my background I started with a piece of Canson watercolor card stock to create an ink smooshed background. I used Brutus Monroe’s turquoise aqua pigment to create this look. I placed a small amount of color and water on my glass mat, then smooshed the paper on the ink. I moved it around several times to achieve the look. I then added splatters to the panel. I trimmed the panel to create an A2 sized panel and glued this onto my card base. I chose the sentiment from the set and stamped this onto my card panel. I added a few sequins for added sparkle.

I hope this card brings you a smile today! Have a wonderful evening crafty friends!

Thank you so much for your continued support! It means so much to me!

Supplies Used:

Crafty Hugs,

Natasha

Butterfly Kisses – Brutus Monroe

Hi everyone – Today I am stopping in to share with you some crafty inspiration using the Stamp of the Month from Brutus Monroe. The stamp this month is adorable! The best part of the membership…. it will ship to you each month! How fun! If interested in any of the products I use today, I would greatly appreciate you considering to use my affiliate links. Thank you!

To begin I started with a watercolor base panel. I wanted to create a bright background with stripes to highlight these cute butterflies. I started by taping down washi tape in different size stripes going across my panel. I then used distress oxide inks to paint the stripes. I love coloring with these inks – you get such bright color! I used picked raspberry, mustard seed, peacock feathers, and spiced marmalade. I did each stripe 3 times to ensure I had bright colors. I then carefully peeled the washi off and set it aside to dry. Once it was dry I placed this under heavy books to flatten the card panel.

I stamped several butterfly images on neenah 80lb cardstock. I used my scan and cut to die cut my images. I then used Brutus Monroe Rainbow embossing powder to add sparkles to the insides of my images. I used an embossing pen to do this and added the powder, then heat set. I did this several times to get the right amount of sparkles.

I then used Tattered Rose and Worn Lipstick to create a blended background. I blended the 2 colors until I was happy with the color. I added splatters to this using gold perfect pearls. Once dry, I used Brutus Monroe Circle Foundation dies to cut my blended piece. I adhered this to my card panel using foam tape. I also used foam tape for my butterflies. I stamped the sentiment Butterfly Kisses from the stamp set. I added a few sequins to add a little more sparkle to my card.

Supplies Used:

Have a great day crafty friends!

Hugs,

Natasha

Peony Hugs – Unity Stamp Company

Happy Sunday crafty friends! I hope you are having a good weekend! I have been able to start working in my garden which is one of my other loves! It feels so good! I am actually headed back outside shortly! Today I am sharing another card design using the Peony Hugs – Unity Stamp Company. I LOVE this set! The gorgeous full blooms are amazing and is designed by artist Graciellie Designs! This gorgeous set is still on SALE today – you can find it here, as well as here is a link to the amazing flash sale from this weekend! I am truly grateful if you use my affiliate link! Thank you!

I started by stamping my image on kraft card stock. I love kraft paper and the rustic vibe it has! If you saw my home, you would know I love the country/rustic vibe! I wanted to use colored pencils for my coloring today. I used a variety of shades of yellow, deep orange, and a deep brown on the flowers, along with white. I always start from the lightest shade and work my way to the darkest. For my leaves I used a light green, dark green, a teal, as well as a little yellow in some areas. I really let my pencils do most of the work as far as the shading, in a couple sports I may have pushed to hard.

I then used my brother scan and cut to cut my peony image. I set this aside. I then chose the same kraft for a card panel. I used a combination of white, gold, and black splatters. I then used a hero arts rectangle die to cut the outer edge of the kraft and a Gina Marie designs die to add the dot details to the inner portion of the card panel. I adhered the panel to a brown card base (Recollections 120 lb paper). I used foam adhesive to adhere my floral image and I used all 3 sentiments from this beautiful set. I adhered them in various spots on my card panel. I then added 3 Nuvo drops in black.

I hope you enjoy this card! If you love this gorgeous set I encurage you to add it to your cart today! Have a wonderful weekend! I truly appreciate your time and your encouragement!

Supplies Used:

  • Stamp – Peony Hugs – Unity Stamp Company
  • Paper: Kraft card stock (Stampin Up), Recollections brown 120 lb
  • Coloring Medium: Arteza 120 colored pencils
  • Other – Gina Marie Designs Die, Hero Arts, Nuvo Drops

Enjoy your afternoon! Crafty Hugs,

Natasha

Do Not Worry – Graciellie Designs

Hi everyone… I hope you are doing well and are adjusting to all the changes that are happening around us. It is so different to be home everyday and not go anywhere unless I have to (grocery store). I am enjoying my time at home with my family, my card making hobby, and I even got into the garden today! I hope you are doing well and healthy! Today I am sharing a beautiful new release from Graciellie Designs… Do Not Worry. This set is beautiful, 2 beautiful images, as well as 7 inspirational sentiments. I hope you will check it out, as well as the sale on her page! Gracie is kindly offering a free gift with an order too! You can see it here, this set is free with a $10 purchase!

I started by printing my image on Canson Mixed Media paper. This is a light weight paper, I don’t use it too often, but I wanted to give it a try. When I use a water based marker on digital images I like to set my card panel aside for 24 hours to ensure it is dry and ready for me to color. This set was so fun to color. I used both images from this set and I layered the one floral branch behind the bird. I used my Tombow dual brush pens to color my images. I used several layers of color on each section.

Once my coloring was complete I did add some colored pencils to the nooks and crannies as well. I also used a black Sakura Micron pen to add more details to the stamen of the flowers. This paper is thin and I don’t use it too often. I did find using a light touch with my markers and my water brush, the color moved really well. I wanted to try it as the paper is thinner and so much easier to print on. I will use it again for sure! I set the panel aside under heavy books for the night to flatten out. Then I cut the panel with a Gina Marie designs die. I adhered the panel to a kraft card panel, then adhered it to my card base. This card was all about the coloring, all one layer. I hope you enjoy it and be sure to check out the new release at Graciellie Designs. Be sure to visit her website as well, so many amazing and beautiful stamps on sale!

Enjoy your evening friends! Crafty Hugs,

Natasha

Kindness for Florals Instagram Hop – Graciellie Designs

Goodmorning my crafty friends! I hope you are doing well! Today I am sharing a beautiful stamp from Graciellie Designs – Hey Friend. I love this set and it is currently on sale! Today I am teaming up with some of my crafty friends on Instagram for an IG hop. I hope you will visit my instagram page to join our hop – you will be insprired by beautiful cards. Our theme for our hope is Floral Kindness – we all used a floral set, along with ink blending and stencils! It was so fun to see how beautiful and different they all are! Join in our hop and win prizes along the way!

I started by printing my images on Neenah 80lb card stock. I decided to experiement with ink smooshing using distress oxides and it worked! I used tumbled glass and worn lipstick. I then set my panel aside to dry overnight under some books. The next day I colored my images using my arteza everblend markers. I am excited to begin to use these more and learn new ways to blend! I love the bold colors!

Wen my coloring was complete I added a litle colored pencils for additional dimension in my coloring. I always get excited when I get to this part, I feel it all comes together! I then used a stencil from my stash and used glitter glaze from Brutus Monroe – Fallen Snow. This glaze is currently sold out, but it is so pretty! I love how much sparkle is in this glaze! Once the glaze dried, I added a few splatters usng Tattered Angels GlimmerMist. I then adhered my card panel to the card base and used foam tape to adhere my sentiment. Look how pretty this font is too…..

I hope you enjoyed this card and be sure to visit my instrgram account for our hop! You have until April 10th to enter the giveaway! Come join the fun!

Supplies Used:

  • Stamps: Hey Friend
  • Paper- Neenah 80lb cardstock
  • Coloring Medium Arteza Everblend markers, Arteza colored pencils
  • Other – Gitter Glaze

Have a good day! Crafty Hugs,

Natasha

Peony Hugs – Unity Stamp Company

Hi everyone! I am stopping in with a quick blog post….I was so excited to share with you that Unity Stamp Company has released the beautiful Peony Hugs from the artsit Graciellie Designs into a red rubber stamp! This stamp is so beautiful! I couldn’t wait to make a card! Unity Stamp Company is also hosting an amazing weekend flash and inventory sale! You can see it here. If you are inspired by my card, I would greatly appreciate you using my affiliate links! Thank you so much!

I stamped 2 images using the beautiful peony cluster. I used Canson Mixed Media paper. This is a light weight paper, but I knew I was going to do a light wash of color, so I knew it would be ok. I used distress inks to watercolor my peonies. I used picked raspberry and evergreen bough. I did each color twice. I used a very light hand on my coloring, this is different for me. I wanted to create a subtle, but very beautiful floral image. What do you think?

Once my watercoloring had dried, I used my scan and cut to trim these images. I then set them aside and aslo under heavy books for the night. I used a Gina Marie Designs background die. I love this die. I cut it in black cardstock and adhered this to my panel. The next day I added some gold splatters to my flowers. I played with a few different layouts, but once I was happy, I adhered them with foam tape to my card. I added my sentiment and a few sequins and my card was complete!

I am so excited about this beautiful stamp being released in red rubber, Peony Hugs! Its truly stunning and if you agree, visit my links! Be sure to check out the amazing flash sales – here !

Have a great night! Crafty Hugs,

Natasha

Miss your Face – Brutus Monroe

Happy Thursday Crafty Friends! I hope you are doing well. I am stopping in to share a bright and colorful card inspired by Jennifer McQuire. She is amazing and teaches me something new all the time! I was inspired by a recent you tube video she shared using multiple colors on stencils. I had to try it and I had the perfect stencil in my stash from Brutus Monroe – Circle Tone. I hope you enjoy my card and if you see some items I use that inspire you, I would love it if you shopped using my affiliate links! Thank you!

I started by placing my stencil on bristol smooth card stock. I taped it down to ensure it didn’t move! Overall I did pretty good, but I did have some ink move to other colors, but I was still happy with this bright fun card in the end! I used a rainbow of distress oxide inks (candied apple, spiced marmalade, squeezed lemonade, lucky clover, salty ocean, and seedless preserves). I started with the red and worked my way towards the purple color. I used my blending brushes and used my hand to cover the section next to it. You can see why I had a couple go over, but that’s ok!

I set my panel aside to dry for a bit. I worked on the sentiment. I love this one – miss your face! It’s so fun! I used the Super Sentimental set. I embossed the image using Brutus Monroe embossing ink and alabaster embossing powder. I placed foam adhesive under the sentiment and set it aside.

I was so excited to add all the glitter and sparkles using – Glitter Glaze (falling Snow). It is currently sold out at the moment. They do have other ones available here, as well as a monthly subscription! How fun! I used my spatula to place the glaze over the stencil and once it was complete I removed the stencil and set the panel aside to dry. Once my panel was dry I trimmed the panel a bit, as I wanted to show the back aqua card panel. I loved the addition of the aqua color and then I added the sentiment and my card was complete!

I hope you enjoyed this card and it brings you a little bit of happiness and sparkle to your day!

Supplies Used:

Crafty Hugs,

Natasha

Jesus and Germs – Unity Stamp Company

Good morning crafty friends! I hope you are doing well! I wanted to stop in and share another beautiful limited time digital stamp release from Unity Stamp Company! Today I am sharing the Jesus and Germs stamp set! This stamp set is so beautiful and as soon as I saw it I couldn’t wait to ink it up! This beautiful set is created by artist Tierra Jackson. It has beautiful pre-made A2 panels, as well as the individual stamped imaged and sentiments to create your own designs as well! I hope you will check out this set and more of the amazing digital stamps being released! You can see them all here – Unity Stamp Company! I would greatly appreciate it if you love these stamps like I do, you would kindly use my affiliate links. Thank you!

I started by printed the floral frame on Neenh 80lb card stock. I wanted to use alcohol markers for this image and work on my coloring with these markers. I am beginning to truly love alcohol markers and now I want more markers! For todays card I used my Altenew artist markers. I am happy to share the colors I used if this interest you! I had fun coloring this beautiful stamp! I felt this stamp was so beautiful I wanted to create a 1 layer card this time and have the florals and coloring be the focal point of my card!

Once my coloring was complete I used my arteza colored pencils to add more depth to the nooks and crannies! I love this so much because it truly changes my coloring! I added shades of a dark purple and deep blue to the corners! Once my coloring was complete I used a Gina Marie Designs die cut and then adhered the panel to a black card base.

Supplies Used:

I hope you have a good day! Sending you a big crafty hug!

Natasha