Hugs – Rachel Vass Designs

Hi everyone! I hope your weekend is off to a good start and this post finds you doing well! I am back sharing a new release from Rachel Vass Designs. The newest release is adorable and contains floral jars, you can see the set here in Rachel’s ETSY shop. I chose to work with the Eucalyptus Jar stamp to create a CAS design.

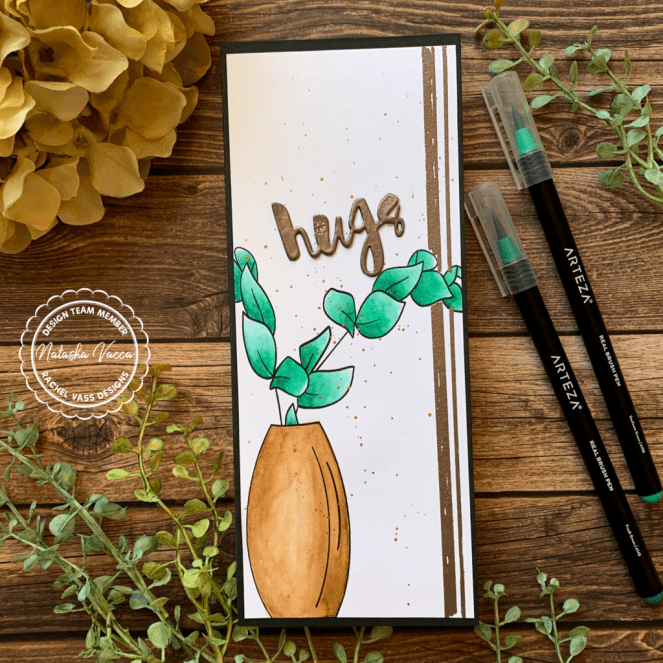
I started by working with my image in Microsoft word. I do all my editing here for my digital images. If you need any help, I am happy to help! I wanted to create a slim line card using this jar. Once my image was sized I printed my images on Canson Mixed Media paper. I have found this paper to be awesome lately when working with digital images, I can color shortly after printing and it can take layers on color too! I used my arteza brush pens for my card today. When my coloring was complete I added 2 embossed stripes on the right hand panel of my card using Rose Gold powder from Ranger. I did leave off small sections of powder to create some added interest. I then added splatters of gold and brown to my card.

I chose a Hugs sentiment die from Simon Says Stamp and cut this 3x on black card stock. I glued them together for added dimension and embossed them using the same Rose Gold powder. I then adhered my card panel to a black slim line card base and glued down my hugs sentiment as well. I added a sentiment from the new release as well to the inside of my card.

This completes my card for today! I hope you will visit Rachel’s ETSY shop to see this new release, plus many other beautiful stamps!

Supplies Used:

  • Stamps: Jars Stamp – Rachel Vass Designs
  • Coloring Medium: Arteza Brush Pens
  • Paper: canson Mixed Media Paper, Recollections 110 lb for card base
  • Other: Ranger Embossing Powder – Rose Gold, Metallic Water Colors

Have a great weekend! Crafty Hugs,

Natasha

Happy Mother’s Day – Graciellie Design

Hi Everyone! I hope you had a good week! I am back sharing the newest release from Graciellie Design – Happy Mother’s Day! This set is beautiful, it has 2 beautiful floral images and 8 different sentiments included in this release!

I started by printing my image on Nennah solor 80 lb card stock. For my coloring today I used my alcohol markers. This is a coloring medium I want to work on for myself, so I thought this is the perfect set to do this. I used a variety of shades for each section of the image. Once my coloring was done I added a bit of color to the nooks and crannies as well. I then used my Brother Scan and cut to fussy cut the image. I then added WOW embossing powder to different sections of the floral image using Fairy Dust embossing powder. I love the added shine of this powder!

I then used an embossing folder from Jo Ann Fabrics to create the panel background for my card base. I foam mounted both my sentiment and floral cluster and my card was complete! I hope you will visit Graciellie Design shop to see the beautiful new release and more!

Have a great weekend and stay healthy!

Natasha

Plant Hope – Unity Stamp Company

Hi everyone! Welcome back! I am excited to share a beautiful new digi stamp release from Unity Stamp Company. It is called Plant Hope! This set is beautiful. When you purchase this set you will have access to the individual image and sentiments, as well as pre-made card panels! These are perfect for coloring, foiling, and sending out a little happy mail! You can see this release, as well as the other new digi releases at Unity Stamp Company.

To begin I started by using a pre made card panel. I started by printing this on Canson Mixed Media paper. I have loved this paper for my digital images lately and using my water based markers. For this card I used my Tombow brush pens. When I do work with digi stamp sets I do work directly in Microsoft word. I have found it to work very well. I am happy to help with that as well, feel free to ask my any questions.

When I use my water based markers I always tape down my paper onto a board or clipboard, to prevent warping. I used many different colors for today’s project. I love color and bright flowers! I had fun mixing colors to create these blooms.

When I was done coloring I used my metallic water colors to add splatter. Adding splatter to my cards is one of my favorite details to add! I then set this aside to dry. Once my panel was dry, I used a Hero Arts die to trim the panel. I started by trimming to a full A2 sized card panel. I then chose another die (2 sizes) smaller to trim the panel one more time. I then glued the middle section onto a foam base. I then glued both parts to my card base.

What is your favorite detail to add to a card?

Supplies Used:

I truly appreciate you stopping by! Your support means so much to me! If you are interested in any of the new digi stamp releases I would love for you to use my affiliate link. Your support means so much to me! You can still see the amazing weekend and inventory sales here – Unity Stamp Company.

Have a wonderful day and stay healthy!

Crafty Hugs,

Natasha

Congratulations – Brutus Monroe

Happy Monday everyone! I hope this post finds you doing well! I am excited to share with you a new card using the Stencil of the Month – from Brutus Monroe. This stencil is so beautiful and was the perfect way to create a Congratulations card. You can also visit Brutus Monroe to see the amazing sales they have going on as well!

To begin I started by placing one side of the stencil on Bristol Smooth paper. The stencil has a square in the middle, I placed washi tape across this section as I was only using the outer portion of the stencil. I then began to ink blend. I used a combination of distress oxides inks in: Abandoned Coral, Sqeezed Lemondae, and Picked Rasperry. Once my blending was complete I added glitter glaze -Unicorn over the top. I then removed my stencil and let the panel dry. Once the panel was dry, I did the other half of my card panel by following the same process.

I then used a piece of pink card stock and cut it down to size to fit between the 2 glittery sides. I adhered this to the card panel. I then stamped Congratulations on white card stock and used foam tape to adhere it to the center of the pink. The congratulations stamp is from Super Sentimental – Brutus Monroe.

I hope you enjoyed seeing another way to use this new stencil! I hope you enjoyed my card for today!

Have a great day- crafty hugs,

Natasha

Supplies Used:

  • Stamps: Super Sentimental – Brutus Monroe
  • Coloring Medium: Distress Oxide Inks (see sbove colors), Glitter Glaze
  • Paper: Britsol Smooth Card Stock, Recollection 110 lb for card base

Doodle Flower – Rachel Vass Designs

Happy Release day – Rachel Vass Designs. Today I am sharing the new release April Doodle Flower from Rachel Vass designs. You can find this new stamp and all of Rachel’s designs at her etsy shop here.

I started by working with the doodle flower in Microsoft Word. I layered 2 of the flower images together to create the slim line card. I printed my images on Canson Mixed Media paper. I colored in my flowers using my Arteza real brush pens. I used a combination of yellow, orange, and red. I completed several layers of color on the paper. I have found with this paper I start with the ink on my paper and then after a couple layers I add the ink to my glass mat, then bring it to the paper. I have found this method to work well, as this paper is thinner. Once my flowers were complete I added white dots to the stamens of the flowers with my gel pen. I added splatters across the panel and set it aside to dry.

Once my panel was dry I adhered my panel to a black card case. I added stickles to the center of each flower for added shine. I hope you enjoyed this card and I encourage you to visit Rachel’s shop for this new release, plus many other beautiful designs.

Have a great day! Crafty hugs,

Natasha

Hang in There – Graciellie Design

Hi everyone – it is release day at Graciellie Designs and today I am sharing the Hang in There digital stamp set. You can visit Graciellie Design shop to see the new release, as well as all the other beautiful sets!

I started by printing the wood board and sentiment on Canson Mixed Media paper. I found with the Mixed media paper I can color shortly after printing (the ink dries very quickly). I am enjoying that part! I colored my image in using my Arteza brush markers. On the floral image I added WOW embossing powder in Fairy Dust. I love all the glitter in this powder! I wanted to use my stash of patterned paper for this card. I created a layout for the back panel using a mix of papers. I also die cut a small heart using a heart die cut. I adhered my card together using the patterned papers and my stamps!

This completes my card for today! I can’t wait to see what you do with the new set – Hang in There!

Crafty Hugs,

Natasha

Spread Joy Blog Hop… Brutus Monroe

Hi everyone! I am super excited to be participating with Brutus Monroe in the Spread Joy Not Germs Blog hop! We have over 31 sponsors and 153 bloggers in this hop! This is AMAZING! I am honored to be a part of this event! Our theme is cards that spread HAPPINESS! So sit back and enjoy this AMAZING HOP! A few details about the hop…. If this is your first stop thank you for being here! If you get lost along the way, you can start at Catherine Pooler Design. Have a great time, enjoy seeing many bloggers, cards that spread happiness, as well as many opportunities to win AMAZING prizes. I encourage you to leave as many comments along the hop as you can, you will have until April 24 to enter comments to win prizes, the winners will be announced on April 27 on Catherine Poolers blog and Alexandra’s blog from the Hedgehog Hollow. For a full list of prizes please visit their blogs to see all the amazing goodies you have a chance at winning.

If you follow me or are new to my blog, thank you for stopping by! I am a huge fan of floral stamps and I LOVE to color! Today I am sharing the Love you Floral stamp – Brutus Monroe. This stamp is gorgeous! Flowers and color to me just say HAPPINESS! Don’t you agree….. Do you love to color flowers? What is your favorite type of card to make? I would love to know (comment below).

I started by stamping my floral image using Versa Fine Clair ink in Pinecone. I then used my Zig Clean Color brush markers to color in my image. I used a variety of shades of colors. I love coloring with my zigs. When my coloring was complete I used some colored pencils (Arteza) in the nooks and crannies for added dimension. In the center of each flower I added a gold Perfect pearls, and used my gel pen for added interest. I also added splatters to the floral sections of my card in gold, a light green, and a red. To complete my card I die cut the floral panel and adhered it to a purple panel, then adhered this to my card base. I used the sentiment Thankful for You – Super Sentimental Brutus Monroe. Foam mounted the sentiment and my card was complete!

I would love for you to comment below and sign up to follow my blog! I truly appreciate you stopping by and have fun on the hop!!!!!! Keep reading below …. to see where you will be going!!!!!

I hope you enjoyed stopping by and have fun on this AMAZING hop! Please visit Jane Tyrell, she is our next crafter! Click her name for a direct link! Have fun! Good luck to everyone!

Crafty Hugs,

Natasha

You are Forever Beautiful – Unity Stamp Company

Hi everyone! I hope this post finds you well and healthy! Today is my son’s 15th birthday! It’s an exciting day for sure! Today I am sharing the beautiful stamp set – You are Forever Beautiful from Unity Stamp Company. I love this stamp and was so excited to color it in as a part of the daily marker from Kathy R.

I started by stamping this beautiful floral 2 times on Neenah 80lb card stock. I stamped the floral across the top and then the bottom too. I used memento ink black, for my stamping today, as I am using Altenew Artist Markers. For today’s coloring I started a bit different as I am trying to learn the best way for me to use alcohol markers. I started dark to light this time. What I love about these markers is that they come in a blending set already. So this helps me for sure! I colored this over a couple of evenings.

Once my coloring was complete I did add a little colored pencils into the nooks and crannies as well. I added a few gold stickles to various parts of the stamp for added shine. I chose a sentiment (Thank you) from Unity’s April Kit of the Month. I love this kit and just became a subscriber! The kits are amazing, full of AMAZING stamps and sentiments! Unity does offer several monthly kits and you can see more information here! As a monthly kit member you have many perks….. check out the memberships that Unity has to offer and see if one of them is right for you!

I hope you enjoyed today’s card! If you enjoyed my card and want to shop, I would love it if you used my affiliate link. Using my link helps me bring more beautiful projects to you (at no additional cost to you). I greatly appreciate it! Be sure to visit Unity Stamp Company for their AMAZING limited time digital stamps too! I have them linked here! They have amazing new stamps and these are available for a limited time!

Thank you for stopping by!

Supplies Used:

Crafty Hugs,

Natasha

Brutus Monroe – Die of the Month

Hi everyone – I am back sharing the Die of the Month from Brutus Monroe! This is a beautiful die and perfect for spring! You can see the monthly subscriptions here. Crafty mail each month – how fun!!!!!! Be sure to visit the Brutus Monroe website today too – it is Christopher’s birthday and there are AMAZING sales!

I started by placing aqua pigments on a clear acrylic block. I used a large block for this. I used Turquoise and Cactus Metallic pigments. These pigments are so fun and full of so much color they are so easy to work with! I love the added sparkles in the metallics. I used an A2 sized piece of watercolor card stock and “smooshed” it against the block. I moved the paper around in different directions to achieve the colors I was looking for. Once it was done, I set it aside to dry. Once it was dry I placed it under a few heavy books to flatten out a bit. I then started to work on my sentiment. I stamped the Hello Beautiful from the Super Sentimental stamp set. I used a white embossing powder on a navy card stock from my stash. I used the same navy paper behind my butterfly die cuts.

When my panel was “flat” I ran it through my die cutting machine. It was so fun to see the beautful pattern of butterflies. These dies cut so beautifully too! I also ran it a second time on a piece of light blue card stock. I then glued the 2 pieces together. The pigment inks gave the front panel of butterflies such a beautiful look. I adhered these to my navy panel and attached them to my card base. I cut a few pieces of glitter card stock for added detail and glued these to the center of the card. I adhered the sentiment on foam tape, added a few sequins, and my card was compelte!

Supplies Used:

Crafty Hugs,

Natasha

Dahlia Slim Card – Alex Syberia

Happy Monday crafty friends! I hope everyone had a great weekend and had a very nice Easter. I spent the day with my family and kids. It was fun to see my kids (18 and soon to be 15) go on an Easter egg hunt in the house! We had a lot of fun! Today I am sharing a beautiful new stamp set from Alex Syberia – Dahlia Slim card panel.

I started by printing the card panel on Bristol Smooth card stock. I used my zig clean color brush markers to color all the beautiful Dahilas. This panel was truly fun to color! I used several layers to add the color and depth to my florals. Once my coloring was complete I added splatters in several colors that are within my card.

To complete my card I added a sentiment from Hero Arts (Sending you Sunshine and Laughter) and the Hugs die is from (Simon Says Stamp). I layered this using a pink and black card stock). To compelte the card I adhered this to a black card panel.

Thank you so much for stopping by! Be sure to visit the Alex Syberia Design shop.

You can also visit Alex’s blog -it is truly AMAZING!!!!!

Have a wonderful day! Crafty Hugs,

Natasha