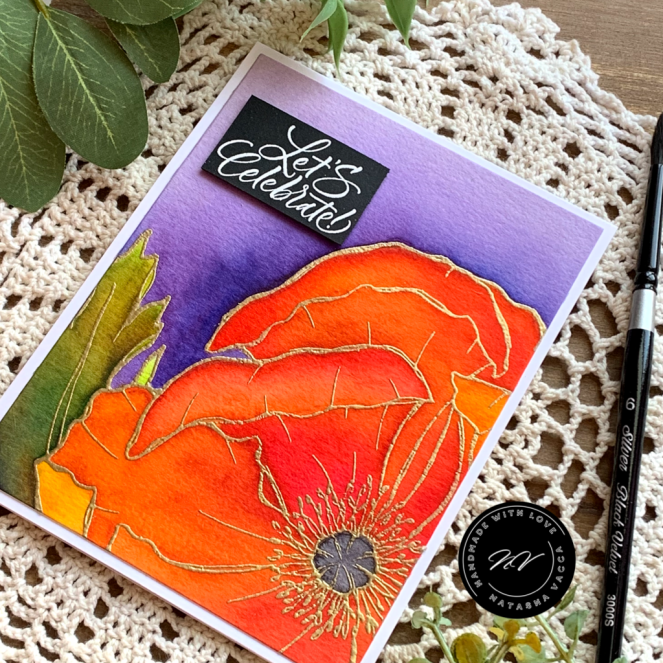
Hi Friends! I hope your week is off to a great start! I have been enjoying using some stamps more recently from my stash! Today I am using the beautiful Unusual Day Poppy – by artist Graciellie Design/Unity Stamp Company! I was excited to work with this image in red rubber, the floral is HUGE!!! So let’s get started!
I started by prepping my A2 watercolor panel/Canson XL water color card stock with my powder tool and heat embossed it using a gold embossing powder. I used my peerless water colors on this card. I truly love these colors, as they are super pigmented so they are fun to use. I used a wet on wet technique to color this beautiful bloom. On the flower I used a combination of yellow, orange, red, and pinks. On the leaves I used greens, blues, and yellows.
Once my watercoloring was complete I added the color around the large bloom, using 2 shades of purple. I did a similar color combination the other day and I loved it! It was fun to try it again. I trimmed my panel to an A2 card size and adhered this to my card base. I chose the Let’s Celebrate sentiment from the May 2020 Kit of the Month. I heat embossed this in white on black card stock and then foam mounted this to my card panel. I find watercoloring so relaxing and an area I want to learn more in.
I also wanted to let you know Unity Stamp Company has a Mystery Discount Summer SALE happening right now. The SALE will go until Thursday evening at midnight. You can add items to your cart and the SALE/discount will appear. Have fun checking it out!
Thank you for stopping by! I am listing all the products I have used below. You can click on any of the links I have shared if you are interested in purchasing the products. The products listed are a compensated affiliate link, which means if you make a purchase I receive a small commission with no extra cost to you. I really appreciate your support.
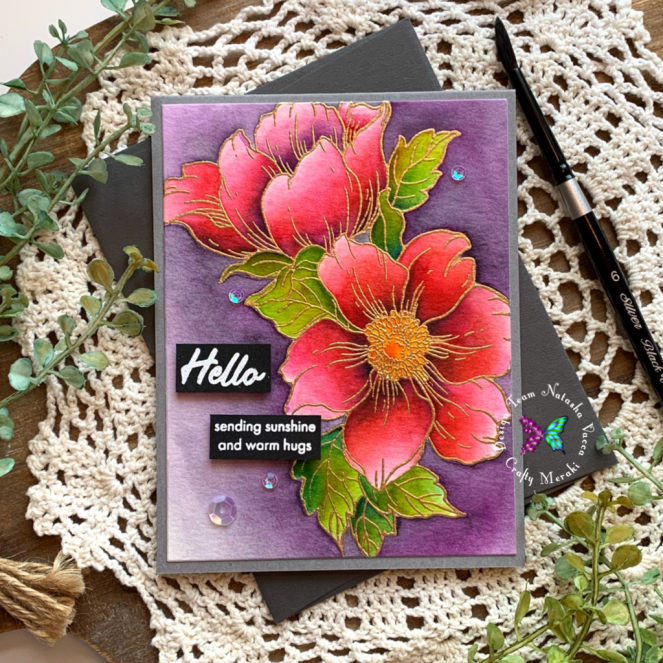
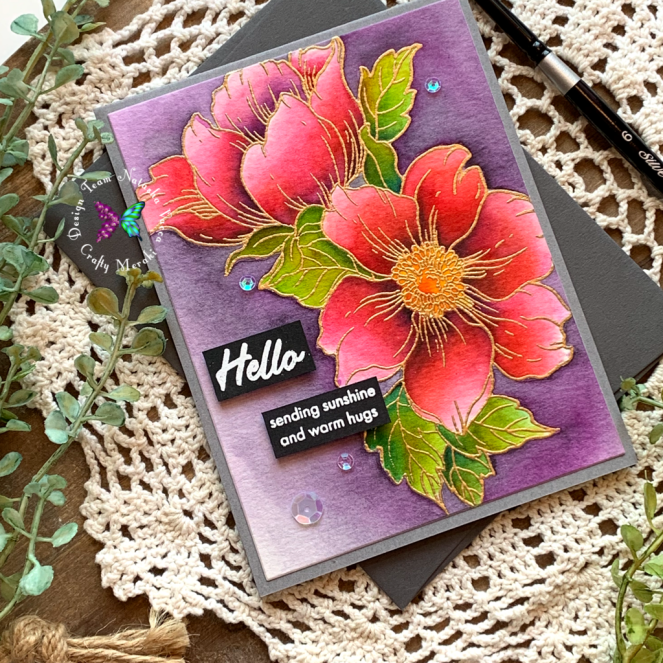
Happy Sunday crafty friends! I hope you are having a good day! I have been enjoying watercoloring over the last couple of days and truly enjoyed working with Statement Flowers. I recently became a DT member at Crafty Meraki and my teammates have continued to inspire me with their talent. I placed an order recently at Crafty Meraki and was so impressed with the items in their shop, kind service, and SUPER fast shipping! I hope you will check it out!
I started by stamping Statement Flowers using WOW embossing ink on Canson XL Watercolor Card stock. I used a gold embossing powder for my image. I started by taping down my image to a board and couldn’t wait to water color. I used 2 different mediums, Gansai Tambi water colors and Peerless water colors. My first layer of color was made using Gansai Tambi. I used a wet on wet technique to color. I let layer 1 dry over night. The next day it was so nice out here, I decided to watercolor on my deck! It was so relaxing! I decided to add more layers using my Peerless water colors. I love intense color, so I opted to use these! I used a variety of shades until my coloring was complete on my floral image! I used shades of red, pink, purple, and blue in each floral. On the leaves I used green, blue, and yellow.
Once the floral was complete I felt I needed a background around the image. Unfortunately this didn’t go as planned. I wanted a dark gray around my image…. I don’t think I did the best job cleaning my brush last time…. it came out purple! So I had to go with it! I ended up liking it, adding shades of purple and some dark gray around sections. In the end, my accident turned out ok! Hope you think so too!
I chose 2 sentiments from the set and heat embossed both using a white powder on black card stock. I mounted the A2 panel onto a gray card base and foam mounted each sentiment. I added a few clear sequins for added sparkle!
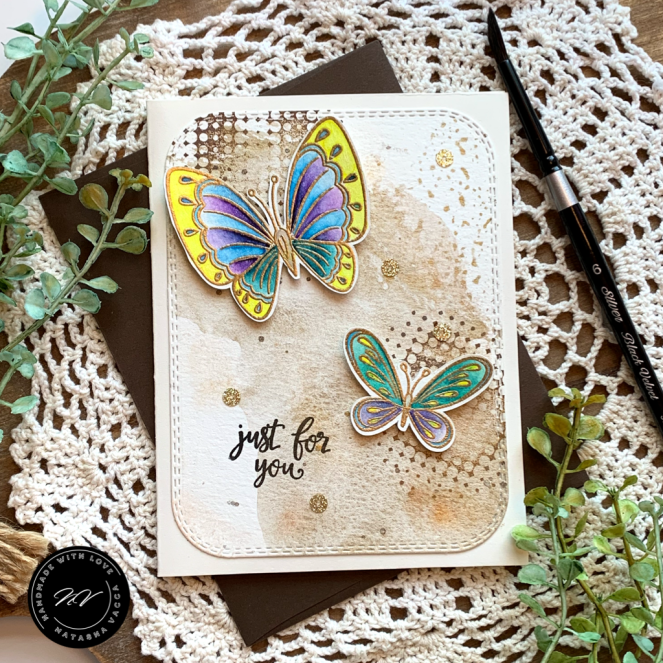
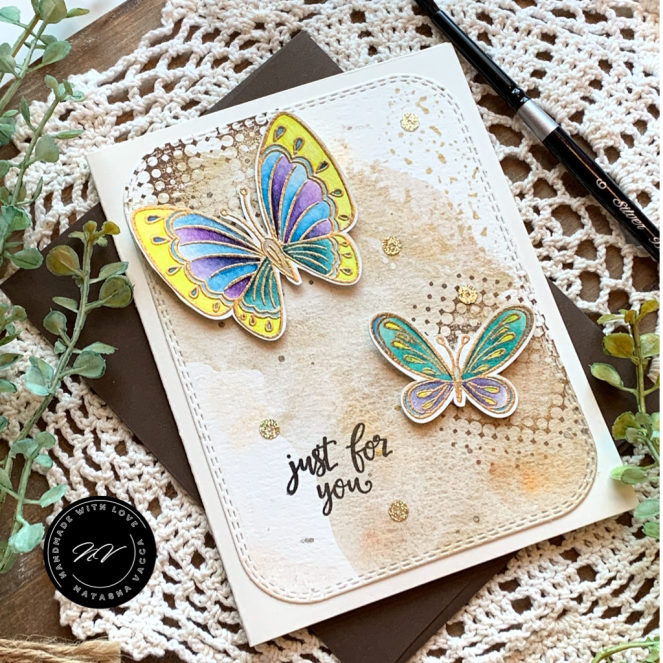
Happy weekend crafty friends! How was your week? I hope you had a great week! Today I am sharing my take on a “mixed media” style card! I love the style and I am always drawn to those cards with a mixed media style! So I decided to give it a try! Let me know what you think!
I started by stamping 3 butterfly images from the Hero Arts – New Butterfly stamp set. You can’t see the third one, but it is glued inside the card! I stamped 3 butterfly images onto Canson XL watercolor card stock. I used clear embossing ink by WOW and gold embossing powder by Ranger. I used my Gansai Tambi water colors to color each butterfly image. I used the wet on wet technique for my watercoloring today. Once my water coloring was complete I used Brea Reese glitter ink to add some extra shine. I wish my photos would capture all the sparkle! I then set these aside and worked to create my background!
I took out an A2 sized panel of watercolor card stock. I used 2 colors of Gansai tambi (Blush Gold and Gold) to create the background. I placed both of these colors on an acrylic block and added a spritz of water. I then “smooshed” the acrylic block onto the card stock, I completed this several times to achieve the look I was going for. I chose to use the block to allow me more control of where I was placing the ink. Once the panel was completely dry I used a stamp from the Vibes stamp set – Unity Stamp Company to add some texture using Distress Oxide Ink – Walnut Stain. I added a few black splatters, as well as Perfect Pearls in Gold and Bronze for added texture and shine. To complete my card I added a few gold glitter sequins.
I had fun creating my take on a mixed media card! I can’t wait to try this again! I am entering this card into the challenge over at the Simon Says Stamp Wednesday Challenge – Anything Goes (Hero Arts)
Thank you for stopping by! I am listing all the products I have used below. You can click on any of the links I have shared if you are interested in purchasing the products. The products listed are a compensated affiliate link, which means if you make a purchase I receive a small commission with no extra cost to you. I really appreciate your support.
Hi Friends! I am super excited to share that I am joining Crafty Meraki as a Design Team member. Crafty Meraki is a new online store with all of your favorite crafty supplies! Be sure to check out their store and while you are there don’t forget to check out the blog – so many beautiful cards to see by the Crafty Meraki design team!
Head over to Crafty Meraki blog to see how I created this card! I would love it if you stopped by there to share some love and meet the team!
Happy Friday everyone! I am super excited to be a part of Alex Syberia’s June release! I love Alex’s work as a card artist, as well as an artist of her own digital stamps! She truly inspires me as a card maker! Today I will be sharing 3 cards with you using her June release! You can see all of the release at her ETSY shop. Alex is also doing an Instagram hop with her guest designers this month, be sure to visit Alex’s Instagram page for an awesome hop full of her beautiful stamps, as well as tons of inspiration! Alex is giving away 5 – $10 gift certificates to her shop! Come join the fun!
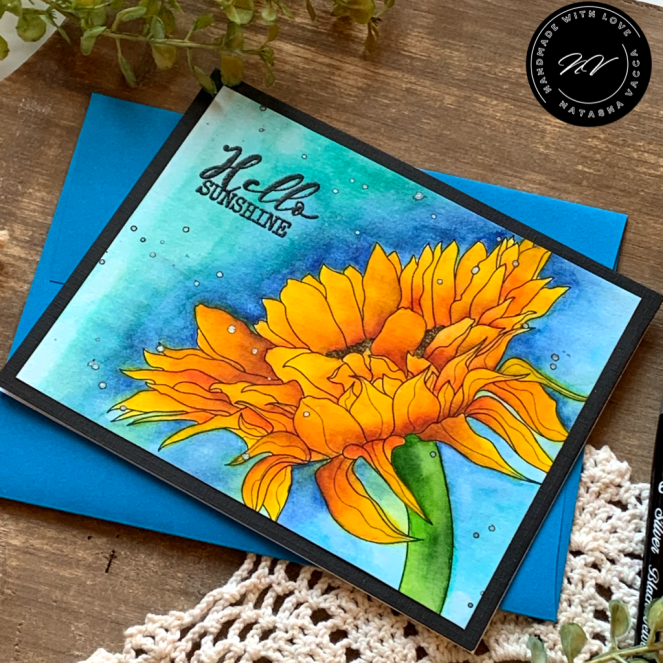
For my first card I am using the Sunflower close up card panel. I LOVE SUNFLOWERS, so I was so excited to work on this card!
I started by printing the card panel on Canson Mixed Media paper. This image was ready to go as a card panel, so I was ready to being my watercoloring! I love making bright cards and I went with BOLD colors and a BOLD background on this one! I used peerless watercolors on the sunflower stamp, as well as the background around my sunflower. I worked in layers on this card and waited for the colors to dry, before adding in another layer of color. I continued this process until my sunflower was complete.
I then followed the same process for the background around the sunflower. I have to admit I did have a few spots that the watercolor ran… but in the end I’m liking all the color! I hope you do too! I stamped the sentiment – Hello Sunshine (Unity Stamp Company – Hello Sunshine Girl) in Versafine black ink and heat embossed it using a clear powder. I added a few black metallic watercolor splatters and mounted the panel on an A2 card base.
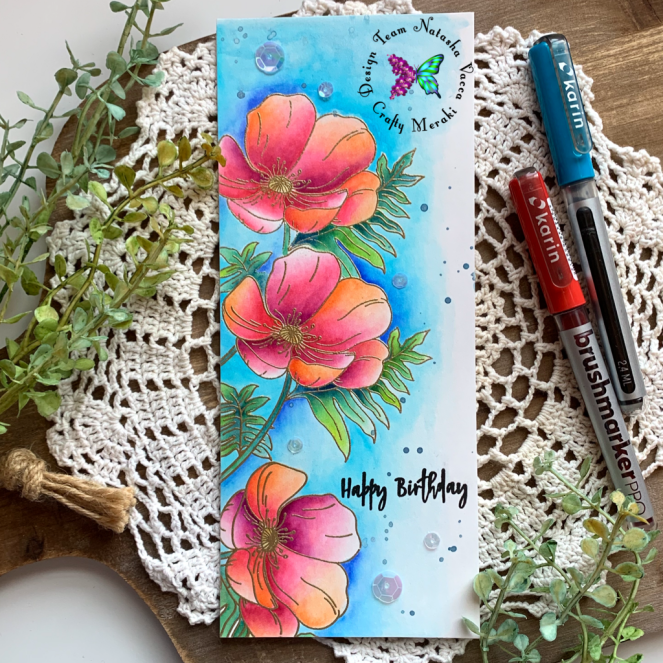
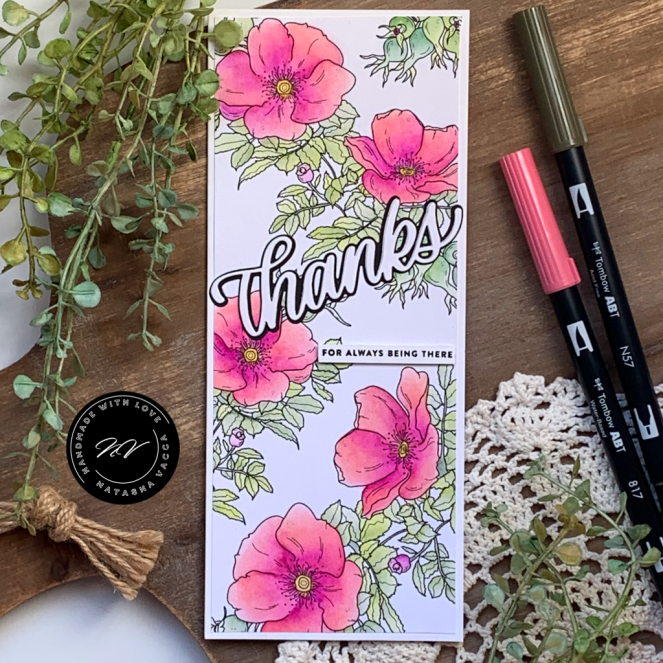
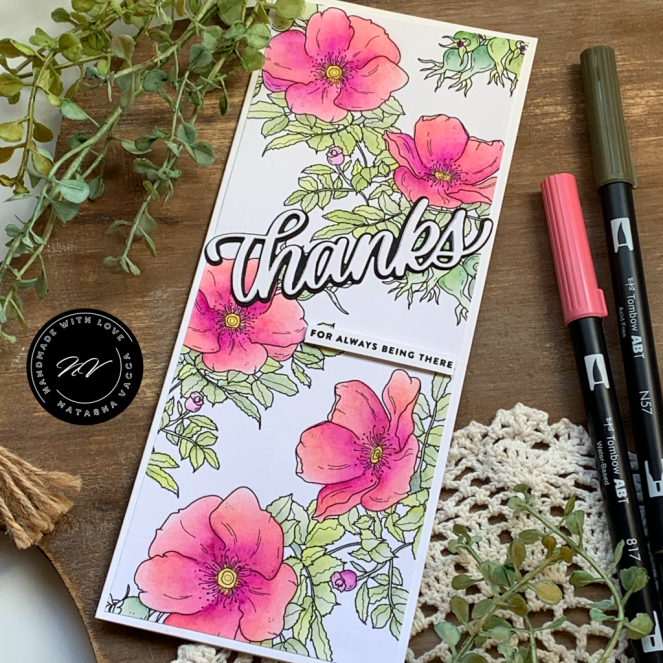
I am loving slim line cards – how about you? For my 2nd card I used the Dog Rose Ready Slime line card panel. I love that this panel was ready for me to create and add all the fun color!
I am using Canson Mixed media paper for my stamped image on this card as well. I used my Tombow Dual brush pens. I wanted to create a softer color palette on this card. Between each layer I let the panel dry, then added more color, until it was complete! I then die cut the Big Thanks die – Simon Says stamp. I die cut the black – thanks 1 time and the white 3 times, for added dimension. I then adhered these together and set this aside to dry under an acrylic block. I stamped the sentiment – For Always Being There from the same set (Big Thanks – Simon Says Stamp). I adhered the floral panel to a slim line card base and adhered both sentiments, the smaller strip is adhered with foam adhesive.
Here is a closer look….
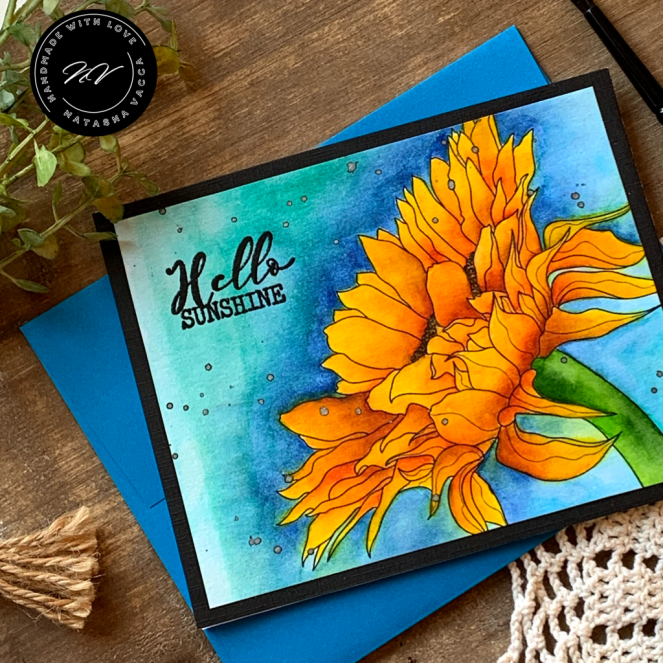
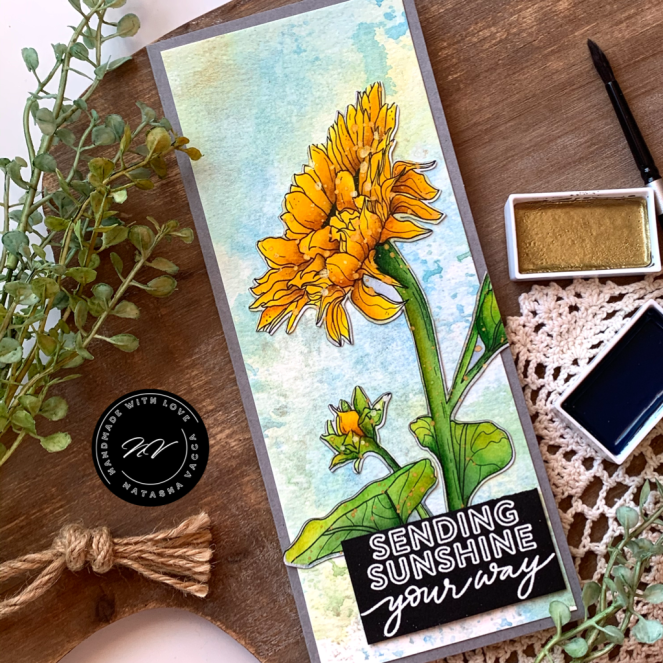
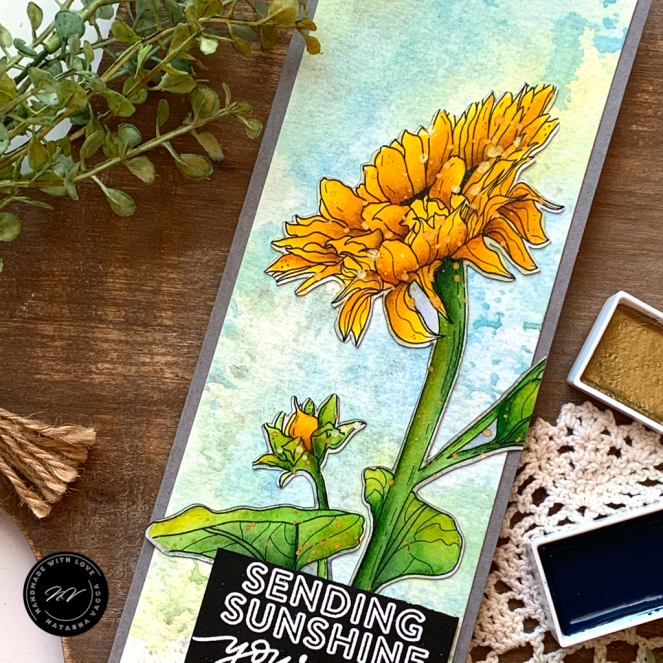
For my last card – I used the Happy Sunflower Stamp. I did work with this image in word a bit, as I wanted to create a slim line card with this stamp as well. Once my image was ready, I printed this on Canson Mixed Media paper and watercolored this image using Peerless Watercolors.
I loved watercoloring this image! I followed a similar pattern as shared with the 2 cards above, giving time to dry between layers. Once my flower was done I set the panel aside to dry. I then started to work on my background the panel. I had so much fun with this… I used my Gansai Tambi watercolors to create the effect using yellow #43, blue #62, #63, gold #91, and White #906. I put all the colors on my glass mat with a little water and “smooshed” the paper on the glass mat. I then dried the background using my heat tool. I completed this process several times until I had the colors I was looking for. I love the added gold sparkle too! I placed the background under some heavy books for the night to “flatten” the panel.
I then used my Brother Scan and cut to “fussy” cut the sunflower. Then I added gold & white splatters to the sunflower. I may have added a few too many! Ooops! I also stamped the sentiment – Simon Says Stamp on black card stock using white embossing powder. Once everything was dry I put my card together and adhered the sentiment with foam tape for a little extra dimension.
I hope you enjoyed seeing 3 of the new June Release stamps from Alex Syberia! Be sure to visit her ETSY shop for the June release and more beautiful stamps!
Check out Alex’s BLOG for some amazing inspiration as well!
Don’t forget to join the Insta Hop – be sure to comment for a chance to win a gift certificate to her shop!
Hi everyone and Happy Friday! I hope you had a great week! The week flew by for me! I am super excited as my daughter graduates this weekend from high school! It’s an exciting time for her and we couldn’t be more proud of the young lady she is becoming!
It’s an exciting time over at Unity stamp Company – there are many beautiful releases, including several digital stamps that are now red rubber! I am excited to share my cards with you today!
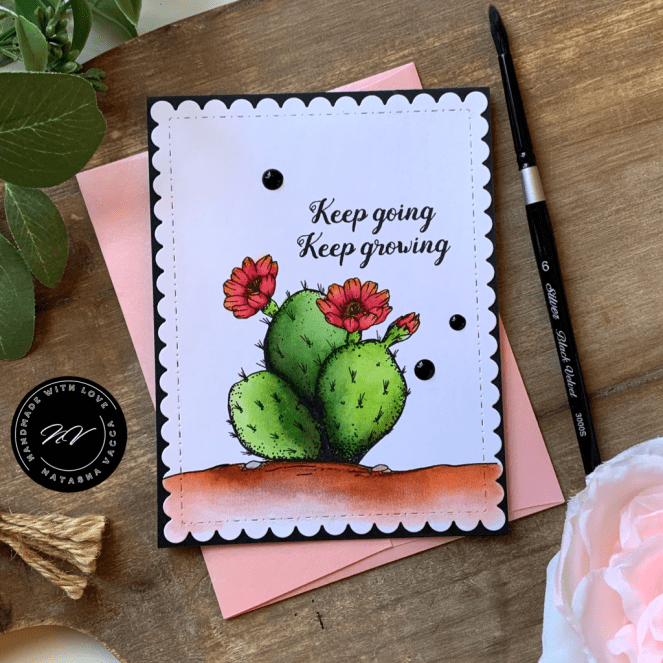
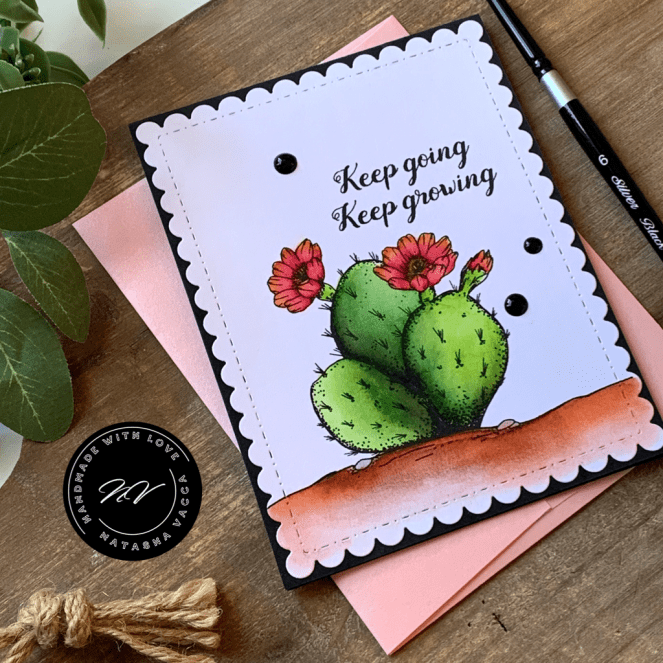
My first card is using the new stamp set Stick Together. This set is illustrated by my friend Sandhya Iyer! I love this set, the cacti is beautiful and the sentiments in this set are AMAZING! A great way to send a sweet message to your friends! For this card I started with my image on Canson Mixed Media paper. I used my peerless watercolors today for this card. I love these colors as they are super pigmented. I always start from lightest to darkest and build color until I have the depth I am looking for. I let each layer of color dry in between for the best results.
Once my watercoloring was complete, I stamped the sentiment Keep Going Keep Growing. I die cut my panel using a Gina Marie Designs Nested Scalloped Rectangle die. I adhered the panel onto a black card base. I then added Nuvo drops in black. I love this set!
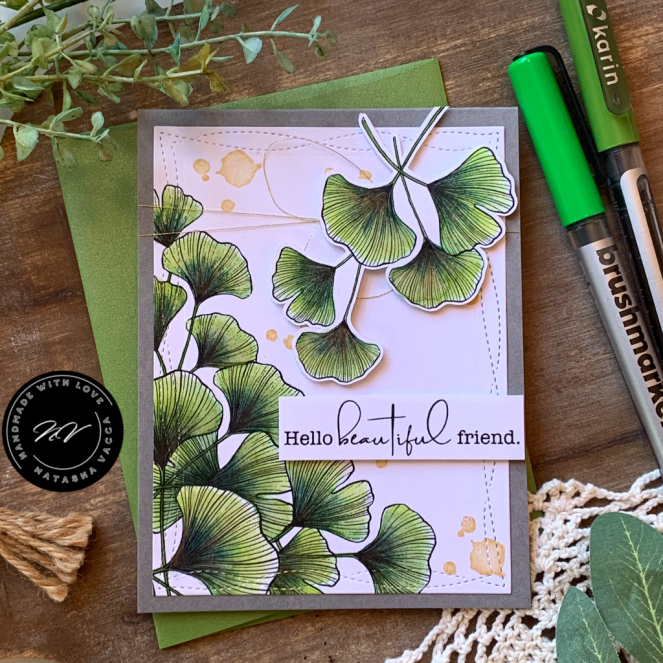
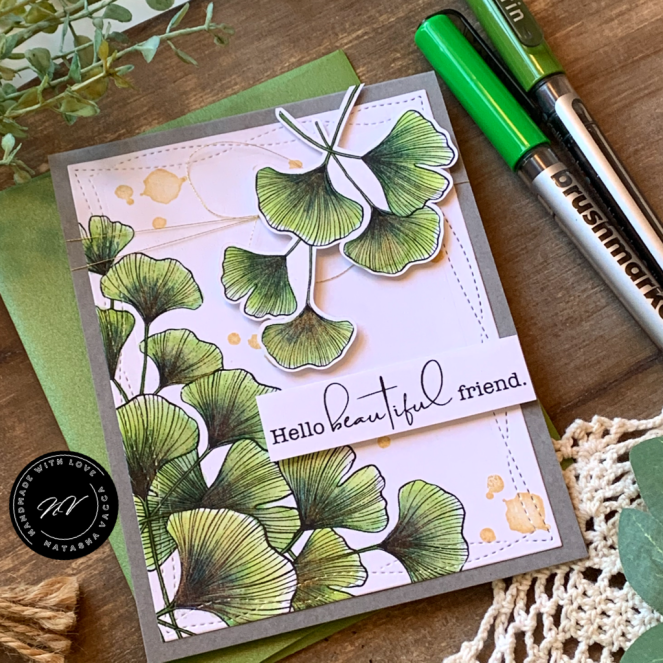
For my next card I am using the new Gingko Greetings. I am so excited this stamp just released in red rubber! This set is also illustrated by my friend Sandhya Iyer. This set has a large corner stamp and a smaller individual stamp too, as well as 3 beautiful sentiments.
I started by stamping the large corner Gingko leaf and then the smaller leaf image as well. For this card I am using my Karin markers! I am loving the vibrancy of these markers! They are so fun to work with! I used the following colors (lightest to darkest): lime green, grass green, olive green, and indigo blue. I added some blue shading in the corner of each leaf using a dark blue pencil.
I then added a few splatters in a gold pigment ink, the splatters are from the May 2020 KOM. I then die cut the panel using a Gina Marie Designs Wonky Stitched Rectangle die. I adhered the panel onto a gray card base. I used a gold thin thread to add some extra interest to the card and adhered the small gingko leaf in the top corner using foam adhesive. I added the sentiment Hello Beautiful Friend with foam tape as well. I can’t wait to use these leaves again!
During the pandemic Unity released digi stamps, many of which are turning into red rubber! You can see the latest release here! One of my favorites is the beautiful Jesus and Germs set! Here is a card sample I made using the digital version, now it’s in red rubber!!!!! So happy about this being released!
I hope you have a great weekend! Be safe and healthy my crafty friends! I truly appreciate you stopping by, it means so much to me!
Thank you for stopping by! I am listing all the products I have used below. You can click on any of the links I have shared if you are interested in purchasing the products. The products listed are a compensated affiliate link, which means if you make a purchase I receive a small commission with no extra cost to you. I really appreciate your support.
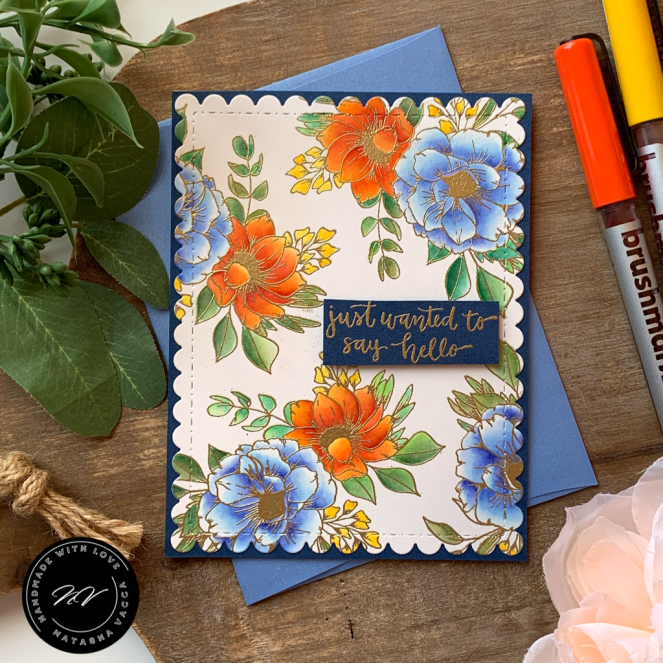
I started by stamping the floral cluster on Bristol Smooth Card stock. I wanted to create a floral background for my card. I stamped using WOW embossing ink and Brutus Monroe Gilded Gold Embossing powder. I created a random pattern of floral clusters all around my card base. I then colored in each of the flowers using my new Karin Markers. This is my first card using these markers and I LOVE them! They are so bright and blend easily on the Bristol paper. My color combinations are listed below:
Leaves: Apple, Lush Green, Cinnamon
Blue Flower: Arctic Blue, Indigo Blue
Red/Yellow Flower: Pale Orange, Orange Red, Gold
Yellow Leaves: Gold
Once my coloring was complete I cut out the panel using the Scalloped Rectangle Die – Gina Marie Designs. I then cut down a blue card stock to A2 sized and adhered this to my card base. I then glued down the floral panel on top of the blue. I stamped the sentiment from the stamp set in the same gold embossing powder and foam mounted the sentiment strip onto the card. I hope you enjoyed this card and how to use the floral cluster to create your own background!
Thank you for stopping by! I am listing all the products I have used below. You can click on any of the links I have shared if you are interested in purchasing the products. The products listed are a compensated affiliate link, which means if you make a purchase I receive a small commission with no extra cost to you. I really appreciate your support.
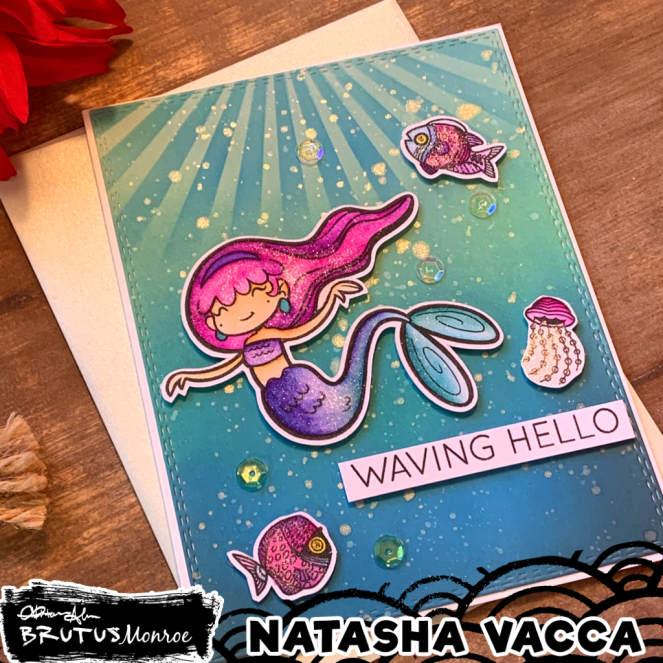
Hi everyone! I hope you had a nice weekend! The sun is shining and it feels like summer! I love it! Hope this post finds you doing well! I had a lot of fun creating this card using the adorable mermaids, these are an add on to the sold out Inspiration box at Brutus Monroe.
I started with all of my underwater images on Canson Mixed Media paper. I colored these in using my Tombow dual brush pens. I wanted to create a bright mermaid with beautiful pink hair. I used a variety of colors and continued to add colors until I achieved the bright colors I was looking for. I set these aside to dry. I started to work on my background for my card. I used an A2 sized panel of Bristol Smooth card stock. I blended several layers of distress oxide ink, from darkest to lightest: black soot, broken china, cracked pistachio, and tumbled glass. I continued until I achieved a smooth blend. I added a rays stencil at the top of the panel to create the sun shining down into the water using the broken china ink.
I added water to the panel to create splatters. I then added gold splatters to the panel as well. I love the added gold to the underwater scene. I then used my scan and cut to cut each of my images. I then added sparkles to each of the images. I then adhered the A2 panel onto a card base and adhered each of the images, as well as the sentiment strip using foam tape. Hope she makes you smile today!
Hi friends! I am back to share a couple cards with you using 2 of the latest releases at Unity stamp Company! I always get excited to see the newest releases and they are all amazing! You can see them all here – Unity Stamp Company. Today I will be sharing 2 cards with you!
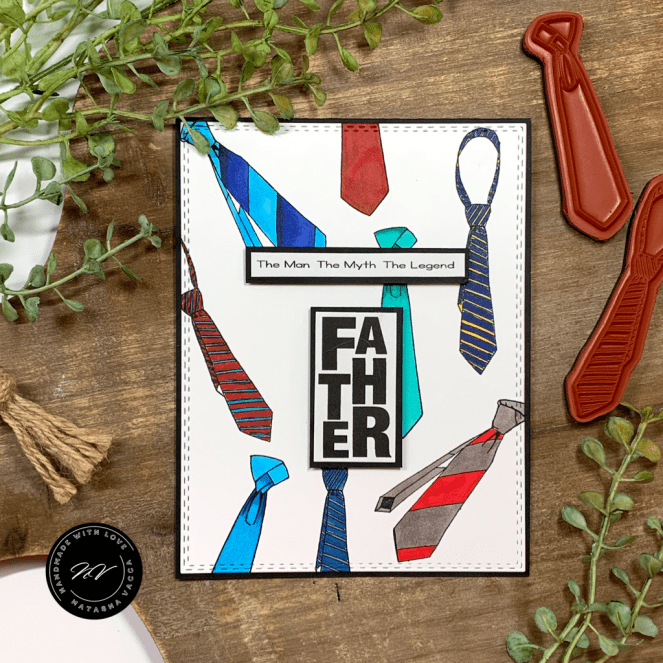
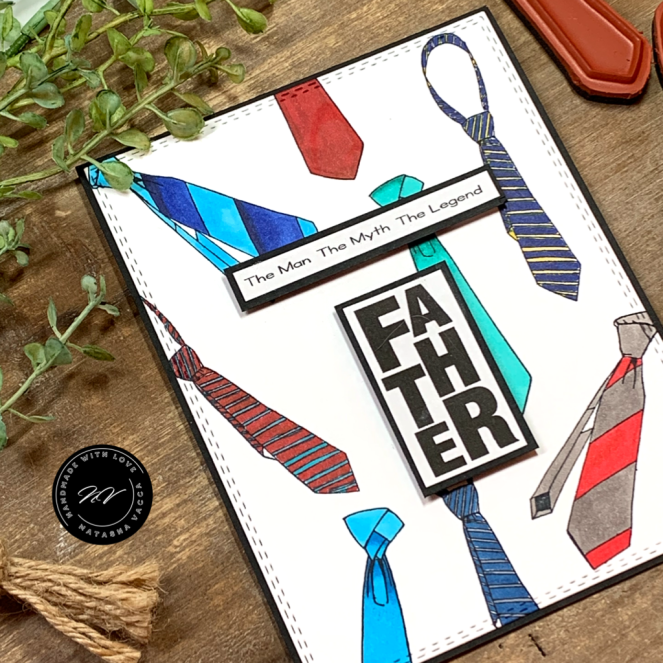
For my first card I am using 2 sets from Unity Stamp Company Favorite Dad and the ties in my card are from the May 2020 Kit of the Month. The Favorite Dad set comes with 13 stamps and this BOLD Father stamp is just amazing. I started by stamping the 3 different ties in a random pattern on Neenah 80 lb. card stock using Memento black ink. I used alcohol markers to color these ties in. I did very little blending for this card. I used 2 sentiments from this set the large Father stamp and the awesome sentiment – The Man, The Myth, The Legend. I love this one – it just makes me smile! I adhered the panel to a black base and used foam tape behind them to add dimension. I die cut my tie panel using a Gina Marie Designs die – Double Stitched Rectangle Die. I used a black card base and then adhered my 2 sentiments and my card was complete!
For card 2 today I am using Passing the Storm – by artist Phyllis Harris, Unity Stamp Company. I am loving the whimsical feel of each stamp Phyllis creates – they are truly beautiful and they remind me of a children’s picture book! I chose to watercolor this card using my Peerless Water colors. I used Canson Mixed Media paper to work on today.
I loved the sentiment in this set – Waiting for the Storm to Pass…. so I decided to create a Rainbow theme for this card. I had a lot of fun coloring this image. It is truly beautiful and so whimsical! Once my watercolor was complete, I added perfect pearls in gold on the sun rays for added shine. I had a hard time capturing the shine in the picture. I also used my white gel pen to add polka dots to her pink rain boots! I set it aside to dry. I used a piece of patterned paper in my stash by Graciellie Design. This was a recent gift in my kit of the month and I just love this paper! It is so thick and pretty! I die cut it to create a panel of rainbow dots. I adhered this to a black card base. Once my stamped panel was dry I die cut this into a rectangle to fit inside my rainbow dot panel frame. I die cut the same sized rectangle out of foam and adhered this to the back of my stamped panel and then glued this down to the card base. I adhered the sentiment and my card was complete! I hope this card makes your dry brighter too!
I hope you enjoyed these 2 cards today! I had a lot of fun working with these new sets! Be sure to check out all of the new RELEASES, as well as their summer inventory SALE!!!!! I have so many favorites in the SALE…. check it out here!
Thank you for stopping by! I am listing all the products I have used below. You can click on any of the links I have shared if you are interested in purchasing the products. The products listed are a compensated affiliate link, which means if you make a purchase I receive a small commission with no extra cost to you. I really appreciate your support.
Hi everyone – I am excited to be back to share the beautiful new release from Rachel Vass Designs – Summer Bloom. I love this bold flower! This beautiful new set comes with a shaded version of the summer bloom, as well as unshaded! How fun is that! You can visit Rachel’s shop here
For today’s card I chose to work with the shaded summer bloom. I wanted to create a large floral image as the focus of my card. Once it was set to the size I was looking for I printed the image on Canson Mixed Media paper. I used my peerless water colors to color in my flower. I used a variety of shades today. I am loving these new water colors and how bright they are. Once my image was complete I set it aside to dry fully.
To create my card panel I chose to work with patterned paper from my stash. The papers I am using today are an older set from Stampin Up, it is double sided. I trimmed the side panel and used a punch to create the scalloped border on the pink. I then chose a sentiment from Simon Says Stamp and stamped this on gray card stock and heat embossed this using white embossing powder. I was then ready to assemble my card. I used my scan and cut to trim the floral. I used foam tape to pop up the floral, as well as the sentiment.