Simon Says Stamp – Let’s Connect NEW RELEASE!!!

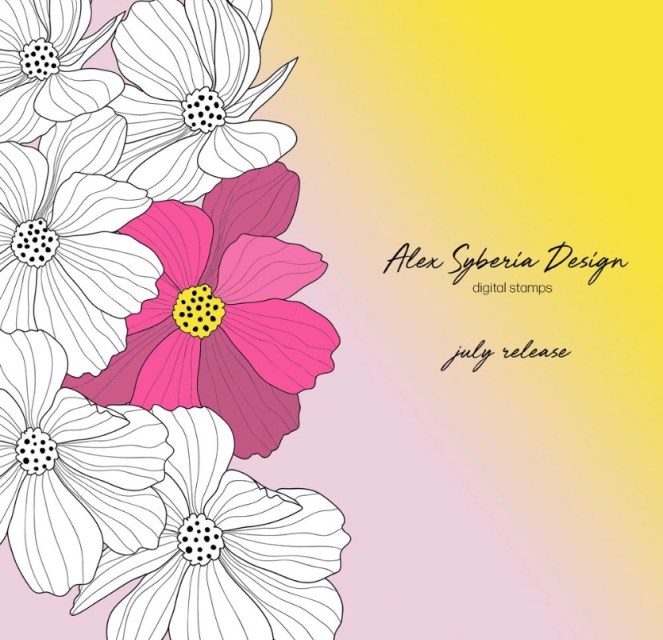
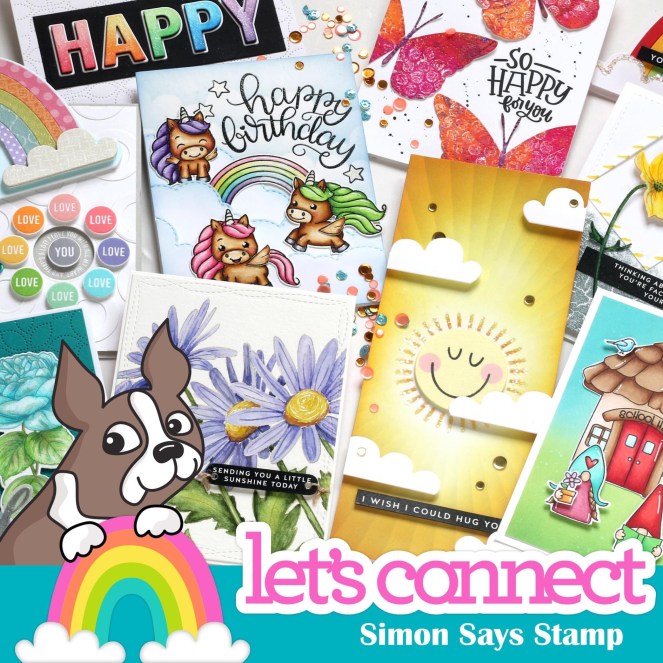
Hi everyone I am super excited to share with you the newest release from Simon Says Stamp. Simon’s newest release is called Let’s Connect. This release is full of amazing new stamp sets, dies, stencils, and sequins! I am super excited to share one of them with you today. You can see all of Simon’s latest release here. It’s an AWESOME release!!!!! For my first card I will be using the new background stamp called Reverse Crackle background. Let’s get started.

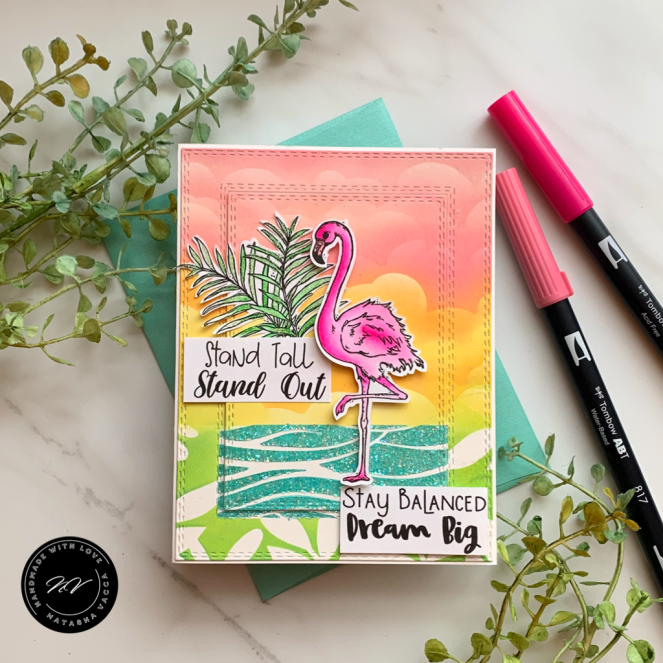
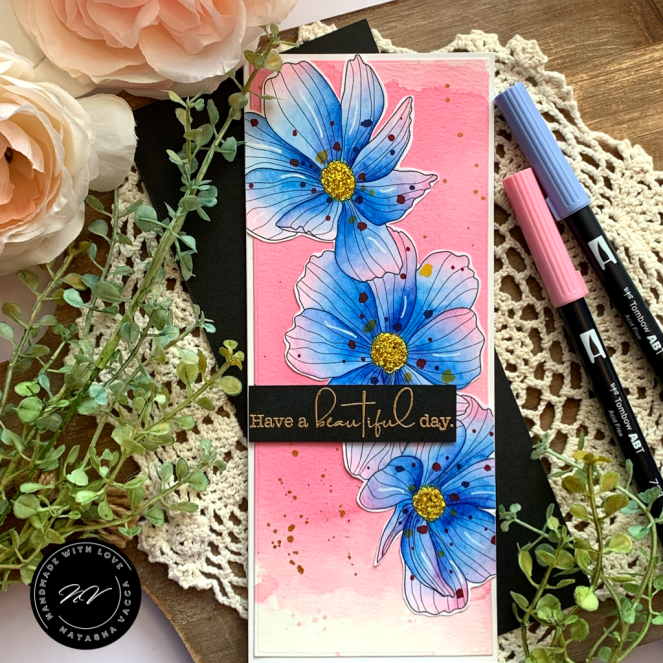
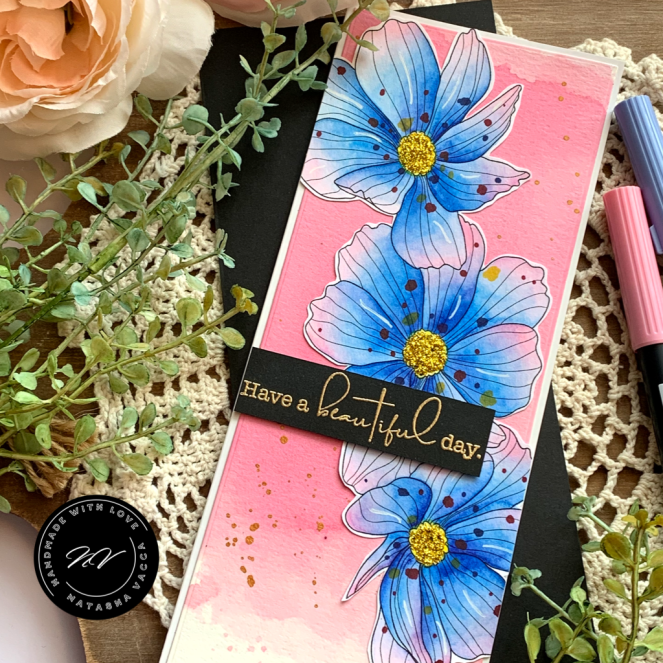
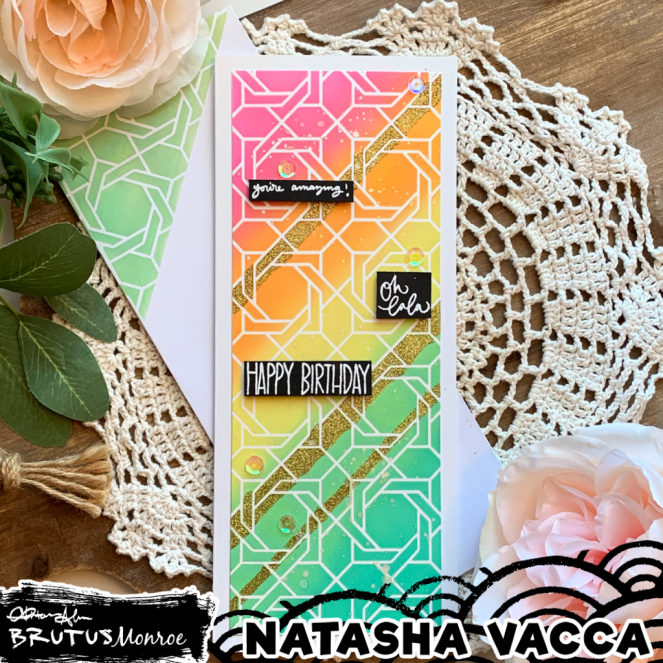
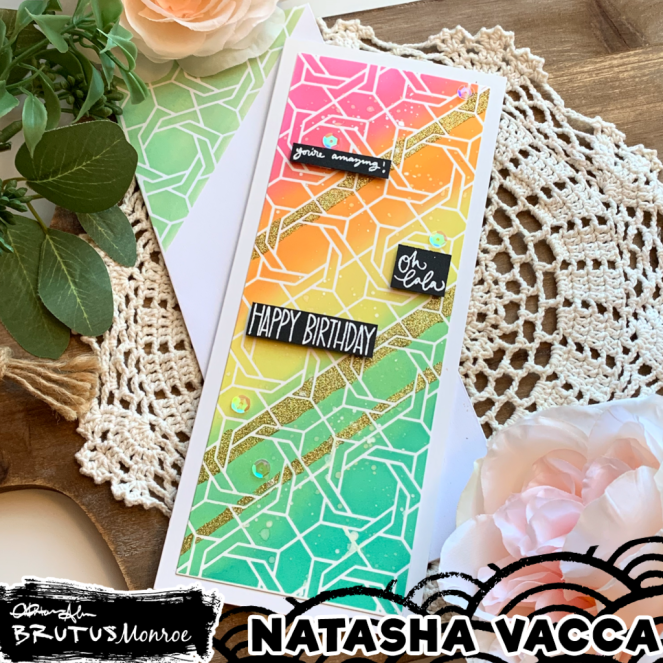
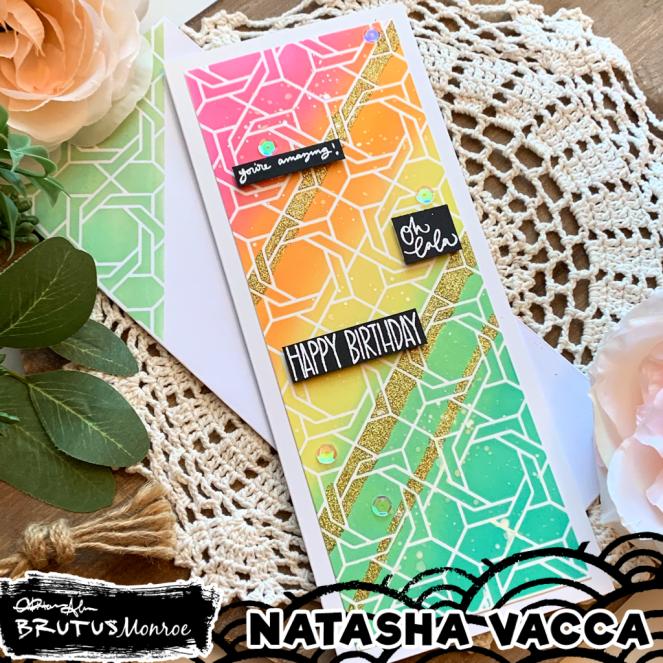
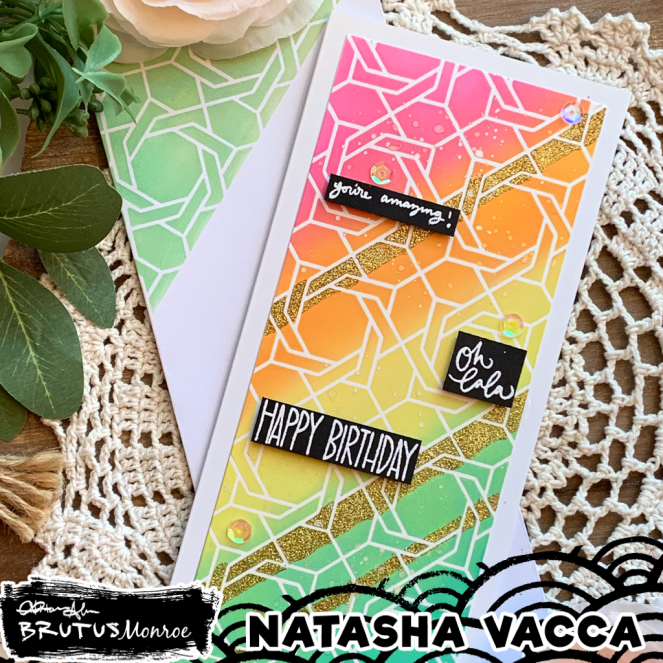
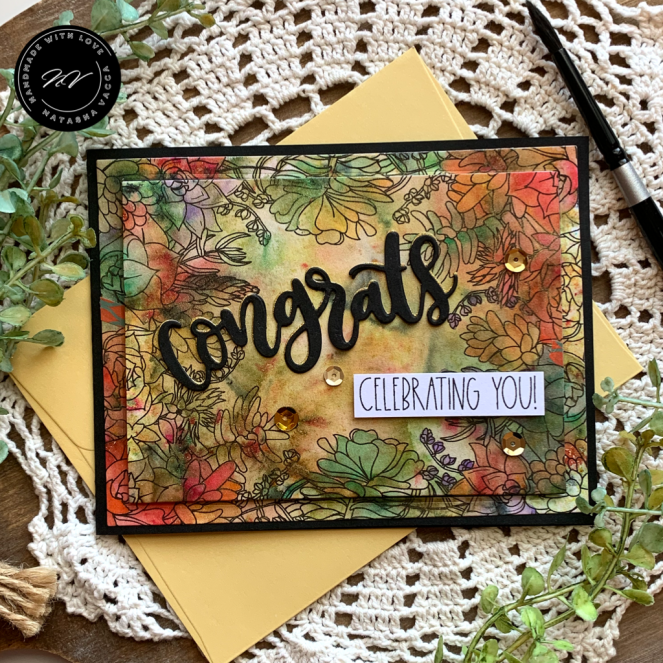
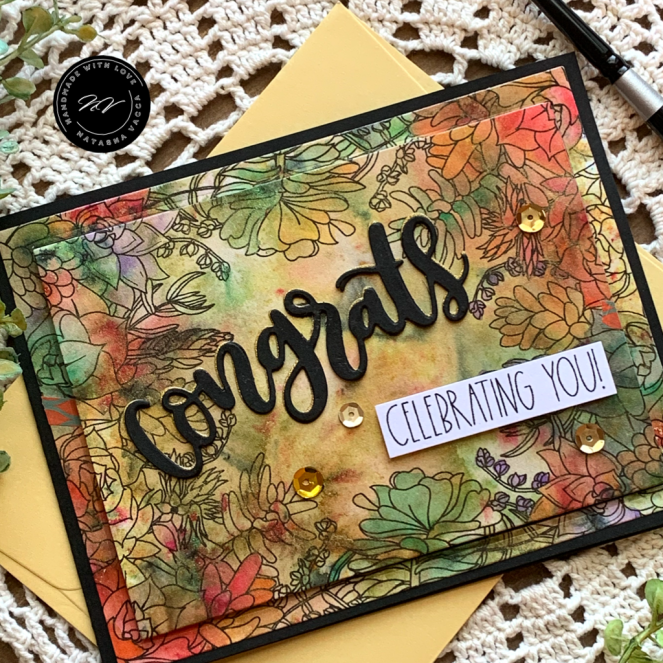
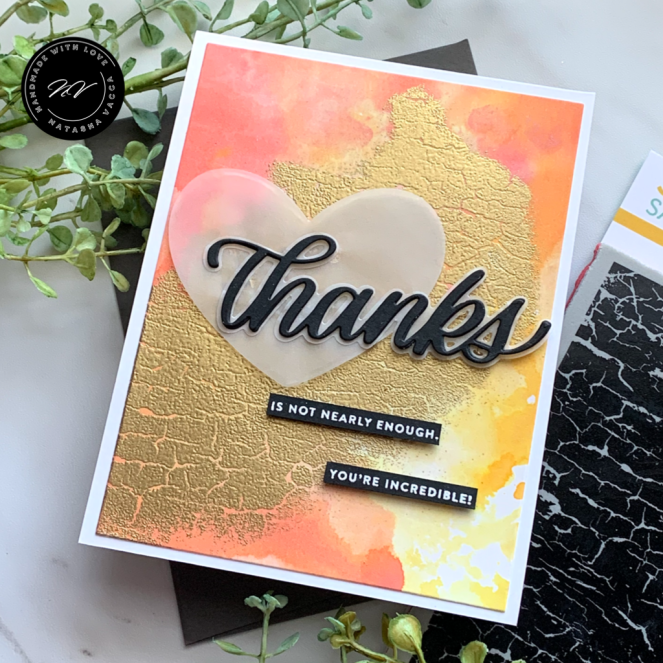
For my first card using the Reverse Crackle Background I wanted to focus mainly on using the background stamp only with some additional sentiments/die cuts added. I started by creating an ink smooshed background using Distress Oxide Inks. The colors I used are Abandoned Coral, Picked Raspberry, Spiced Marmalade, and Squeezed Lemonade. I placed small amounts of color on my gel press plate then spritzed the color with water. I then laid a piece of Bristol smooth card stock on top and used my brayer to move the color around. I completed this two times then set the panel aside to dry.

Once my card panel was dry, I used my embossing buddy and covered the panel. I then used clear embossing ink from WOW on my background stamp. Then I stamped the image on top of my inked panel. I did not cover all of the background, as I wanted to create a mixed media effect. I used my Misti tool and stamped the background twice. I then used a paint brush to remove some of the unwanted areas of the stamped image. I then used gold embossing powder and heat set the stamped image.

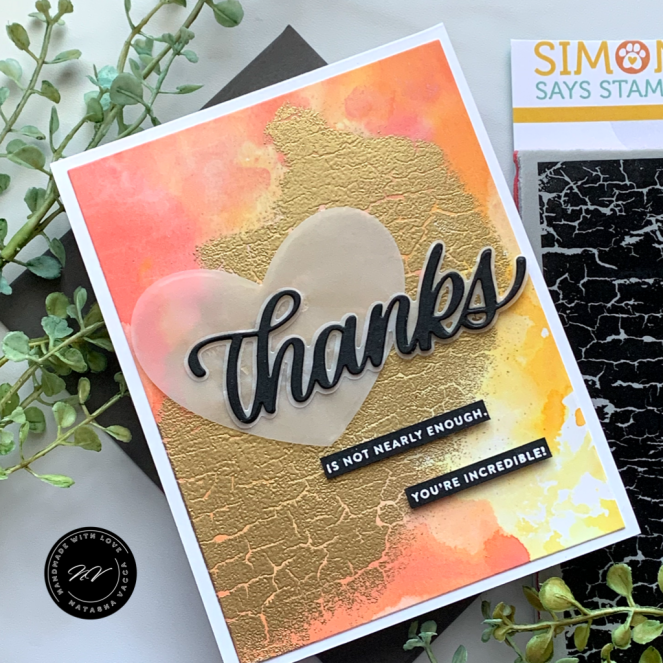
I was then ready to work on the sentiments. I chose to use the Simon Says Stamp Big Thanks Words stamp set & coordinating die set. I die cut the large outer thanks using vellum and then die cut two words of thanks using black card stock. I then adhered these together. I used a sentiment from the big thanks words set and heat embossed it on black card stock using white embossing powder. Then I adhered everything together using foam tape for added dimension.

I hope you enjoyed seeing my first card using one of Simon’s latest releases. I have two more cards that I will be sharing where I am using the background stamp along with several of my favorite Simon says stamp sets. I will be back soon!

Supplies Used:

Crafty Hugs,

Natasha

Happy Halloween – Brutus Monroe Stamp of the Month

Hi everyone! I hope you had a great weekend! I wanted to stop in quickly to share a project I made using Brutus Monroe – Stamp of the Month. This month the stamp is an adorable Jack-o-Lantern! Isn’t it cute! The stamp of the month is one of the monthly subscriptions Brutus Monroe offers. Each month you will receive a 2×3 stamp set for $5 which includes shipping – check it out here!

I started by stamping my pumpkin image on Bristol Smooth card stock. Today I am using my zig clean color brush markers to do the coloring. On the coloring today I started with a darker shade and then blended out with a lighter shade of color. I din’t use any water today. This was a fun and quick image to color! Wouldn’t this little stamp be adorable as a background for your card? I may need to try that! Once the image was colored, I fussy cut the stamped image and set it aside.

I then used a Brutus Monroe slim line stencil to create the background. I used the Star Wreath from collection A. I used a spray adhesive for my stencil and then placed it on my card panel. I ink blended using Distress Oxide in Twisted Citron. I love the bright green of this color combined with the purple and orange. I then did the same in the top corner of my card panel. I added a few splatters using metallic black watercolor paint. I heat embossed the sentiment on on the black card stock. I then adhered my card together and foam mounted the pumpkin. I added a few purple drops to complete this card.

I hope you enjoyed seeing the stamp of the month! It sure is cute!

Last week Brutus Monroe released new slime line stencils – you can see the bundle below.

Thank you for stopping by! I have listed all the products I used within my post. You can click on any of the links I have shared if you are interested in purchasing the products. The products listed are a compensated affiliate link, which means if you make a purchase I receive a small commission with no extra cost to you. I really appreciate your support.

Supplies Used:

Have a great night! Crafty Hugs,

Natasha

One Layer Florals – Crafty Meraki

Hi Friends and hope this post finds you doing well! I am excited to be up on the Crafty Meraki blog today sharing a one layer card using MFT – Fresh Cut Flowers. Come join me on Crafty Meraki – click here I will be sharing card details on the blog, as well as all the materials I used. Here is a quick peek of my card!

I hope to see you over at Crafty Meraki!

Did you know at Crafty Meraki they have free shipping for orders over $50 – come check it out!

Have a great day crafty friends!

Natasha

Stand Tall – Unity Stamp Company

Hi Friends – Hope you had a great weekend! It was a very sunny, hot, and humid weekend here! I love the sunshine… so it felt good! I did have a little more crafty time with the added heat this weekend! Today I am sharing one of the new releases from Unity Stamp Company – Be a Flamingo! I love this set – this set makes me dream of a beach vacation! Be sure to check out the Unity website – for the awesome releases this weekend! There is a set for everyone… Fall, Winter, and a beautiful holiday background stamp too! I have linked them all below!

Let’s get started! I started by stamping the flamingo. I used my Tombow brush pens. I did very simple coloring for the flamingo. I only used 2 colors. I also colored in the palm leaves using a green shade, leaving this coloring very simple. I did add some glitter drops on top of the leaves too. Once my coloring was complete I set the flamingo aside and started to work on my background! I was excited to use my new stencil, a recent purchase from Unity Stamp Company. It is a cloud and wave stencil all in one! I was so excited to use this stencil. I used the following Distress Oxide ink colors for the clouds: Picked Raspberry, Worn Lipstick, Spiced Marmalade, and Squeezed Lemonade! I had fun making clouds – this was new for me! Once my clouds were complete I masked a section on the bottom to add leaves. I created a rectangle shape using washi tape. I used a Simon Says Stamp stencil – Leafy Frames with Lucky Clover and Twisted Citron I wanted to add these leaves to add a tropical feel.

Next up was creating the water and how fun to use this 2 in 1 stencil. I moved my washi rectangle to create the waves. I used Distress Oxide in Salty ocean. I then added Glitter Glaze on top for added shine! Once everything was dry I die cut the card base using the largest of the Gina Marie designs double stitched rectangle. I then used a smaller one for the middle of the card. I then adhered the outer frame to my card base and used foam tape to adhere the middle portion of my card. I glued down the sentiments (this is one large sentiment and I split it into 2 sentiments). I used foam tape for the flamingo too!

I had a lot of fun using this new set! I love the beach, so this set just makes me smile!!!!!!

Be sure to stop by Unity Stamp Company – I have linked each of the new releases below!

Thank you for stopping by! I have listed all the products I used within my post. You can click on any of the links I have shared if you are interested in purchasing the products. The products listed are a compensated affiliate link, which means if you make a purchase I receive a small commission with no extra cost to you. I really appreciate your support.

A few other AWESOME sale categories in the shop include:

Supplies Used:

  • Stamps:Be a Flamingo
  • Paper: Canson Water Color Cardstock, Bristol Smooth Card stock
  • Coloring Medium: Tombow Brush Pens, Distress Oxides (colors shared above)
  • Other: Cloud and Wave stencil

Thank you so much for stopping by! I hope you have a great start to your week!

Crafty Hugs,
Natasha

Happy Release Day – Alex Syberia Design

Hi Friends – I am so excited to share 2 cards I created with Alex Syberia’s July release! The release is so beautiful, you can see the July release and all of her digital stamps in her ETSY shop – be sure to check them out! To celebrate Alex’s new release she is hosting an Instagram hop! I hope you will come join us! You will be able to see all of the beautiful new stamp sets, be inspired by the designers, as well as have a chance to win a gift certificate to her shop! I hope to see you there!

For my first card I am using the Plumeria Card Panel digital stamp. I started by printing my image on Canson Mixed Media paper. I love this card panel image, it is all ready to go to create an A2 sized card. I did want to also share when I work with digital stamps I often print several stamps on one sheet of paper, this is a great way to create multiple cards and to make sure you use a full size piece of paper.

I taped down my panel to my work surface/board and was ready to watercolor. I used a combination of Zig clean color brush markers and Peerless Water colors for this stamped image. I used the following colors:

  • Leaves: Light green 041, yellow green 053, Olive Green 043, Persian Green 033, Peacock 038
  • Flower: Yellow 050, Scarlet Red 023, Dark Pink 027
  • Stem: Mid Brown 065

I worked in layers and allowed my coloring to dry between. Once my coloring was complete I set this aside to dry. To create the background I used an A2 size piece of Bristol Smooth Card stock. I used Distress Oxide in Black Soot to create the background. I added Perfect Pearls as well for added shine. For my sentiments I used the Hugs die from Simon Says stamp and The Gray Muse – You Grow, Girl sentiment strip. I layered the hugs die cut 3x for added dimension. I then fussy cut the stamped image on the top and glued this to my oxide ink blended background. I had fun with this one – it reminds me of the beach!

For my second card I am using the Beautiful Flowers digital stamp set – slimline panel. As soon as I saw this stamp, I thought of Alex’s dot coloring! Which I truly love and can only hope to learn this technique more over time. You can see card examples by Alex using this technique – I am blown away by her creativity! So here is my attempt….

I printed the slim line panel on Canson Mixed Media paper. To color the 3 floral images I used my Tombow markers. I used: Pink 723, Blue 553, as well as added some Peerless watercolors to deepen the blue color. I completed just a couple layers of color on this card. I set the floral image aside to dry prior to adding the dots.

To create the background I used a piece of watercolor cardstock a little larger than a slimline base. I used my Gansai Tambi watercolors: Rose Madder 34, Rose Madder Deep 36, and some Tattered Angels Glimmer Mist (Fuschia) to create the background. I added a few gold splatters to the pink base as well. In person you can see the added shine. I then chose 3 colors of alcohol markers and attempted some dot coloring! I have a log way to go, but it was fun! On Alex’s You Yube channel she does show how she uses this technique! I watched it before trying it! I wanted to add a little extra shine, so I used Stickles in gold and placed this in the center of each flower and added gold glitter on top! It’s super sparkly in person! I then chose the Birthday sentiment from – Gingko Greetings – Unity Stamp Company. I heat embossed this in gold on black cardstock. I adhered my card together and foam mounted my sentiment! I hope this card will brighten someone’s birthday!

Supplies Used:

Thank you so much for stopping by! Have a great day and weekend!

Crafty Hugs,

Natasha

Happy Birthday – Slimline Style!

Hi everyone! I am excited to be back! I hope you had a good weekend! I took a few days off from crafting. I got stung by a bee in my hand and with the swelling I was unable to color! I am happy to be back! I hope this post finds you doing well! Today I am sharing a slimline card using one of the stencils in Collection A.

I started by spraying a temporary “glue” spray to the back of my stencil and then placed the stencil on Strathmore Bristol Smooth cardstock. To create the background I used Distress Oxide inks to create a rainbow background. I used the following oxide colors:

  • Picked Raspberry
  • Spiced Marmalade
  • Squeezed Lemonade
  • Cracked Pistachio
  • Peacock Feathers

I used my blending brushes to complete the process and continued until I had a smooth blend. I then added some splatters to the background and once dry I felt I needed a bit more visual interest on the background. I then used washi tape to create 3 diagonal stripes. I used Brutus Monroe Glitter Glaze in Gold to create the stripes. I then removed the stencil.

I then trimmed my panel using a slimline die – Gina Marie Designs/Scrapbook Outlet. I glued this to my slimline card panel. I then chose 3 sentiments from Super Sentimental and heat embossed these on black cardstock using Alabaster White Embossing Powder. I adhered the sentiments using foam tape. I added a few sequins and my card base was complete.

I then used the stencil to add a little design to the corner of my Envelope – Brutus Monroe. I used Distress Oxide Ink in Cracked Pistachio. I love the added color on the outside of my envelope!

Thank you for stopping by! I have listed all the products I used within my post. You can click on any of the links I have shared if you are interested in purchasing the products. The products listed are a compensated affiliate link, which means if you make a purchase I receive a small commission with no extra cost to you. I really appreciate your support.

Supplies Used:

I hope you have a great week! Crafty Hugs,

Natasha

Thankful for You – Die of the Month

Hi Crafty Friends! I hope this post finds you doing well! It is hard to believe it is mid-July! It has been very hot here in NY and today we have a milder summer day! It feels good to have the windows open! I wanted to stop in and share a card with you using the new Die of the Month from Brutus Monroe. I love happy mail and this die is so beautiful! Let’s get started!

I wanted to keep my card simple today to showcase this beautiful die. I die cut the image using Canson Mixed Media paper. When I first started I wasn’t sure if I was going to watercolor the die cut. But once I cut it out…. I knew exactly what I wanted to do. I created a rainbow background using Peerless watercolors on Canson XL watercolor cardstock. Once my rainbow panel was dry, I glued the beautiful tree/fence right on top of my rainbow background.

I then added a few sequins in pink and yellow for a little extra shine. I then stamped the Thankful for You sentiment – Super Sentimental using Alabaster Embossing powder and Brutus Monroe embossing ink. I trimmed down my sentiment and adhered this with foam tape. This die is so beautiful – it truly did all the work for me! A simple watercolor background and my card was done.

Here is a link to the current SALE items at Brutus Monroe.

Thank you for stopping by! I have listed all the products I used within my post. You can click on any of the links I have shared if you are interested in purchasing the products. The products listed are a compensated affiliate link, which means if you make a purchase I receive a small commission with no extra cost to you. I really appreciate your support.

Supplies Used:

Have a great day! Crafty Hugs,

Natasha

NEW Release and Birthday SALE – Unity Stamp Company

Hi friends! Hope you are doing well! It has been very hot here the last 3 days! Which means I did have a bit of extra crafty time! I am super excited to be able to share 3 cards with you using some of the NEW RELEASE at Unity Stamp Company! This new release is beautiful and so much fun! Here is a link to all the new arrivals. Unity is also celebrating their birthday with a site wide SALE.

Let’s get started with 3 of the new stamps released. My first card is using the set Aging Gorgeously – July 2020 Sentiment Kit

For this card I chose to watercolor using my Peerless Watercolors. I love the bold colors in this set. I used the following colors: Jackqueminot Red, Mauve, and Chrome Green Deep. I used 2 layers of color on this floral image. Once my watercoloring was complete I set this aside to dry. A few weeks back I had a fun afternoon and made several backgrounds using alcohol inks and glitter. I tried something different, I placed the alcohol ink on my glass mat, added glitter, placed photo paper on top, then used my brayer. I was excited to see it work. It was a fun way to use the inks, along with photo paper.

I wanted to add a little more dimension to the card. I used a Gina Marie Designs Die – Slanted Brick Background die. I adhered the alcohol background to this die cut and then adhered it to my card base. I fussy cut the floral image and adhered this with foam tape. I then chose this beautiful sentiment from the kit and adhered this with foam tape. I love the added dimension! This set has so many beautiful birthday sentiments – I hope you will check it out!

For my second card I am using the set Words in Bloom. This set was illustrated by my dear friend Sandhya Iyer. When I first saw this set I wanted to create a set of notecards! I think this set would also make a beautiful slimline card, or even added to the outside of an envelope! So many beautiful possibilities with this set!

I started by stamping each of the floral words in this set – you will see each flower has a different sentiment on the stem: Hello, Blessed, Believe, Hope, and Kindness. I did simple coloring on each of the floral images for these cards using my Tombow markers. I then added some Glitter on each floral using Brea Reese liquid glitter. I die cut each floral using a Hero Arts rectangle die and then matted these on black cardstock. To create the background I used the Faithful Letter Background Stamp – Unity Stamp Company. I stamped these on a kraft card base. I wanted to soften the background a bit, I used distress oxide in: Frayed Burlap and Walnut Stain, and of course some gold splatter. I added die cut leaves in coordinating colors to each card. Foam mounted the floral panels and my card was complete.

For my last card I am using the beautiful new Succulent Border Background, also illustrated by Sandhya Iyer. I love background stamps! I truly love to color, but wanted to showcase another way to use a background stamp today! Background stamps are so versatile and can be used in so many ways!

Once my image was stamped, I taped the watercolor card stock down to a wood board. I then took out my Nuvo shimmer powders! These are so fun to work with, I love all the different colors within one bottle! I used the colors: Golden Sparkle, Catherine Wheel, and Green Parade. I added a bit of each color to the stamped image and then sprayed water. It’s so fun to see the colors come alive! I have learned it is best to let the colors dry. Initially it looks a bit messy, but it does come together!

Once my panel was dry I did add a bit of color using my zig clean color brush markers. I added colors in different areas to add more interest! I then die cut my panel 2x using a rectangle die cut. I used a foam background under the center panel to add more dimension. I adhered these to my card base. I then die cut a Congrats sentiment 3 times (2x in black and 1x in gold) and stacked these together. I then chose the Celebrating You sentiment from the Aging Gorgeously – July 202 Sentiment Kit , foam mounted this and added a few gold sequins! I hope you like this one too and give this idea a try!

Unity is also celebrating their birthday with an AMAZING site wide sale, as well as a few new crafty products on their store! I hope you will check it out! Here are just a few links:

Thank you for stopping by! I have listed all the products I used within my post. You can click on any of the links I have shared if you are interested in purchasing the products. The products listed are a compensated affiliate link, which means if you make a purchase I receive a small commission with no extra cost to you. I really appreciate your support.

Have a great afternoon! Crafty Higs,

Natasha

Happy Birthday – Stencil of the Month

Happy Monday Crafty Friends! I am excited to be back sharing 2 of the monthly subscription products from Brutus Monroe. I am using the stencil of the month and the stamp of the month. I encourage you to check these 2 subscriptions out, as well as the other monthly subscriptions Brutus Monroe has.

I started by taping down the stencil of the month onto a piece of A2 sized water color card stock onto my glass mat. I sprayed the panel down with water and then sprinkled Tonic Shimmer Powder – Catherine Wheel on top of the water. You only need a little of the shimmer powder – the water does the magic for you! I sprayed a bit more water and it was fun to watch the powder move and the colors form! This monthly stencil was so fun for this technique. I was able to get 2 more panels created with the left over powder/water. I love when I can create multiple panels in one sitting!

I set aside my panel to dry. I then used the same stencil to create the envelope. I created a pattern along the bottom portion of the envelope and then stamped the cute mouse from the Stamp of the Month! Just a fun and easy way to coordinate the envelope! I used the Alabaster envelopes from Brutus Monroe and they were so easy to blend color on!

When my panel was dry, I die cut a heart out of the panel and the next size in vellum. I adhered the panel onto the card base, then the vellum heart, and last the hart using foam tape. I did add a bit of gold twine underneath for added interest and a few gold sequins.

I chose a sentiment from Super Sentimental – Happy Birthday! I stamped this using Brutus Monroe ink and Alabaster White embossing powder. I foam mounted my sentiment and my card was complete!

I had so much fun trying this technique! I learned this idea from my friend Ishani – you can see her Instagram here and on her page you will find a link to her you tube video using stencils! I encourage you to check it out!

Thank you for stopping by! I am listing all the products I have used below. You can click on any of the links I have shared if you are interested in purchasing the products. The products listed are a compensated affiliate link, which means if you make a purchase I receive a small commission with no extra cost to you. I really appreciate your support.

Supplies Used:

Have a great day!

Crafty Hugs,

Natasha

Let You Dreams Bloom

Happy Sunday Crafty Friends! I hope you are doing well! I hope those of you who celebrate the 4th of July had a wonderful day with family and friends! We had a small family BBQ – it was nice and relaxing! For today’s card I am using the Paint a Flower – Hydrangea by Altenew.

I started by stamping the Hydrangea bloom using WOW embossing ink on Canson Watercolor card stock. I stamped the hydrangea 3 times and heat embossed the image using gold embossing powder. I watercolored the blooms using my Karin markers. I have listed the colors I used:

  • Pink Bloom: Pale Pink, Magenta, Pale Violet, Indigo Blue
  • Blue Bloom: Sky Blue, Royal Blue, Lilac
  • Leaves: Apple Green, Ochre, Olive Green

I enjoyed the watercoloring process using the markers. I am enjoying participating in the 30 day color challenge with Kathy Racoosin. Are you joining in? You can see all of Kathy’s posts here! I colored this over days 2-4. I just enjoyed the process and really took my time. I started with a light layer and then as the layers dried, I continued to add more colors.

When my coloring was complete I decided I needed a background. I was speaking to my friend Enna and she suggested a pale purple, what a great idea! I encourage you to check out her cards – Enna-Cardmaker (@ritzyhag) I love her work. I feel it just pulled the card together! To create the purple background I used my Gansai Tambi watercolors – Imperial Violet and White, mixed them together to create a pale purple. I completed the background 2 times. I added a piece of purple card stock to my white card base and adhered the 2 panels onto the card. Then stamped 2 sentiments from the set on black card stock and heat embossed the image using white embossing powder. I foam mounted these and added a few sequins.

I had a lot of fun watercoloring this stamp set! Have a good afternoon!

Supplies Used:

  • Stamps: Paint a Flower – Hydrangea by Altenew
  • Paper: Canson Watercolor Card Stock
  • Coloring Medium: Karin Brush Markers, Gansai Tambi 36 watercolor set

Crafty Hugs,

Natasha