Unity Stamp Company – NEW Release

Hi friends! I am super excited to be back today on my blog sharing an AMAZING new release at Unity Stamp Company! It has been a very busy start to the school year. I apologize if I have missed some of your posts. I am hoping to begin to get back on track! Unity has an awesome release today and I had so much fun creating with 3 of the new sets! Let’s get started!

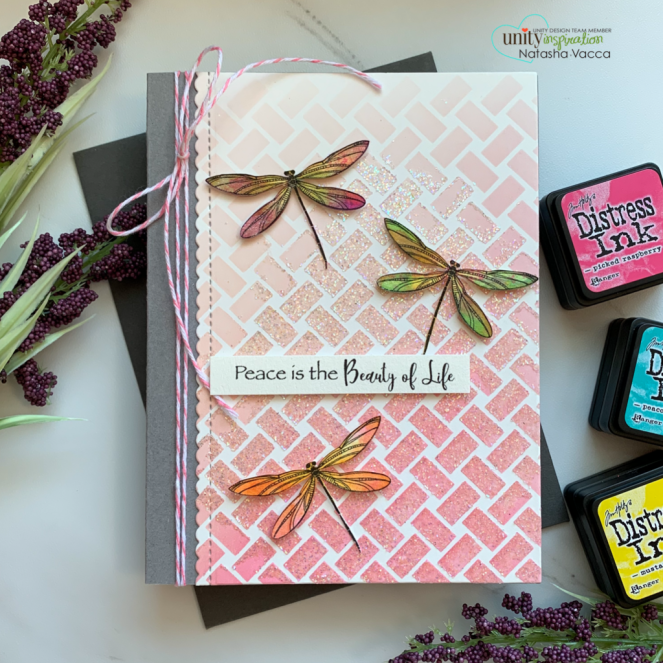
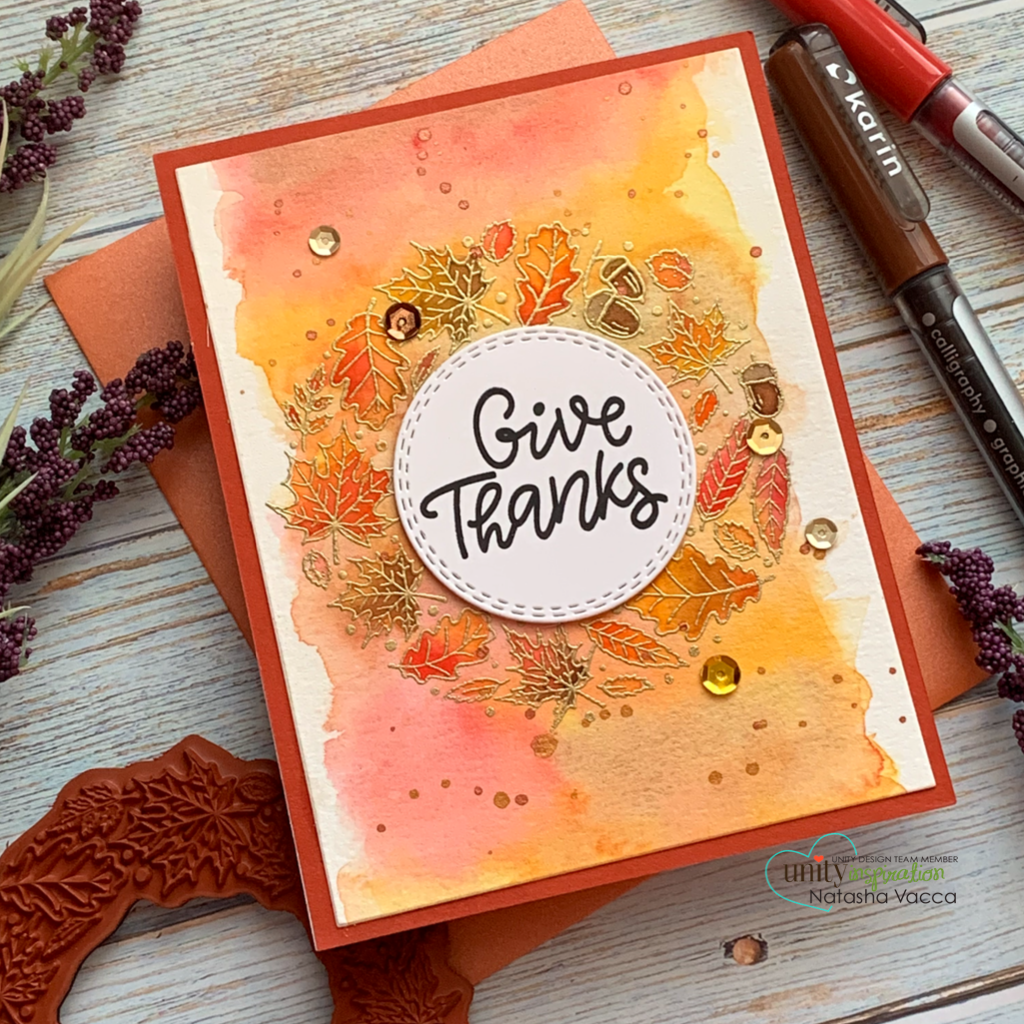
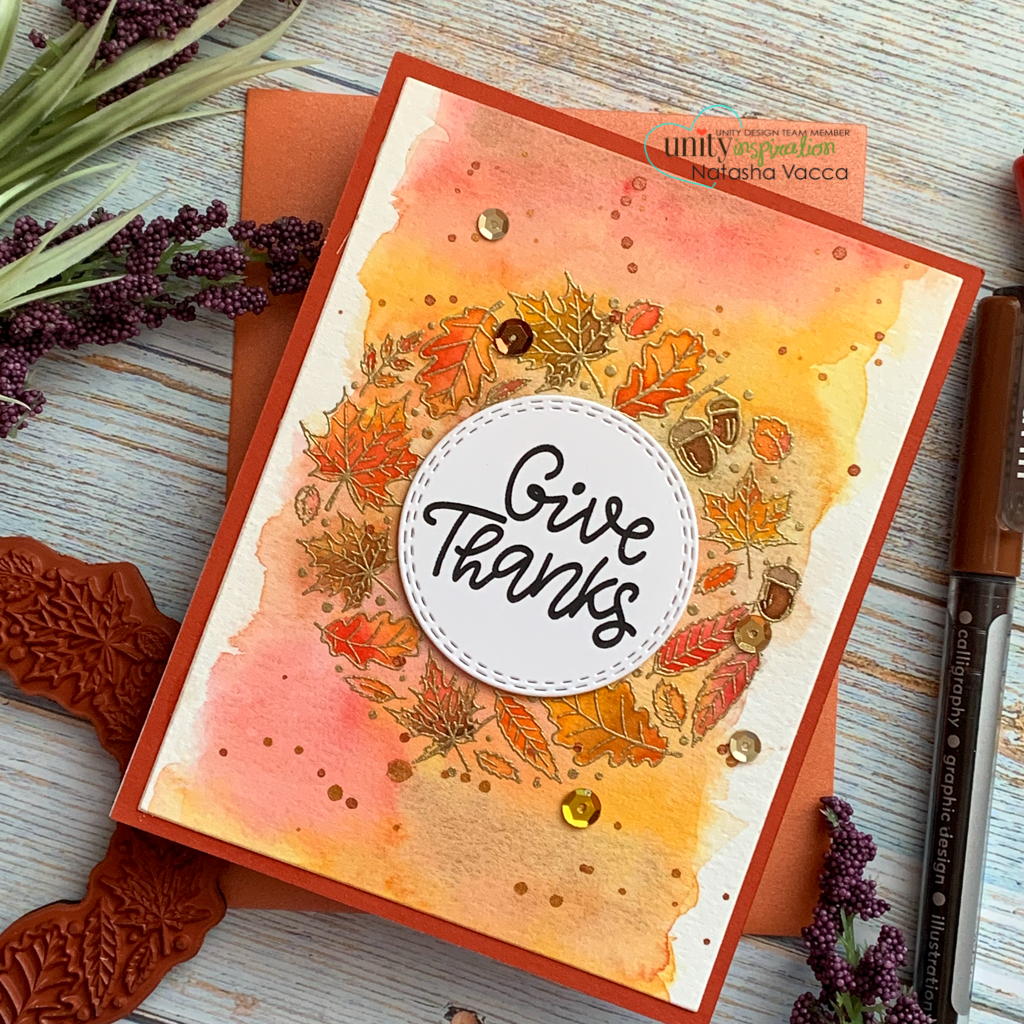
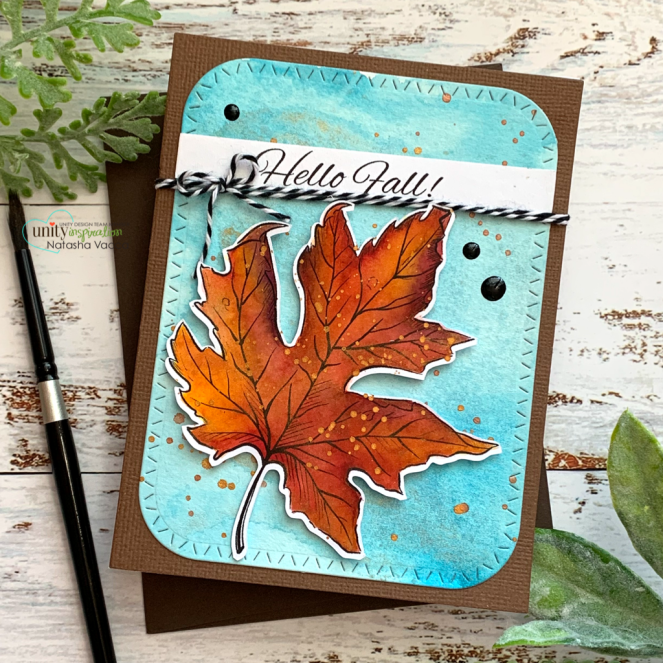
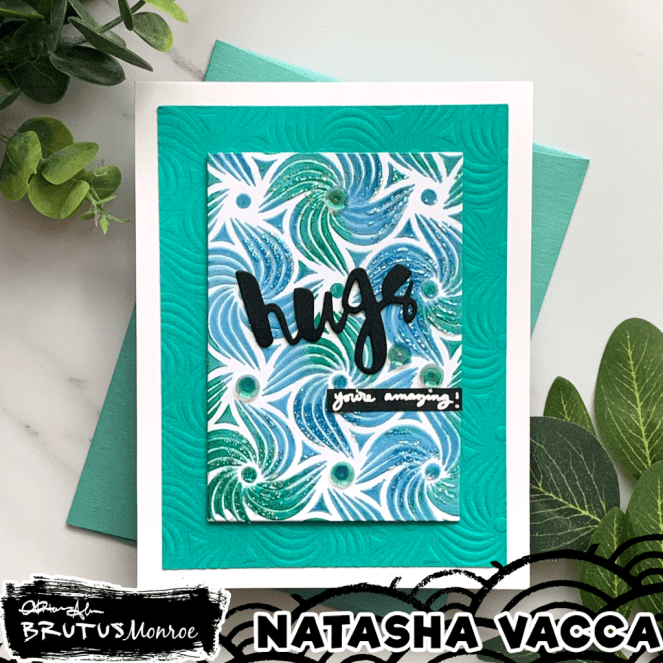
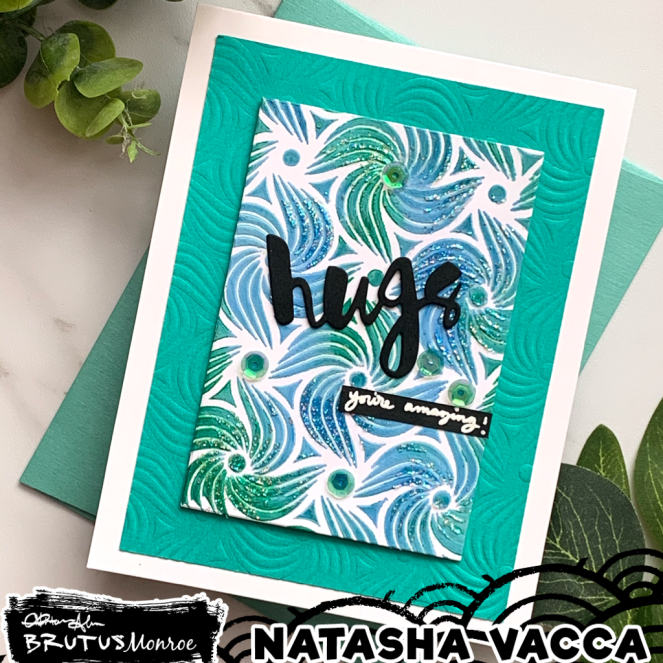
For my first card I am using the beautiful Scattered leaf Background stamp. I love this stamp and I created a shaker card using this beautiful new set! I haven’t made a shaker card in awhile, I thought this was the perfect set to create a fun shaker card! So let’s get started!

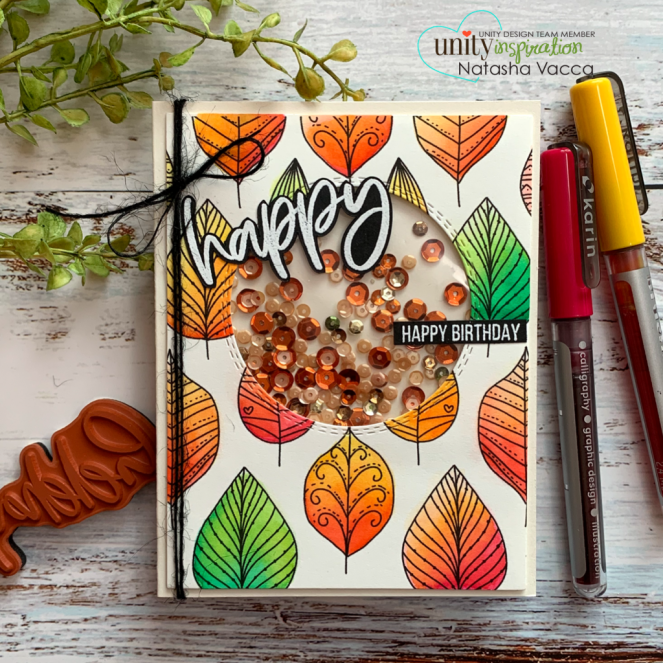
I started by stamping my image on Fabriano Hot Press watercolor paper. I love this paper for my Karin markers! I find the color moves really well on this paper and allows me to build color up really well without the paper pilling. Once my coloring was complete, I die cut the center circle for the shaker element. I then started to prepare my shaker.

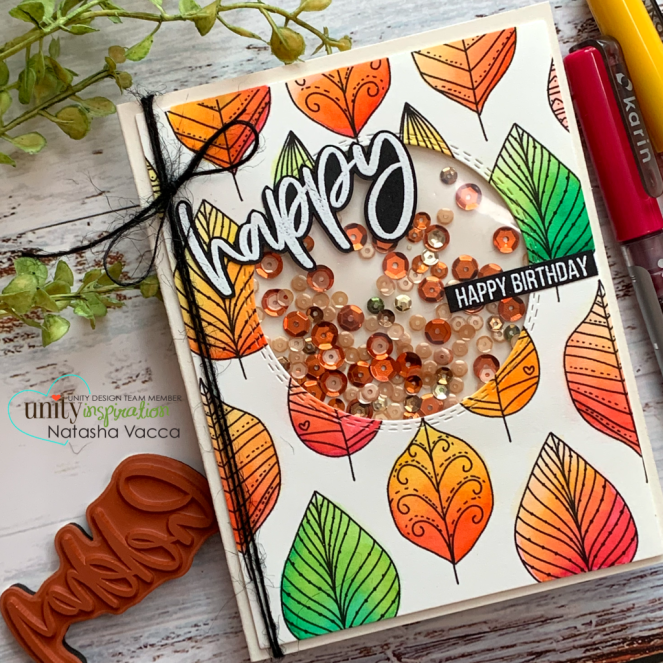
To create a shaker pouch I use the clear office 3 ring binder sheets. I start by cutting the section I need to fill in my space. I have found using the binder pouches it is easy to create a shaker pouch. To create the shaker I use a Fuse Tool. Depending on the cut, I may need to fuse together 3 sides before I add the shaker elements. Once my elements are inside, I fuse the last side together. I then tape the pouch on the back panel and then use foam tape to create dimension, which allows the shaker elements to move. I then chose 2 sentiments from the Heart of Autumn Sentiment Kit. I heat embossed these on black cardstock using white embossing powder. I adhered my card together and added black twine which was a part of a KOM. I hope you enjoyed my first card.

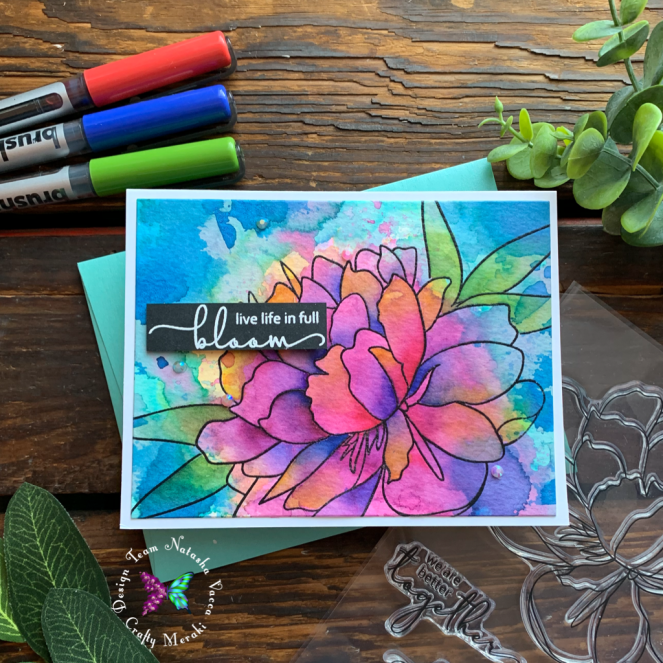
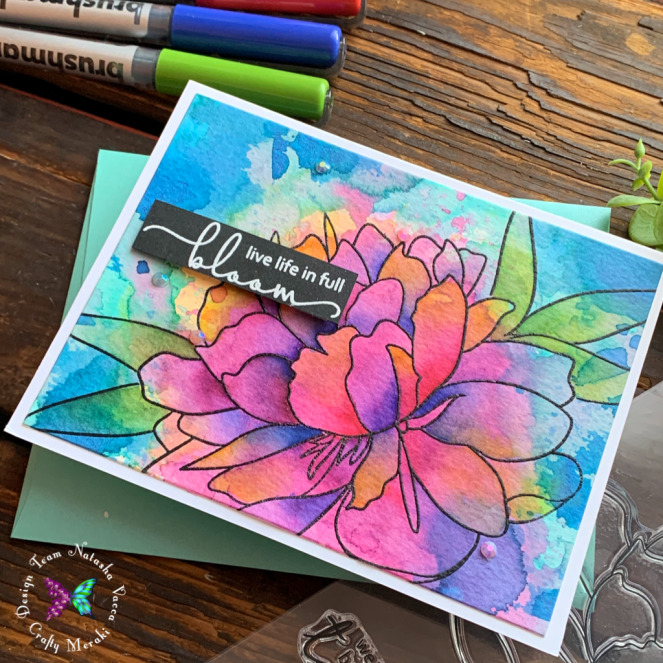
For my second card I am using another beautiful background stamp called Illumination border background. I love the simplicity of these beautiful holiday lights. I also adore the vintage feel to these bulbs as well! Let’s get started!

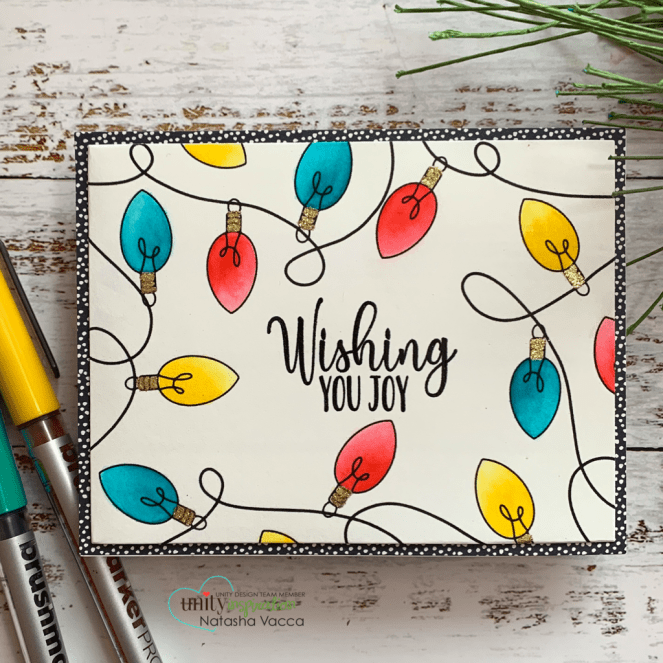
I started by stamping the background stamp on Fabriano Hot Press watercolor paper as well. I planned to use my Karin markers to color these beautiful bulbs. I colored in my bulbs using 3 different colors. Once my coloring was complete I wanted to add a bit of sparkle to the bulbs. I used WOW Glitter embossing powder. It is hard to capture the shine in the pictures. I chose a sentiment from the September 2020 KOM. I love these kits – they are full of beautiful red rubber stamps delivered right to your door each month! I then trimmed down the card panel using a Hero Arts rectangle die. I trimmed own a piece of patterned paper from my stash and then adhered my card together. This was a fun and quick card to make! The possibilities with this stamp are endless and so fun! I can’t wait to see what you make with it!

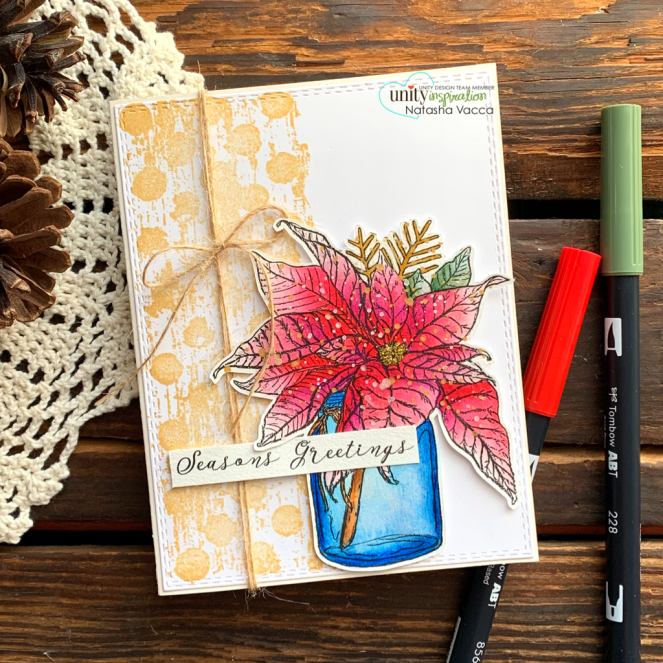
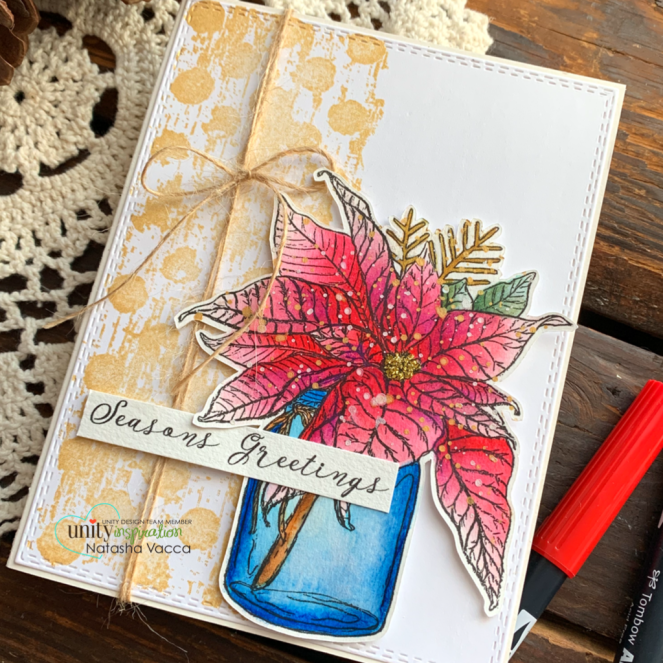
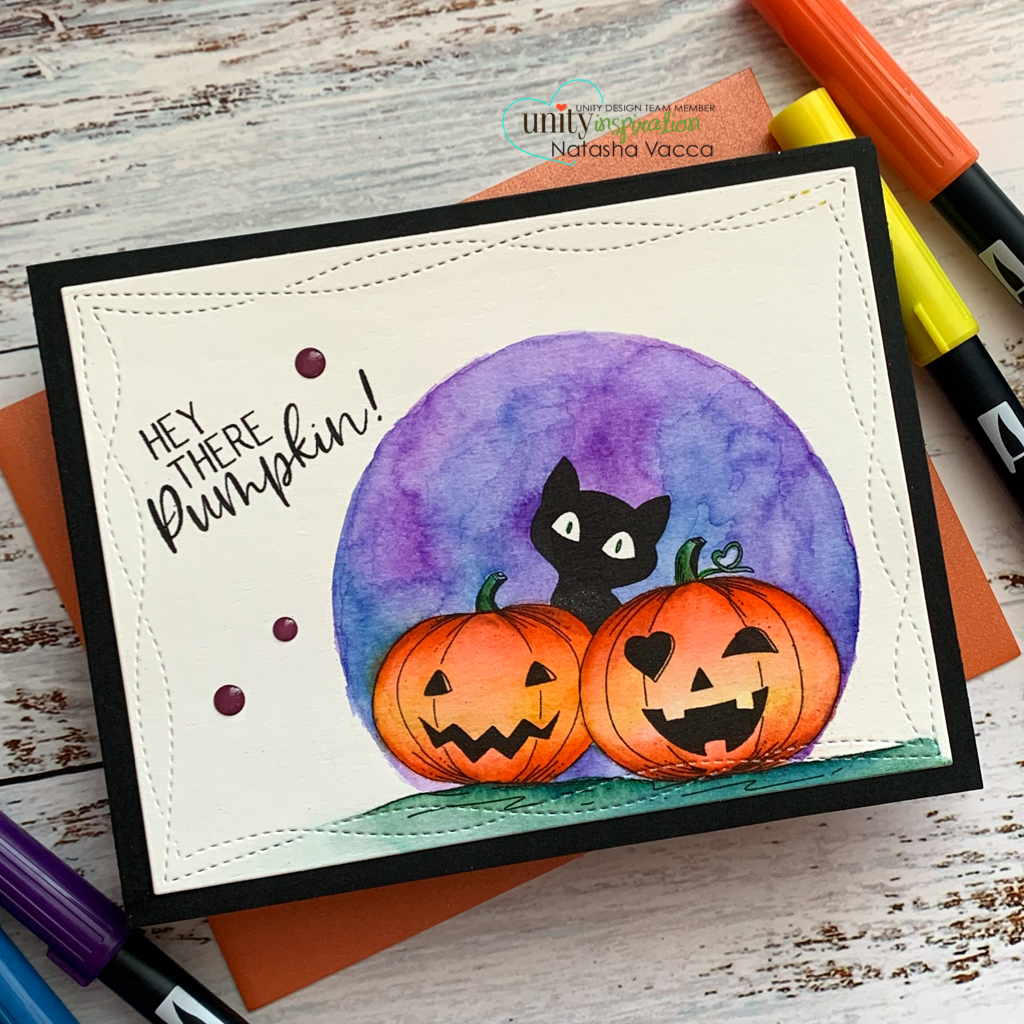
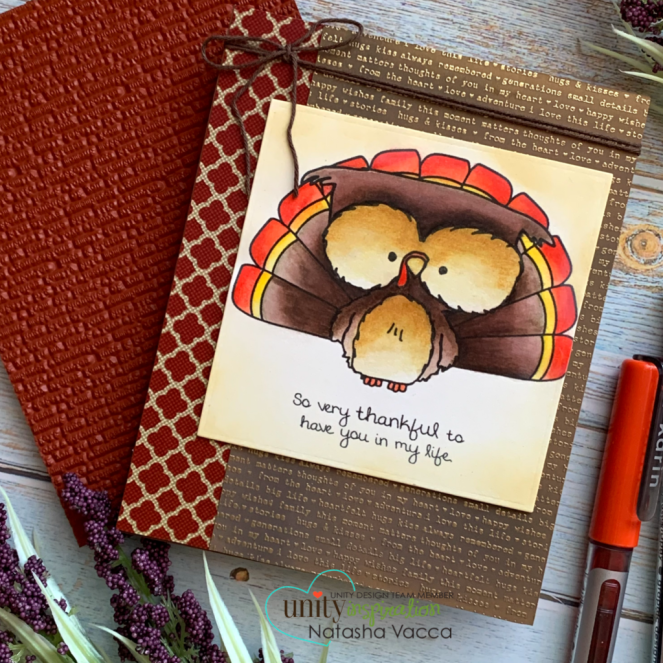
For my last card I am using the ADORABLE Gobble owl, isn’t he so cute? I had so much fun coloring him. Let’s get started with my last card using this cutie!

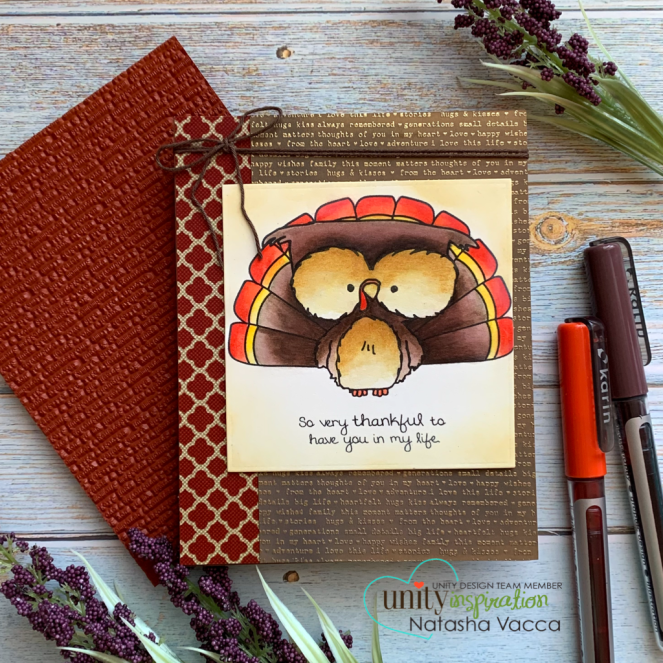
To begin I stamped the owl on Fabriano Hot Press watercolor paper. I used my karin markers to color in this adorable image. I completed serval layers of color and then added colored pencils to the nooks and crannies for added dimension to this owl image. I then trimmed down my owl into a square using a die cut from my stash. I find I don’t use my square dies enough. I need to bring them out more often.

I wanted to create a fun background for my stamped image, I wanted to use this beautiful piece of patterned paper that was a gift mailed with my September 2020 KOM – I love that Unity adds fun surprises to your monthly mail. I trimmed down the patterned paper to fit an A2 sized card panel. I then stamped the beautiful background stamp – Small Details onto a piece of kraft cardstock using gold embossing powder. I then used a combination of distress oxides to “antique” the background a bit. I then adhered my card together and used foam tape behind my owl stamp panel. I added a bit of brown twine for added interest.

Thank you so much for stopping by today! You can see all of the new released stamp sets here! I hope you will take a peek!

Unity also carries beautiful patterned paper packs and the quality is amazing! You can see the new Fall line here.

Be sure to check out these amazing SALE categories too:

Thank you for stopping by! Thank you for stopping by! I have listed all the products I used within my post. You can click on any of the links I have shared if you are interested in purchasing the products. The products listed are a compensated affiliate link, which means if you make a purchase I receive a small commission with no extra cost to you. I really appreciate your support.

Crafty Hugs,

Natasha

STAMPtember PARTY!!!!!

Hi everyone! It’s party time! Have you seen the AMAZING new STAMPtember release – it is AWESOME!!!!! I love it and I am so excited to participate in the PARTY today! Come join the party and be sure to check out the Simon Says Stamp blog. You will see beautiful inspiration using the awesome new release! Come check it out!

Today is special party! We are celebrating Simon Says Stamp 11th – STAMPtember! Come join the fun and discover all the different promotions that Simon Says Stamp has to offer! Be sure to check out the designers blogs, Facebook posts, and Instagram to see what promotions they have available to you! It’s going to be so much fun!

Let’s get this party started – using the Circle Pattern background stamp! I love this new background stamp! I have created 3 cards so far using this new release and I know I will be using this again! It is such a versatile stamp to have in your collection! For today’s card I wanted to focus on mainly using the background stamp with a few added sentiments! The party begins with a rainbow inspired card!

I started by preparing a piece of Canson XL watercolor cardstock with my embossing buddy. I heat embossed the background stamp using white embossing powder. I was now ready to create my rainbow of watercolor! To create my rainbow I used my Gansai Tambi watercolors.

  • 32 Red
  • 33 Cadium Orange
  • 40 Lemon Yellow
  • 51 Sap Light Green
  • 64 Ultramarine
  • 139 Cobalt Violet

I used a wet on wet technique to create this background. I wet the background panel down with water. I then added the layers of each of the colors listed above. I completed this 2x, letting it dry between each layer on it’s own. I find this gives the best results.

Once it was dry, I added some metallic watercolor splatters. Then I trimmed down the panel using a stitched rectangle die. I die cut the outer panel using my largest die, then die cut another using the next largest die to add more dimension. Then I die cut two circles on my A2 panel using a punch and added foam tape behind these! I set these aside and began to work on my sentiments!

For the sentiments I chose to use the CZ Designs – You Da Best die. I die cut the outer portion using black cardstock and then the middle using white cardstock. I die cut the white portion 3x and stacked these to create more dimension. I wanted to add 2 smaller sentiments in the circle die cuts. I thought it would be a fun way to “pop” up the sentiments for added interest! I chose 2 sentiments from the Simon Says Stamp Beautiful Flowers set. I heat embossed these in white on black cardstock. I then adhered my card together and added a few sequins for more sparkle and fun!

I hope this card makes you smile and keeps the party going! I had a lot of fun with this one!

Thank you so much to Simon Says Stamp for having me join your designer family! I am having a great time and I am very thankful! I am excited for a month long party! Be sure to join Simon Says Stamp Facebook live events all month long! The next live will be Friday 9/4/2020 EDT. You will see more beautiful inspiration and maybe some more awesome giveaways!

Thank you for stopping by my blog today! I am excited to share my promotion with you! Happy shopping!

Happy STAMPtember!!!!!!!

Crafty Hugs,

Natasha

Unity Stamp Company – New Monthly Kits!

Hi Everyone! It is September 1st and that means the new monthly kits are being revealed today over at Unity Stamp Company! I love when the first of the month arrives, it is exciting to see the new stamp memberships and all the beautiful red rubber stamps! Unity Stamp Company has 4 different memberships, there is something for everyone! I will link them all below if you are interested in checking them out!

Today I am sharing 2 cards with you, using 2 of the monthly memberships. For my first card I am using the September 2020 kit of the Month – Elements of the Holiday. I love this kit, it is full of red rubber stamps and this month’s kit is full of amazing holiday stamps! I can’t wait to create more cards with this kit!

I started by stamping this beautiful Poinsettia image. I used Tombow markers to color today. I worked in layers to complete this coloring. I worked from my lightest color to my darkest color. I did add colored pencils to the nooks and crannies for added dimension. Once my coloring was complete I used my Brother Scan and Cut to trim this stamped image. I added metallic splatters to the floral image and set it aside to dry.

I then started to work on my card panel. I wanted to add some interest behind my floral image. I chose the stamp set Love Life as Is – Unity Stamp Company. I stamped the large background stamp in Gold ink onto my card panel. I then trimmed down the panel using the Double Stitched Rectangle Die from Gina Marie Designs. I adhered this panel to my A2 card base. I added burlap twine around my card base. I really like the added burlap twine – I feel it adds a rustic touch! I used foam tape to adhere the floral image, as well as the sentiment. My card is complete! I can’t wait to create my next holiday card with this kit – so many amazing stamps!

For my 2nd card I am using the September 2020 Uniquely Unity – Wings of Peace. This set is adorable. I wanted to showcase the beautiful dragonflies from this set with a simple color palette and of course some added shine! Let’s get started!

I started by stamping 3 of the same dragonfly stamps on Canson Mixed Media paper. I then trimmed them using my Brother Scan and Cut. I wanted to do some ink “smooshing” for the dragonflies using distress inks. I love adding color this way – it is simple and quick! I used the following colors: Picked Raspberry, Spiced Marmalade, Mustard Seed, Peacock Feathers, and Shaded Lilac. I placed some ink on my glass mat and spritzed water and then “smooshed” the dragonflies into the ink. I did this several times. I then set them aside to dry and started to work on my background panel.

I started with a piece of Bristol Smooth cardstock for my background. I chose a Gina Marie Designs stencil from my stash. I used two colors on the background/Distress Oxide: Worn Lipstick and Tattered Rose. Once my blending was complete, I added glimmer paste – Brutus Monroe Glitter Glaze/Fallen Snow. I set this aside to dry. Once dry, I trimmed this panel down to an A2 card size. I wanted only a portion of my gray card base to show. I trimmed the scalloped border using Pretty Pink Posh scallop border die. I then adhered my card and added some pink twine for added interest!

Thank you for stopping by today! You can see each of the monthly memberships here if you are interested:

There is also a 2 day flash sale – click here

Thank you for stopping by! Thank you for stopping by! I have listed all the products I used within my post. You can click on any of the links I have shared if you are interested in purchasing the products. The products listed are a compensated affiliate link, which means if you make a purchase I receive a small commission with no extra cost to you. I really appreciate your support.

Crafty Hugs,

Natasha

A quick way to add color…

Hi everyone! I hope you had a great week! I can’t believe August is winding down! I have been busy getting my daughter ready for college, and as a family our school year starts in just a couple of weeks! Today I am guest designing over at Crafty Meraki.

Do you love to color? I know I do! Today I wanted to share with you a different way to add color to a floral image that is quick and simple. I also think it gives beautiful results when you are pressed for time. I was inspired by this design by 2 of my talented crafty friends Alex Syberia and Colleen Balija. I have linked their Instagram accounts as well (just click their names). Colleen also has a quick video on her feed if you want to see this technique in action! Thank you to my sweet friends for sharing your ideas! I am using the beautiful Hero Arts & Altenew collaboration set, Bloom and Grow.

To begin I stamped the image on Neenah 80 pound solar white card stock. I used Versafine ink in black and heat embossed the image using clear embossing powder. I then used three ink cubes from Altenew. I used Baby Pink, Fuchsia, and Magenta. To add the color I simply started with the lightest color by placing the ink pad directly on the paper. I started on the left side of the floral image and gently swiped the ink pad across my card stock panel. I then moved to the medium color Fuchsia and did the same thing. Last I added the deepest of the pinks, Magenta following the same pattern. I then added a bit of gold pigment ink by gently swiping the ink pad across the panel as well.

I then chose the sentiment from the stamp set and placed it in the top right corner using Versafine black ink. I die cut the panel and adhered it to my black card base. I added a few gold sequins to pull out the gold ink in the background. I truly love to color floral stamps! I was excited to try something different today! I hope you enjoyed it!

Crafty Hugs,

Natasha

Give Thanks – August KOM

Hi everyone I hope your week is off to a great start. Today I wanted to stop in and share a fall card using the August 2020 kit of the month from Unity Stamp Company. The kit is full of so many beautiful red rubber stamps as well as beautiful sentiments. Today I chose to work with a fall wreath from the kit as well as a sentiment.

To begin I started with a piece of Canson water color card stock. I first started by creating a watercolor background using Gansai Tambi Watercolors. I used the following colors to create the background: 42 Aureolin, 46 Burnt Sienna, 32 Red, and 33 Cadium orange. For this background I used a wet on wet technique. I placed water on the background, then brought in each color to the paper. I have found when creating a background the wet on wet technique works very well for allowing the watercolors to move and blend together. It is important to let each layer dry before adding more color. I have found best results when they dry on their own. I did two layers of color and on the second layer I did add some blush gold 91.

Once my background panel was dry, I embossed the wreath using Brutus Monroe embossing ink and then used Brutus Monroe Gilded Gold embossing powder. I then used Karin brush markers to color the fall leaves and acorns in. I used the following colors: Red 209, Amber 195, Gold 283, Sepia 074, and Henna 105. Since I did a watercolor background I did very simple coloring. I did one layer of color and then added a second layer in different parts of the leaves and acorns for added interest. I then used a Hero Arts nested rectangle die to die cut my panel. I added some metallic splatter to the watercolor background in a red metallic and orange metallic. I used a piece of dark orange card stock from my stash and glued that to my card panel. I then placed the wreath panel on top. I chose a sentiment from the set called Give Thanks. I stamped this in black and then die cut it using a Gina Marie designs stitched Circle die. I adhered this with foam tape. I added a few sequins for added sparkle.

Today is the last day of the sale at Unity stamp company. Many sets are on sale for 55% off, over 600 stamps in the sale category (Fall, Halloween, Love & Friendship, Kids, Pets, School). Add the items to your cart and at checkout you will use the code FALL 55 to see an amazing discount. I encourage you to check out the sale and the different categories. I have them linked here for you as well. Thank you for stopping by today and be sure to check back in the next week as the new kit of the month, as well as all the new memberships will be revealed!

I have shared several cards on Instagram over the last few days using the AMAZING new releases at Unity Stamp Company! I have had so much fun working with these new sets! Check them out too – they are all on SALE!!!!!

Teach Love Inspire
Letting Go
Monster Hugs
Hey There Pumpkin

Thank you for stopping by! I have listed all the products I used within my post. You can click on any of the links I have shared if you are interested in purchasing the products. The products listed are a compensated affiliate link, which means if you make a purchase I receive a small commission with no extra cost to you. I really appreciate your support.

Crafty Hugs,

Natasha

Watercoloring and Ink Smooshing

Happy Friday everyone! I hope you had a great week! Today I am Guest Designing over at the Crafty Meraki blog! Today I am using the beautiful Sweet Nothings set from Altenew. It is a beautiful stamp set! Let’s get started!

For today’s card I chose to work with my Gansai Tambi watercolors. Any water coloring medium you own will be great to use! I started by stamping the 2 large floral images and several of each leaf on Canson Watercolor paper. I stamped the images in Versamark ink and then heat embossed the images using clear embossing powder. Today I am using the wet on wet technique for my watercoloring. I made sure to tape down my paper to a board to help prevent warping. When watercoloring I work in layers and let each layer dry. I find with watercoloring, letting it dry on it’s own gives me the best results. The colors I used are:

  • Leaves: Turquoise Blue 62, Viridian 55, Forest Green 56, Yellow Ochre 44, Blush Gold 91
  • Flower: Cadium Orange 33, Carmine 35

Once my watercoloring was complete I set these aside to dry. I then wanted to create a watercolor background. Which is truly one of my favorite ways to make a background! I placed several colors on my glass mat and sprayed with water and then “smooshed” my paper onto the glass mat. I completed these several times and then set it aside to dry. The colors I used are:

  • Lemon Yellow 40, Imperial Violet 38, Indigo 67, Gold 90

I then fussy cut my images using my Scan and Cut. I trimmed down my watercolor panel using a slimline die. I love the sentiments in this set. I stamped the sentiment using Versafine Ink directly on my card panel. I adhered my card together. To complete my card I added some gold perfect pearls splatters and Nuvo drops.

Supplies Used:

Thank you so much for stopping by today! Have a great day!

Crafty Hugs,

Natasha

Sending you a Hug

Hi Crafty Friends and welcome back! I hope you had a great weekend! It was a great weekend here! Lots of time in my garden, family time, and of course some crafty time! Today I am sharing a card using the Brutus Monroe Stencil of the Month. It is such a fun stencil design and will pair well with many other stamps in your collection! So let’s get started!

I started by preparing my stencil with adhesive spray. I have found the spray to work well with temporarily adhering the stencil to the paper. This is especially helpful when working with pastes! Once everything was set, I was ready to play with Velveteen glazes on my Stencil of the Month. Today I am using 2 Velveteen Glazes: Midnight Indigo and Fresh Kale. I enjoyed using these 2 colors together. I did lighten the Midnight Indigo a bit, with white Gesso, as I wanted a lighter blue. To do this I just mixed a little of each together on my glass mat (Gesso and Midnight Indigo) and it was ready to go. When I applied this glaze I wanted to create a mix of the 2 colors on the stencil. So I randomly applied the color. Once it was all set, I placed this panel aside to dry over night. I then prepped the teal color card stock panel by dry embossing the stencil using my die cutting machine. I also prepared 2 sentiments for my card. I chose a Hugs die cut from Simon Says Stamp and another from Super Sentimental Brutus Monroe. I die cut the Hugs sentiment 2x and adhered these together. I embossed the other sentiment on black card stock using white embossing powder.

The next day I was ready to complete my card. I wanted to add a little “extra” sparkle to my stencil and glaze, so I added Glitter Glaze Fallen Snow – Brutus Monroe. I applied this in various sections on the panel for added interest! I then adhered my card together. I added a few sequins for added shine and sparkle! I hope this card will brighten someone’s day!

Thank you for stopping by! I have listed all the products I used within my post. You can click on any of the links I have shared if you are interested in purchasing the products. The products listed are a compensated affiliate link, which means if you make a purchase I receive a small commission with no extra cost to you. I really appreciate your support.

Supplies Used:

Have a great day! Crafty Hugs,

Natasha

Bold and Bright Ink Smooshing Florals

Happy Friday everyone! It has been a beautiful week here, lots of sunshine, gardening time, family boating, as well as crafting time! Today I am guest designing at Crafty Meraki. I was so excited to use the beautiful collaboration set from Hero Arts and Altenew – Bloom and Grow! This stamp is beautiful! Today I wanted to create a bold and colorful card using ink smooshing and markers! Let’s get started!

I started with a piece of Strathmore watercolor paper. To create the background I used an ink smooshing technique using a piece of acetate. I brought out my Stampin Up ink pads in the following colors: Pink Passion, Bermuda Bay, Rich Razzleberry, Blue Bayou, Brilliant Blue, and Summer Sun. One at a time I smooshed the ink pad on my glass mat, added water, and picked up the color using acetate. Then I placed the piece of acetate in different sections of the panel and layered the colors. I completed this several times and dried the panel between layers with my heat tool. The last layer I let that air dry.

Once my panel was dry I used the large bloom in the stamp set. I prepped the area using my embossing buddy and then stamped the bloom using versa mark ink in black and then I heat embossed it using clear embossing powder. I created a mask for the bloom so that I could stamp the leaves behind the flower. Once I was done stamping I went back in with Karin markers to add deeper color. The colors I used are: Lipstick Red, Gold, Curry, Olive Green, Sapphire Blue, and Indigo Blue.

I then chose a sentiment from the set and heat embossed it on black card stock using white embossing power. I die cut the panel and adhered it to an A2 sized card base. To complete the card I added a few gemstones for added embellishment. I hope you enjoyed learning about this bright and bold technique today.

Supplies Used:

  • Stamps: Bloom and Grow
  • Paper: Stathmore Watercolor Cardstock
  • Coloring Medium: Karin Markers – Lipstick Red, Gold, Curry, Olive Green, Sapphire Blue, and Indigo Blue
  • Stampin Up Ink Pads: Pink Passion, Bermuda Bay, Rich Razzleberry, Blue Bayou, Brilliant Blue, and Summer Sun

Thank you for stopping by today! Have a wonderful Friday and weekend!

Crafty Hugs,

Natasha

Back to School Supplies

Hi everyone I hope you’re having a great weekend. I am super excited to be back today to share a card with you using 2 of Unity Stamp Company‘s newest releases. The release has many beautiful stamps including back to school, a new sentiment kit, as well as some holiday stamps! Truly something for everyone you can see all of the new releases here.

Let’s get started today I am using School Days and Heart of Autumn Sentiment Kit. I started by stamping the backpack and all the adorable patches on Canson Mixed media paper. I started by coloring in all of the images using peerless watercolors. I did simple water coloring for today’s card. Once my coloring was done I set the images aside to dry. Once they were dry, I fussy cut the images.

I then started to work on the background. I loved these stamps they truly reminded me of back to school supplies so I wanted to create a fun rainbow card. To create the background I used a Gina K designs stencil. I used Distress Oxide’s in the following colors to create a rainbow pattern: Candied Apple, Spiced Marmalade, Squeezed Lemonade, Cracked Pistachio, Peacock Feathers, and Dusty Concorde. To create the rainbow pattern I used a small blender brush from Picket Fence Studios and Washi tape between the layers to ensure the color wouldn’t transfer between each other. I used a Gina Marie Designs stitched rectangle die to trim the A2 panel. Once this was done, I adhered everything together. I used foam tape on the back of the backpack. I then chose a sentiment from the set Heart of Autumn Sentiment Kit. I decided to just use the Happy sentiment and will later add to this depending on what I use the card for.

I think this set is so cute and can be used to send happy notes to your kids, your child’s teacher, and notes of encouragement. What is your favorite back to school supply?

Thank you for stopping by! I have listed all the products I used within my post. You can click on any of the links I have shared if you are interested in purchasing the products. The products listed are a compensated affiliate link, which means if you make a purchase I receive a small commission with no extra cost to you. I really appreciate your support. There is also a great SALE happening over at Unity – I hope you’ll check it out! The SALE will end Tuesday at midnight.

Supplies Used:

Crafty Hugs,

Natasha

Thank you for being you – MFT Peony Perfection

Hi everyone! I hope you are having a great day! Today I am guest designing on the Crafty Meraki blog. I am sharing a CAS design card using the MFT – Peony Perfection stamp set. I love this beautiful set and felt it was a beautiful set to create a CAS design. I hope you will stop by the blog to see how I created this card! I had a lot of fun with this set! Below I will share a list of crafty supplies used.

Supplies Used:

  • Stamps: MFT Peony Perfection, Altenew Sweet Nothings
  • Paper: Bristol Smooth Card stock
  • Coloring Medium: Zig Clean Color Brush Markers, Gansai Tambi water color (Gold)

Thank you for stopping by! I hope you will visit me on the Crafty Meraki blog!

Crafty Hugs,

Natasha