Strawberry Cupcake – Alex Syberia Designs

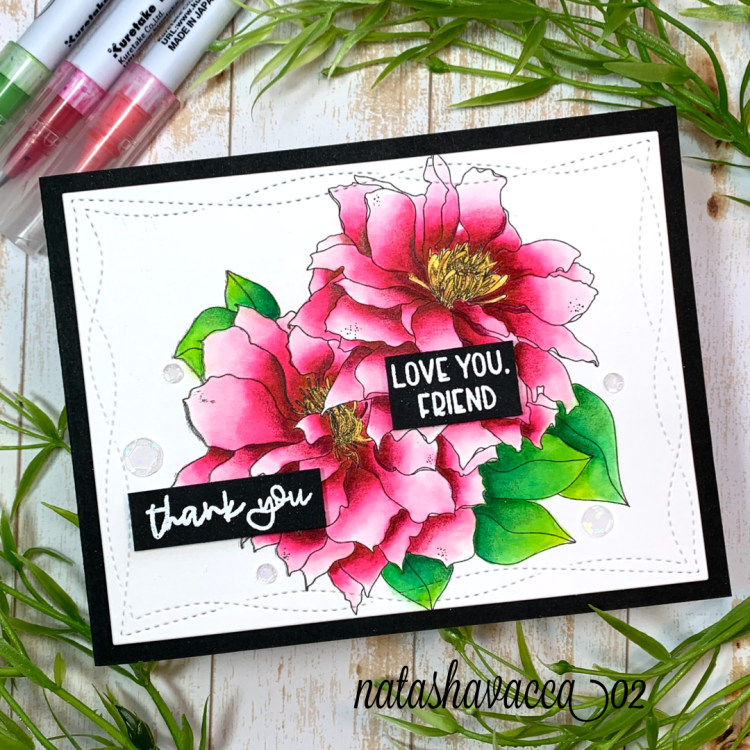
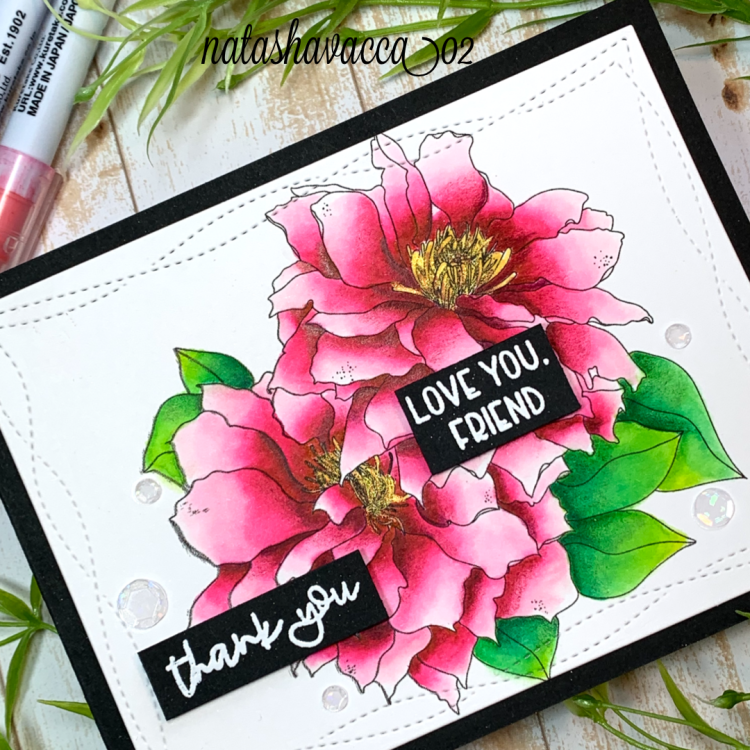
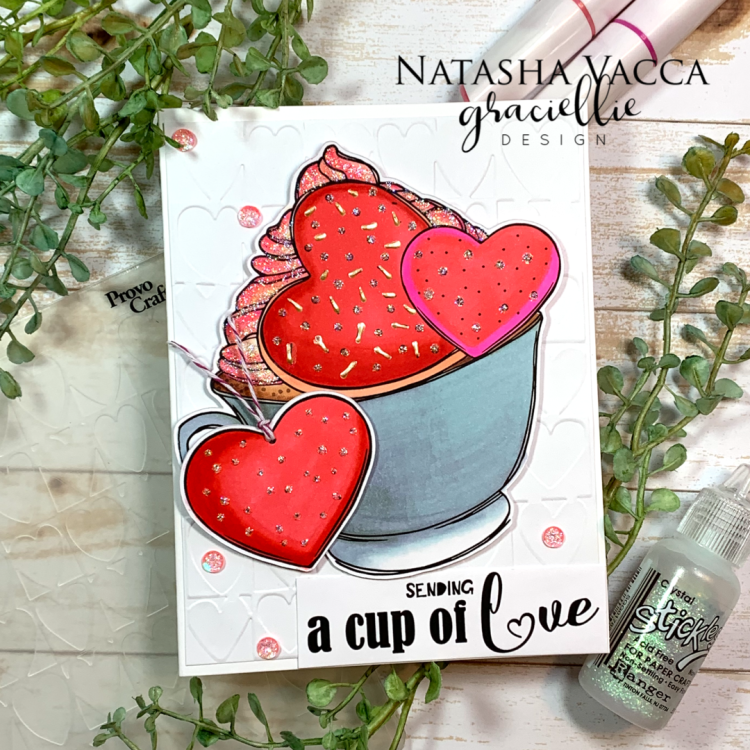
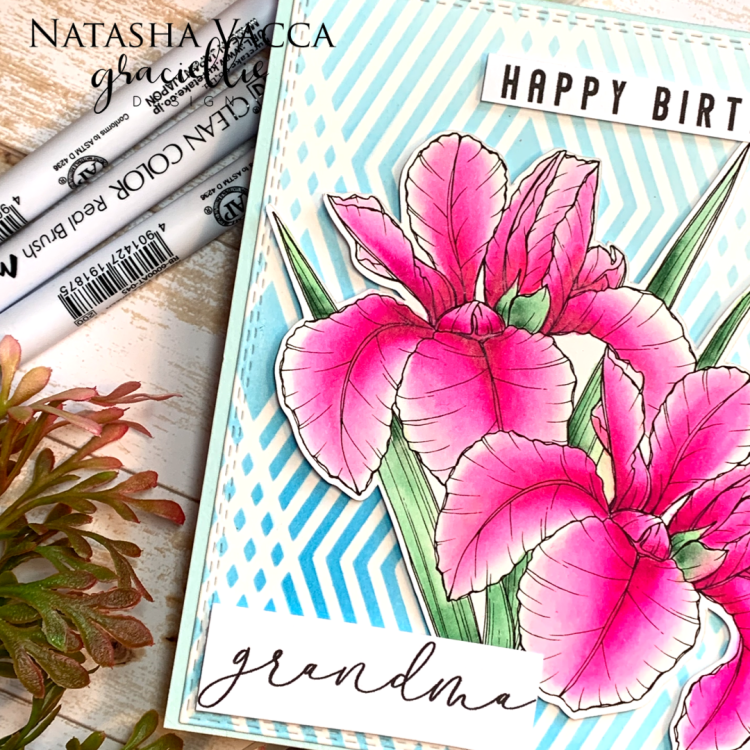
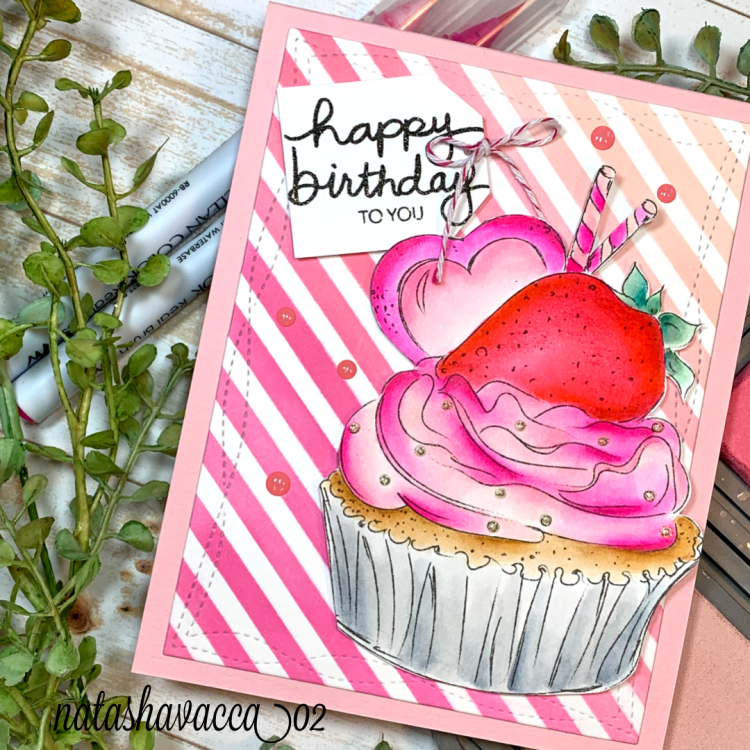
Happy Saturday everyone! Hope you had a nice week! I am back today using a new stamp from Alex Syberia. You can find her AMAZING blog here http://alexsyberia.com/ I encourage you to visit her blog and to see her beautiful work, as well as visit all the guest designers to see their work using her new release. Today I am using the Strawberry Cupcake image, you can find a direct link to her shop here https://www.etsy.com/shop/AlexSyberiaDesign I had so much fun creating with the beautiful Strawberry Cupcake stamp! This image is so fun, beautiful, and versatile! I wanted to create a large cupcake for my card, that was the focal point for my design!

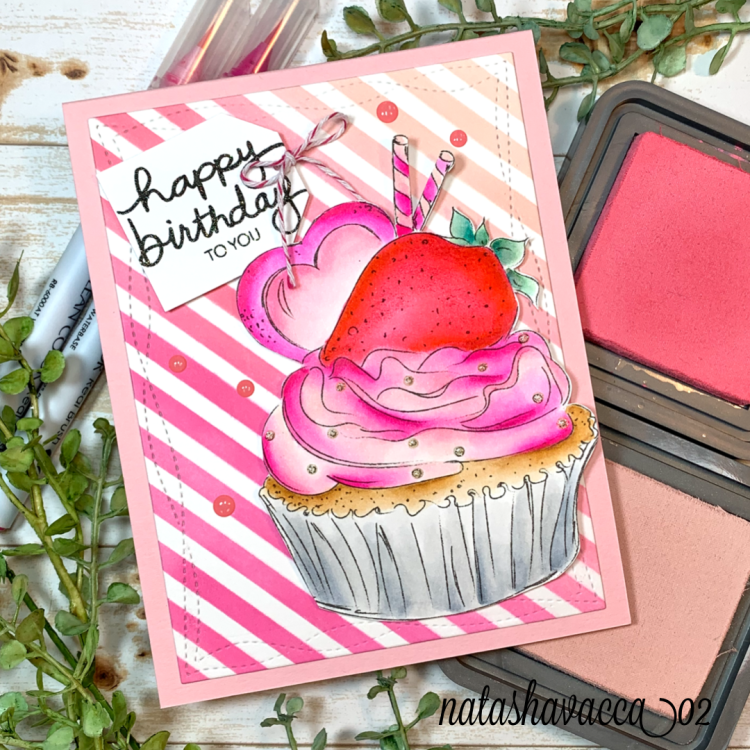
I started by stamping my image on Bristol Smooth card stock. I then colored my image using a variety of zig clean color brush markers. I wanted to use a variety of shades of pink for this card. Once my coloring was complete I fussy cut the image. I then chose a stencil from Gina K Designs for the background and blended using 3 shades of distress oxide ink: Picked Raspberry, Worn Lipstick, and Tattered Rose. For my sentiment I chose a birthday script sentiment from Stampin Up (past Paper Pumpkin kit) and used versa mark ink in black. I chose an embossing powder with some glitter/shine. I then cut the sentiment into a tag shape and used a small hole punch to add a bow using twine.

I then foam mounted the cupcake and sentiment to the stenciled background and adhered this panel to my card front. I added a few pink drops to the panel for added dimension.

I hope this birthday card brings someone a smile!

Supplies Used:

  • Stamps: Strawberry Cupcake(Alex Syberia Designs), Stampin Up
  • Paper: Bristol Smooth card stock
  • Coloring Medium: Zig Clean color brush markers
  • Other supplies: Distress Oxide Ink, Gian K stencil

Have a good day! Crafty Hugs,

Natasha

Clematis – Alex Syberia Design

Hi Everyone! I am so excited to be a guest designer for Alex Syberia this month as she has a BEAUTIFUL new release! I have shared a couple cards with you already and today I am the guest on Alex’s blog! http://alexsyberia.com/ Be sure to visit Alex’s blog for amazing inspiration from many other guests, as well as Alex herself! Her cards are beyond AMAZING! I know you will love them! I have been such a fan of hers and her AMAZING coloring, that this is truly an honor for me! Today I am using the new Clematis stamp. You can find this set in her shop (as well as so many others). https://www.etsy.com/shop/AlexSyberiaDesign

I love this stamp set and it was a lot of fun to color. I wanted to create a monochromatic color palette for my first card.I printed my image on Bristol smooth card stock. I chose to work with my zig clean color brush markers for this design. For my floral image I used light pink and wine red. For the leaves I used a variety of shades of green, as well as added some highlight areas using yellow. I have been working to add more dimension to my cards using colored pencils after my image is dry. I used a variety of pencils in darker pink and green tones in the nooks and crannies.

In the center of the flowers, I used perfect pearls powder in gold. I then chose 2 different sentiments for this card. The first sentiment (thank you) is from The beautiful Blooms stamp set from The Gray Muse (illustrated by Alex Syberia) and the (Love you Friend) sentiment is also from The Gray Muse, Happiness Blooms. I stamped these both and heat embossed them with white powder on black card stock. I then used foam tape to adhere these for added dimension. I chose a couple clear sequins for added sparkle.

Supplies Used:

  • Stamps: Cleamtis (Alex Syberia Design), The Gray Muse
  • Paper: Bristol Smooth Cardstock
  • Coloring Medium: Zig Clean Color briush markers, colored pencils
  • Other supplies: Clear sequins

Thank you so much for stopping by! I am so thankful for Alex for this opportunity! Stay tuned… I have 2 more cards coming soon from this release!

Crafty Hugs, Natasha

Happy Flowers – Alex Syberia Designs

Hi everyone! I am back with another beautiful stamp from Alex Syberia. This one is called Happy Flowers! This stamp sure does make me happy! For this card I wanted to create a bright flower to help remind me that spring is coming! You can find this beautiful digi stamp in Alex’s shop, as well as many beautiful other stamps in her collection! This stamp is part of her new release! https://www.etsy.com/shop/AlexSyberiaDesign I can’t wait to share 3 more cards with you as a part of Alex’s guest design for her new release!

I started by printing my stamp on Bristol smooth card stock. I then started to color my stamp using Tombow Dual brush pens. I used a pink, orange, and yellow for this flower. Once the flower was dry, I used colored pencils to add more dimension to the nooks and crannies. I truly love adding pencils to my coloring now! I hope you like it too! For the center of my flower I used a combination of Nuvo drops, as well as perfect pearls.

I then added splatter to my card base over my flower image. I used a combination of gold and pink splatter. I then chose a sentiment (You’re the Best) from Ranger. I heat embossed the sentiment using white embossing powder and adhered this to my card using foam tape.

I added a piece of pink card stock to the base and adhered my card together! I hope you enjoy this design! A huge thank you to Alex for having me be a part of this release! I am very thankful!

Craft Supplies Used:

  • Stamps: Happy Flower (Alex Syberia Design), Ranger
  • Paper: Bristol smooth
  • Coloring Medium: Tombow Dual Brush pens
  • Other supplies: Metallic Watercolor, Perfect Pearls, Nuvo Drops

Have a great week and crafty hugs!

Natasha

Love and Friends – Collaboration

Hi everyone! I am excited for a collaboration with 2 of my fellow Graciellie Designs team mates Sandhya Iyer and Angie Cimbalo. For this collaboration we chose to use the beautiful Love and Friends stamp set. https://gracielliedesign.shop/product/love-friends-digital-stamp-set/ This set has a beautiful grapevine wreath with a gorgeous floral. The sentiments in this set are so pretty as well.

I started by printing my image and sentiment on Tonic Studios alcohol marker paper. I was eager to try out my new Altenew Artist Markers for this project. I am learning how to color with these markers, I have a long way to go, but it is fun to learn new coloring mediums. I use the shades of purple set for the floral image. Once the image was completed I added shades of a deep purple and blue to the nooks and crannies for extra dimension. For the leaves I used greens from Tonic studios, Nuvo Alcohol marker pens. For the grapevine wreath I used 2 copic brown colors. Wow… I sure do have a mix of alcohol markers! But I guess it works….. To complete my card I used Nuvo glitter drops and metallic water color splatter, along with some gold sequins.

I would love it if you would stop by Sandhya’s blog to see how she used this set! https://wp.me/paiTWP-JE Then be sure to stop by Angie’s blog to see another wonderful idea for this beautiful set! https://cimbacreativefun.blogspot.com/2020/02/always-love-you-with-graciellie-designs.html We would love to see what you make with this set! Be sure to tag us on Instagram using the #gracielliedesigncollab

Supplies Used:

  • Stamps: Love and Friends (Graciellie Design)
  • Paper: Tonic Studios, Recollections for card base
  • Coloring Medium: Altenew artist markers (Shades of Purple), Tonic Nuvo Markers, Copic
  • Other supplies: sequins, metallic watercolor, Tonic Glitter drops

Hope you had a great weekend! Crafty Hugs,

Natasha

A Cup of Love – Graciellie Design

Hi everyone! Hope your weekend is off to a great start! We had a snowstorm over the last couple of days, so I spent my time inside! I was able to craft with the new release from Graciellie Design – A Cup of Love! https://gracielliedesign.shop/product/a-cup-of-love-mega-digital-stamp-set/ I wanted to create a cup of coffee/hot cocoa with some yummy sprinkled whipped cream! I went for a glittery cup, I hope you like it! This set has an adorable cup of coffee, cookie shaped hearts, and adorable sentiments!

I started by printing my digital images on alcohol marker friendly card stock, today I chose to work with the Tonic Studios card stock. I then colored all of my images using Arteza Everblend alcohol markers. Once my images were all colored, I cut them out using my Brother scan and cut. I then used an embossing folder (Provo Craft) hearts background on white card stock. I then mounted all my images using foam tape. I added a combination of stickles to the whipped cream. I wanted a glittery cup… as well as to the sprinkles on the cookies. I added a few sequins for added sparkle. I added my sentiment and my card was complete! I hope you like it!

Supplies Used:

  • Stamps: A Cup of Love (digital stamps) Graciellie Design
  • Paper: Tonic Studios
  • Coloring Medium: Arteza Everblend Alcohol Markers
  • Other supplies: Hearts embossing folder, stickles, and sequins

Have a nice weekend! Crafty Hugs,

Natasha

A Beautiful Clematis – Alex Syberia

Hi Everyone! I am super excited to share with you my first card as a guest designer for Alex Syberia! I have been a huge fan of her work for awhile now! Her coloring just blows my mind, it’s truly GORGEOUS! A huge thank you to Alex for having me be a part of her release! You can find all the beautiful new stamps at her Etsy shop https://www.etsy.com/shop/AlexSyberiaDesign

For my first card I chose the stamp A beautiful Clematis. I am such a fan of flowers, so I couldn’t wait to ink this one up! I started by printing my images on Bristol smooth cardstock. I love this paper for stamping when I am coloring with my zig clean color brush markers. I chose a variety of shades of pink. For the leaves I used a combination of greens and blues. I love adding in a deep blue in the nooks and crannies. I then cut out the image using my Brother scan and cut.

I then used another piece of Bristol smooth card stock for my A2 panel. I wanted to create an ink blended background. I used a combination of Antique Linen and Shaded Lilac. I then used drops of water and perfect pearls on the background as well. For my sentiments I chose a friend die from Simon Says stamp and The Gray Muse (amazing sentiment). I added some sequins from Trinity stamps for added shine.

Supplies Used:

  • Stamps: Alex Syberia (digital stamps) https://www.etsy.com/shop/AlexSyberiaDesign
  • Simon Says stamp die, The Gray Muse
  • Coloring Medium: Zig Clean Color Brush Markers, Distress Oxide Ink
  • Other: Perfect Pearls, Trinity Stamps sequins

Wishing you a great weekend! Crafty Hugs,

Natasha

Family Love – Graciellie Design

Hi everyone! I hope you had a GREAT weekend! Did you watch the Super Bowl? I didn’t watch it, but I did watch the half time show! That is my favorite part! I did enjoy some yummy super bowl food though! I hope you had a good weekend and your week is off to a good start! This weekend Graciellie Design’s released a beautiful new bundle… Family Love, it truly is GORGEOUS! I couldn’t wait to begin my 2nd card with this gorgeous release! https://gracielliedesign.shop/product/family-love-digital-stamp-bundle/

I started my printing the digital image on bristol smooth cardstock! This is my favorite card stock for water brush markers! I loved this image with the 2 iris flowers. I chose different shades of pink for this card, I used a light, medium, and a dark in the nooks and crannies. I did add extra color using colored pencils to darker highlight areas. I used a combination of greens for the leaves. I then die cut the flower image using my scan and cut machine. I chose 2 different sentiments from this bundle for my card. I love all the different sentiments in this set! They are so pretty!

I then chose a stencil from Hero Arts for the base of my card panel. I chose a bright blue to compliment the pink in the flowers. I adhered the stenciled background to my card and used foam tape to mount the flowers, as well as the sentiments! I encourage you to give digital images a try! They are so fun to work with! I love that I can resize them and even layer them! I am happy to help if you need! Have a great week!

Supplies Used:

  • Stamps: Family Love digital Bundle, Graciellie Design
  • Paper: Bristol Smooth card stock
  • Coloring Medium: Zig clean color brush markers
  • Other – Hero Arts stencil

Have a great week! Crafty Hugs,

Natasha

Graciellie Design – Family Love

Hi everyone! Hope you had a great week! It’s been a busy week here, but I am ready to begin the weekend! I am so excited to share the beautiful new release from Graciellie Design. Her new set is called Family love and it is a GORGEOUS set! The set includes beautiful Iris flower images, as well as over 22 sentiments for any family member! This set is beautiful and so versatile! I think you will love it! https://gracielliedesign.shop/product/family-love-digital-stamp-bundle/ This beautiful new set is currently 20% off and the entire shop is 10% off!

I started by printing my digital images on Bristol smooth card stock. When working with digital images I let my images dry for 24 hours to ensure the ink doesn’t smear as I color. Depending on your printer you may not need to do this, but this method works best for me! For today’s card I chose the large single iris flower and re-sized the image to make this my focal point. I wanted to create a clean and simple design. To color I chose a variety of my zig clean color brush markers. I wanted to add different shades of purple, along with some areas of a pink/purple for added interest. Once the coloring was complete I added a sentiment from the set, along with some clear sequins. I also popped up my sentiment for added dimension. I hope you enjoy this card!

Supplies Used:

  • Stamps: Family Love Digital Stamps, Graciellie Design
  • Paper: Bristol Smooth cardstock
  • Coloring Medium: Zig Clean color brush markers
  • Other supplies: Clear sequins

Wishing you a wonderful weekend! Crafty Hugs,

Natasha

Cupcake Wishes – Graciellie Design

Hi everyone! Hope you are having a great start to the week! Today I have a fun birthday card for you using the beautiful, fun, and adorable Cupcake Wishes set by Graciellie Design: https://gracielliedesign.shop/product/cupcake-wishes-digital-stamp-set/

I love this fun digital set as the cupcake was fun to color and decorate! I enjoyed making an oversized image and off set the image to the right of the card a bit. This set is perfect for anyones birthday, you could color it up to make this for a masculine card as well, or even for a little ones birthday!

I started by stamping my image on Bristol Smooth paper. I then chose a variety of colors to add details to my cupcake. I used a combination of my Arteza real brush pens and colored pencils. I recently took the Online Road trip card class and I truly loved it. I learned so much from Kathy Racoosin. In the class she talked a lot about color plucking and using pencils to add more details to the nooks and crannies. This is truly one of my favorite techniques now, it truly adds more details and dimension! I encourage you to give it a try! Once I had completed my coloring, I used my Brother Scan and Cut to “cut” my image. I cut directly on the stamped image this time, as I did not want a border. I added stickles to the sprinkles for some more shine and interest.

I then used distressed oxide on my A2 panel. I blended the background using Squeezed Lemonade. I did add a little water to my blended background as well (sorry it is harder to see). I then stamped a birthday sentiment from Stampin Up (past Paper Pumpkin kit). I did add a little more stickles to the front panel for more interest!

I hope you enjoyed this fun cupcake! I encourage you to give digital stamps a try, if you need help or have questions feel free to reach out to me! Have a good week!

Supplies Used:

  • Stamps: Graciellie Design Cupcake Wishes
  • Paper: Bristol Smooth Cardstock
  • Coloring Medium: Arteza real brush pens, colored pencils (Prismacolor and Arteza)
  • Other Supplies: Stickles

Have a wonderful Wednesday! Crafty Hugs,

Natasha

Wild & Whimsy – Graciellie Design

Hi everyone! I am back with a beautiful new collection from Graciellie Design! I started by printing papers for the Wild and Whimsy digital paper pack https://gracielliedesign.shop/product/wild-whimsy-digital-paper-pack/, as well as images from the beautiful Wild and Whimsy sticker pack https://gracielliedesign.shop/product/wild-whimsy-digital-stickers/ These images are all so beautiful and are watercolored by the amazing Gracie from Graciellie Design! Be sure to visit her shop there is a 50% off sale on orders over $20 this weekend!

I started with the navy blue and white striped patterned paper and die cut a circle in the middle for a shaker card. I then used 2 circle dies together to create a border circle around the center die cut. I then created a shaker pouch using storage pockets. I cut a section I needed and then used my fuse tool to create the pocket. I added a mix of sequins which had similar colors to the beautiful images I chose for my card. I then adhered the pouch on the back of the panel and used foam tape to pop up the card panel.

I then chose several images from the sticker pack and decided on a layout for my images! I did pre-cut these images using my Brother Scan and Cut, I love this machine! I adhered all the images and then chose a sentiment for my card. My sentiment is from Ranger, I chose a bold Hello statement and embossed it using gold embossing powder. I then used foam tape to pop up the sentiment.

Materials Used:

  • Stamps/Papers: Graciellie Design
  • Paper: Images printed by Staples copy center, Recollections 110 for card base
  • Other supplies: mixed sequins, circle die cuts

Have a great start to your week! Crafty Hugs,

Natasha