Just Hold On – Monthly Floral Release

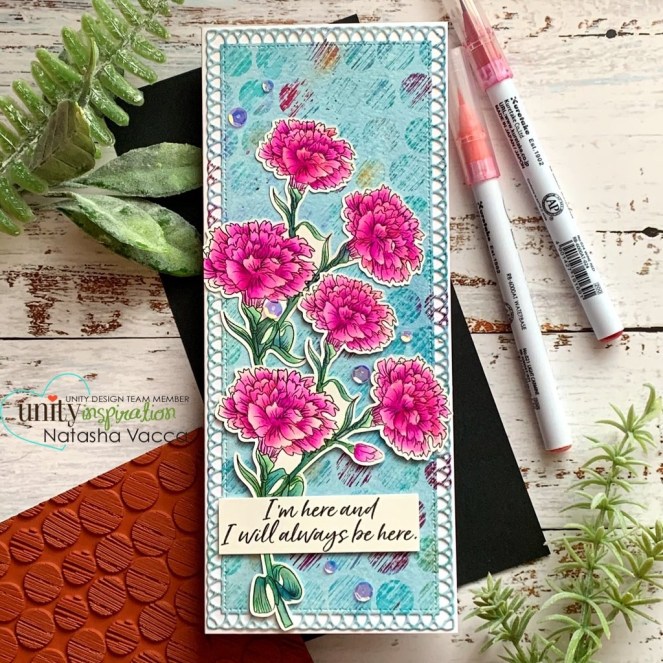
Hi Friends! I wanted to stop in to share with you the beautiful new monthly floral release from Unity Stamp Company! I am super excited for a monthly floral stamp set for each month in the coming year! Today I am sharing the first set with you called Just Hold On! This set has a beautiful carnation and 3 beautiful sentiments! I am so excited about this set! Let’s get started!

Just Hold On

Stamping/Coloring

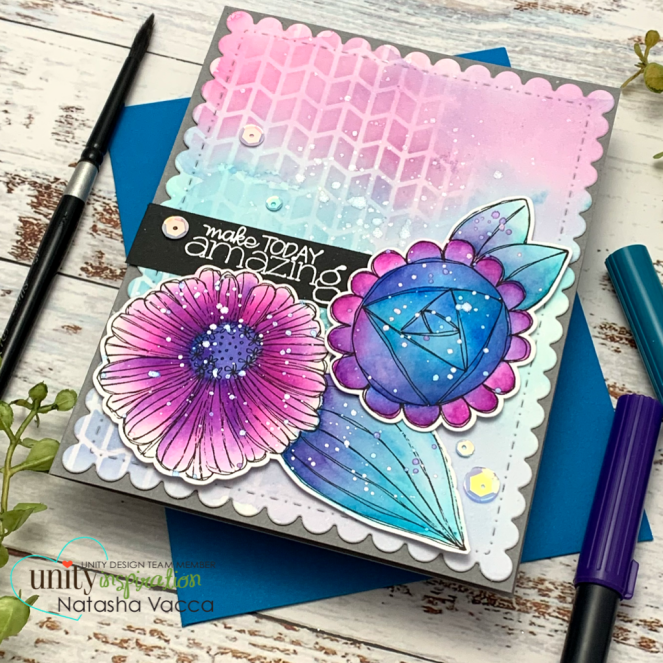
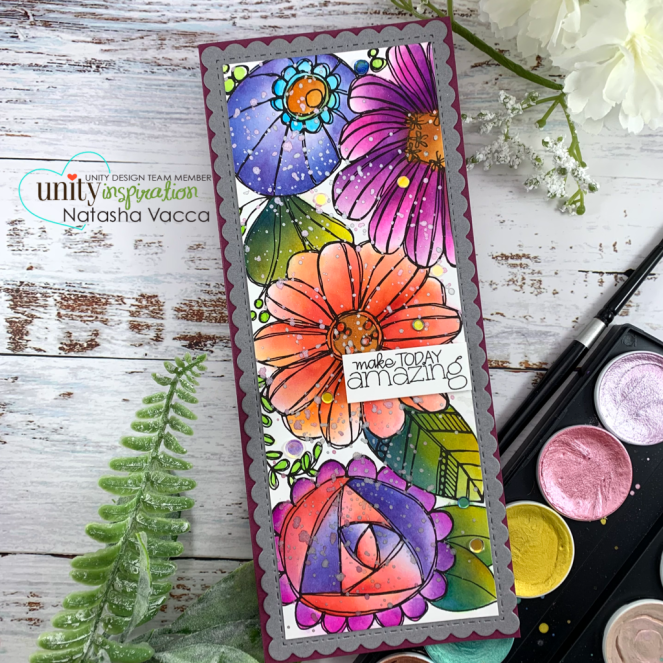
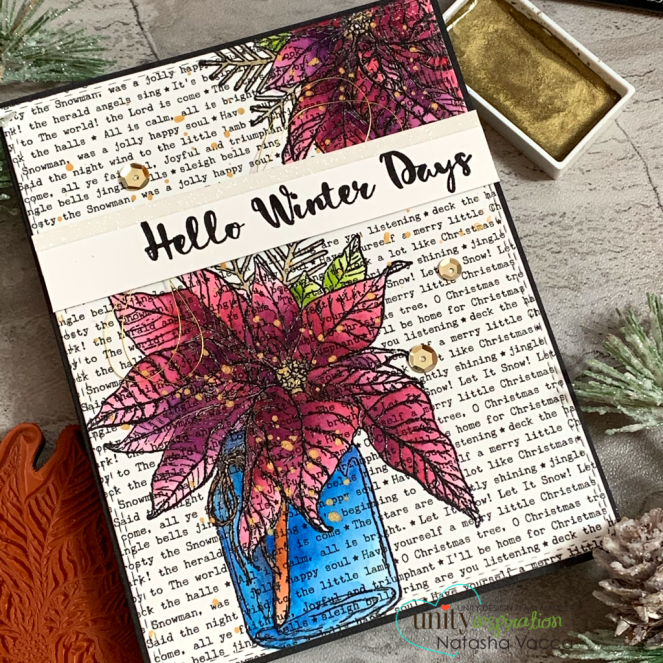
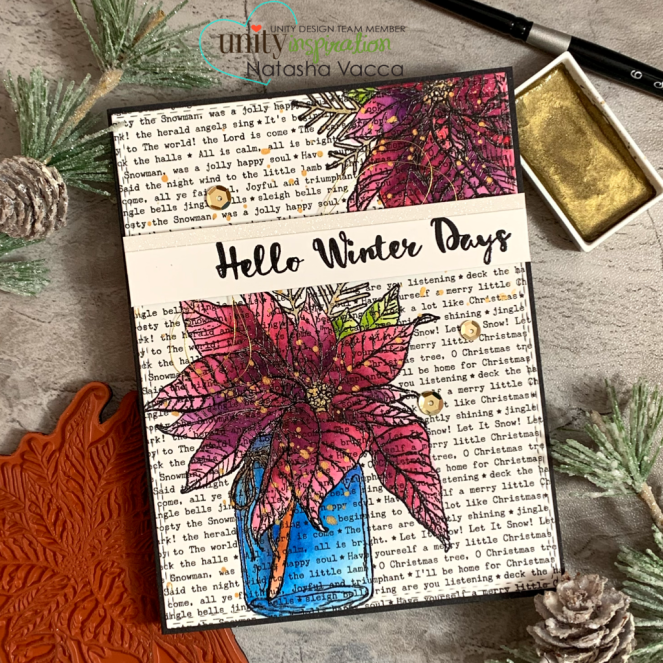
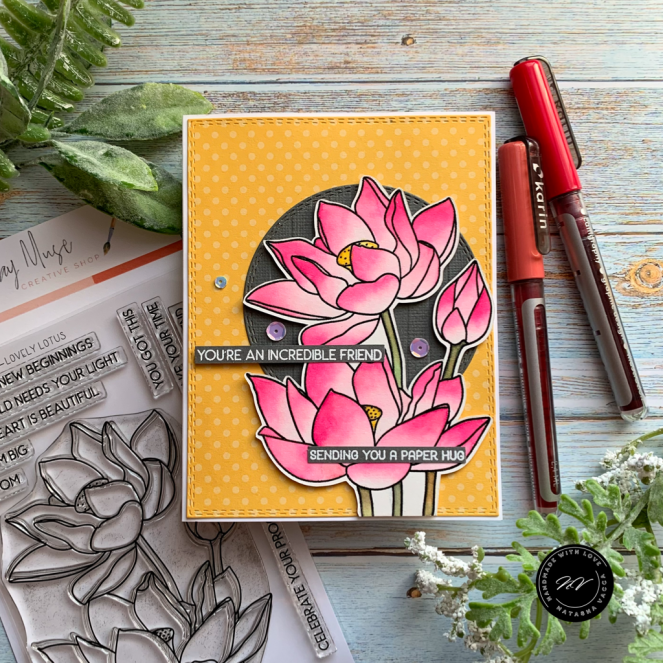
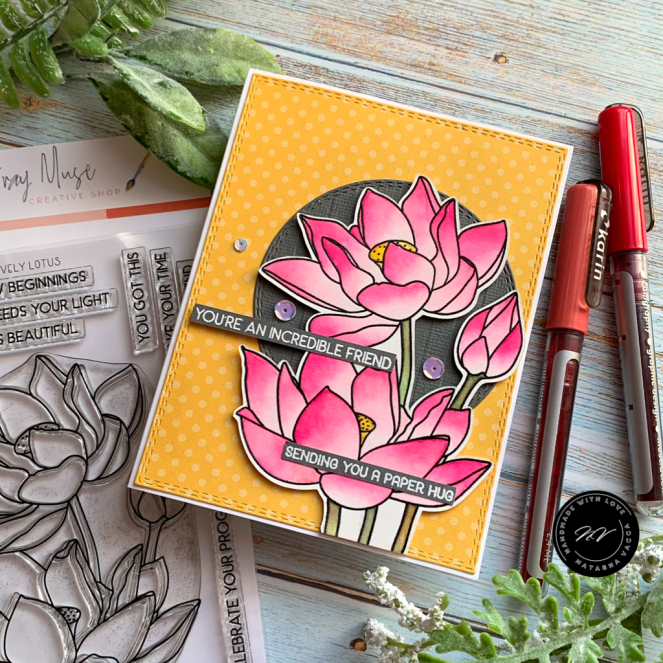
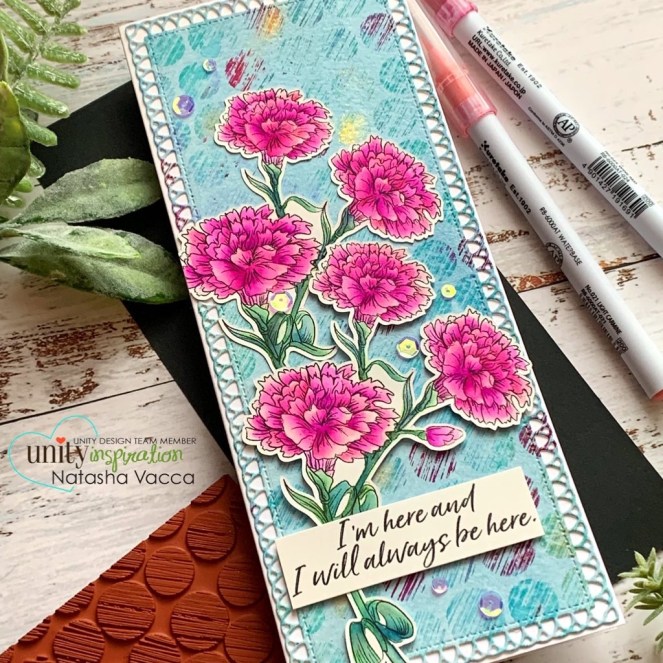
I started by stamping two of the caranation florals on Fabriano Hot Press cardstock. I knew I wanted to create a slimline card using this beautiful new image, so I stamped 2 images. For my coloring today I am using my Zig Clean color brush markers! These markers still hold a special place in my heart, so I love to take these back out to watercolor with! I worked from lightest to darkest for all of the coloring. I had fun coloring these images. I set these aside to dry. Once they were dry I used my Brother Scan and cut to trim both of the floral images.

Background

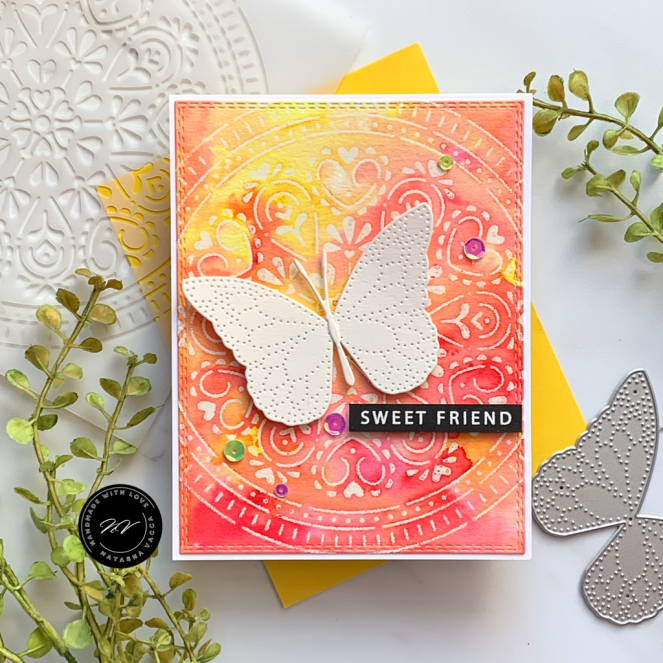
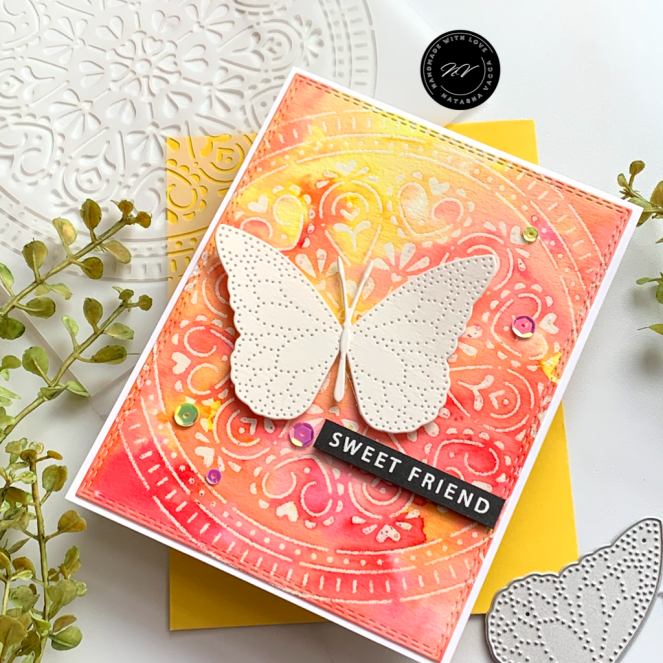
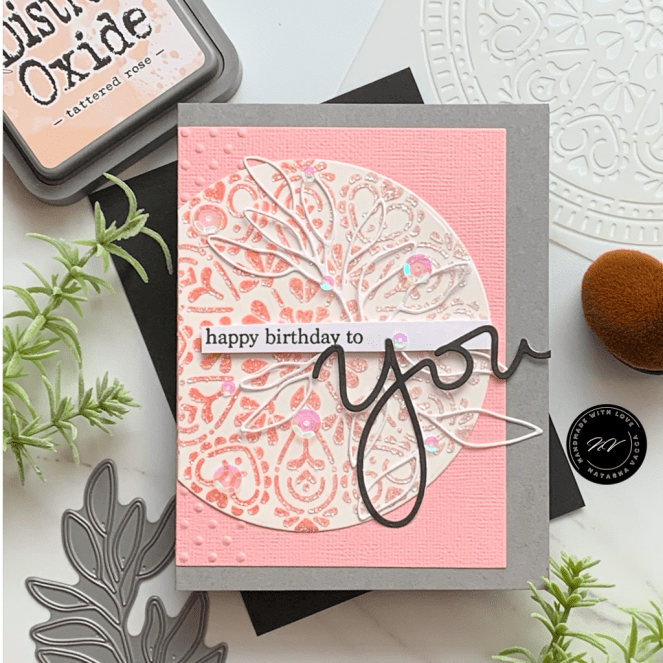
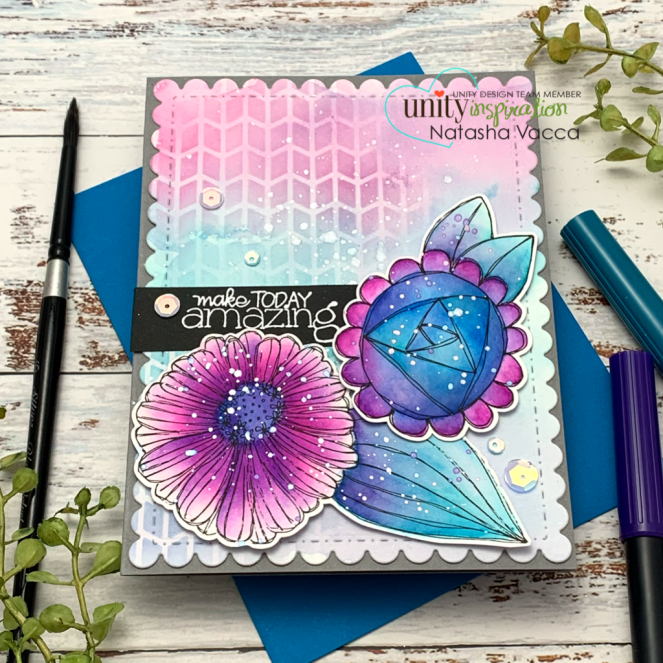
For my background today I am using one of the newer background stamps in the Unity collection, it is called Polka Dance! I just LOVE everything about this background stamp! Be sure to check it out now – it is on sale too! To create the background I trimmed a panel of watercolor cardstock to slimline size 3.5 x 8.5 and placed this in my Misti. I inked up the background using Distress Inks: Peacock Feathers, Shaded Lilac, Gold Pigment Ink, and my zig marker. I lightly misted the stamp with water and stamped the image. I completed this several times to ensure I had the colors I was looking for. I then trimmed down the panel using a Gina Marie Designs slimline die. I also added Perfect Pearls to some of the dots for added shine.

Card Assembly/Sentiment

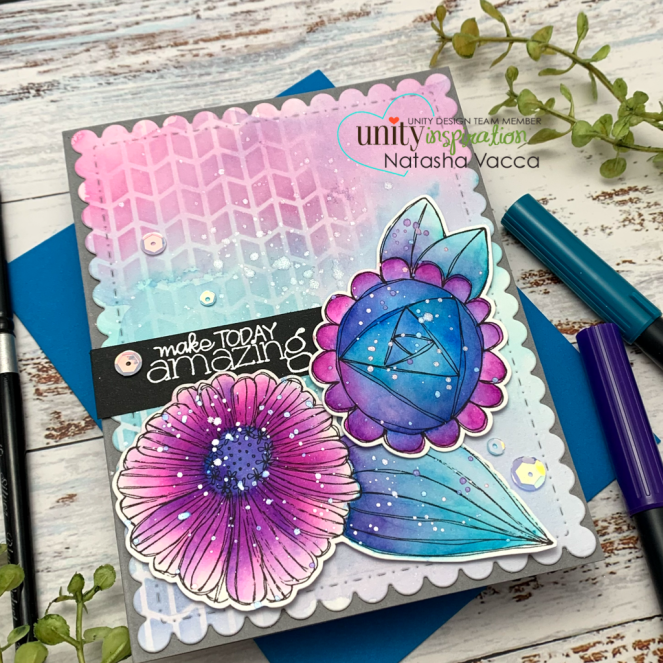
I always love putting the card together once all the elements are ready to go! I foam mounted the 2 flowers on the Polka dance background. I stamped a sentiment from the stamp set on white cardstock and adhered this with foam tape as well. I glued the panel down onto a slimline card base. I added a few sequins from Studia Katia – Crystal Clear Fushion.

I hope you enjoyed my new card featuring the beautiful new Just Hold On stamp set! I am so excited to see all of the beautiful monthly floral images released in 2021!

Thank you for stopping by today! Be sure to check out the SALE that is still happening at Unity Stamp Company! I have the SALE categories listed for you here as well! You can click on any of the links I have shared if you are interested in purchasing the products. The products listed are a compensated affiliate link, which means if you make a purchase I receive a small commission with no extra cost to you. I really appreciate your support.

Crafty Hugs,

Natasha

Simon Says Stamp – Love you Release

Hi Crafty Friends! I hope this post finds you doing well! It is hard to believe it is December! Today I am back sharing a new card using the new Boho Circle Stencil from the beautiful Simon Says Stamp – Love You Release! This release is so beautiful – I seriously love it all! You can check out all of the new release here – Simon Says Stamp Love you December 2020 Release.

Stencil/Coloring & Background

I started with the Boho Circle Stencil on Canson Watercolor cardstock. I began by prepping the area for embossing using my embossing buddy. I taped my cardstock on my stencil and then used my WOW embossing pad to emboss the stencil onto the watercolor cardstock. I made sure to add 2 layers of embossing ink to ensure I had good coverage. I then sprinkled clear embossing powder and heat set the stenciled image. I love watching the powder melt! The pattern on the Boho stencil is so beautiful and for this card I wanted to create a bright and colorful card! I thought it would be fun to send to a friend during these cold winter month’s!

I then taped down my card panel onto a hard board. For this card I colored the background of the stamp using Ken Oliver Color Burst powders! These powders are so fun and truly easy to use! I chose 3 colors: Alizarin Crimson, Orange, and Lemon Yellow. With these powders you truly don’t need too much. I sprinkled a little of each color onto my card stock and then spritzed the panel with water. The water does all the work! They blend easily and are truly so pigmented! I then set it aside to dry on it’s own.

Card Assembly/Sentiment

While my card panel was drying, I die cut the gorgeous Detail Meadow Butterly. I have had this gorgeous die in my stash for a bit, I thought it was the perfect addition to this bright and colorful card. I die cut this on Canson watercolor paper as well. I wasn’t sure if I was going to add color to it, in the end I decided to leave it white. I chose a sentiment from the Summer Rose Stamp set. I heat embossed this on black cardstock using white embossing powder. I then trimmed down my stenciled background using a rectangle die from Gina Marie Designs. I then adhered my card together using foam tape on the butterfly and the sentiment strip. I added a few Simon Says Stamp sequins from a past card kit. I hope you like it!

I will be sharing my other 2 cards on social media over the next few days! I will share them here with you!

Boho Stencil – Foiling

Boho Stencil/Ink Blending

Thank you for stopping by today! I hope you have a great day!

Crafty Hugs,

Natasha

Let’s Make Today Amazing

Hi crafty friends! I am super excited to be back to share a watercolor background technique using a stencil. I love a watercolor background and wanted to create a fun and colorful background for the beautiful new release – Pocket Full of Posies from Unity Stamp Company! For Cyber Monday Unity Stamp Company has released 10 new stamp sets! There is truly something for everyone, holiday, flowers, dinosaurs, and a new slimline stamp too! You can see all of the new released kits here. So let’s get started!

Pocket Full of Posies

Stamping/Coloring

I started by stamping 2 flowers from the new stamp kit – Pocket Full of Posies. This new kit has 4 floral images and 2 sentiments. I chose 2 flowers from this kit for my first card. I stamped the images on Fabriano Hot Press watercolor cardstock. For my flower images I used my Tombow brush pens. It was fun to use these, I haven’t used them in awhile. I worked from lightest to darkest for my color, being sure to let each layer dry in between. Once my coloring was complete, I trimmed these using my Brother Scan and cut. I then added splatters to both flowers using my metallic watercolors. I then set these aside.

Background

I then started to work on my background! I wanted to create a soft background using water color, with some added interest using a stencil. I started with a piece of Canson Watercolor cardstock, trimmed to 4.5 x 5.5. For my background I chose to use Distress Inks today. I used the following 3 colors: Picked Raspberry, Peacock Feathers and Shaded Lilac. I smooshed all 3 colors on my glass mat in the order listed above from top to bottom. I create a row of each color on my glass mat and spritzed it with water. I then layed my cardstock on my glass mat and “smooshed” the paper. I completed this 2x and set it aside to dry. Once it was dry I chose a stencil from my stash with a small pattern – this stencil is from Gina Marie Designs. I layed this on top of my watercolor panel and used the same 3 inks on the above panel. I used a gentle touch with my blending brushes, as I wanted to create a light stencil pattern. I then added a bit of sparkles using Perfect Pearls on the background using a paintbrush to create splatter. I set this aside to dry.

Card Assembly/Sentiment

Once everything was dry, it was time to assemble my card. I die cut the background using a scallop rectangle border from Gina Marie Designs. I adhered this to a gray card base. I chose a sentiment from the Funky Flowers stamp kit. I thought this sentiment would be fun for a birthday card. I heat embossed the sentiment on black cardstock using white embossing powder. I glued the sentiment to my watercolor panel and popped up the flowers using foam tape. I added a few sequins and my card is complete!

I hope you enjoy this new stamp kit – Pocket Full of Posies by artist Ann Corbiere. I can’t wait to use this stamp kit again to create a masked background! These flowers are so fun and whimsical!

Cyber Monday NEW Releases

You can shop all of the new stamp kits released today for Cyber Monday – NEW RELEASES, as well as Mini Kit Mania $7

Thank you for stopping by! Be sure to check back to Unity Stamp Company tomorrow for the December monthly kits! They are all AMAZING!

You can click on any of the links I have shared if you are interested in purchasing the products. The products listed are a compensated affiliate link, which means if you make a purchase I receive a small commission with no extra cost to you. I really appreciate your support.

Crafty Hugs,

Natasha

Watercolor with Sparkles – Unity Stamp Company

Hi everyone! I wanted to stop in today to share a card making technique with watercolor and sparkles! When I think of a winter scene I can see the snow glisten with added shine, it makes the cold and winter days so pretty! For today’s card I am using 2 stamp sets from Unity Stamp Company – October 2020 KOM and Love into Giving! Let’s get started!

I started by stamping the large tree scene stamp from the October 2020 KOM using Versafine Clair Ink – in Pinecone on Canson XL watercolor paper. I prepped my area for stamping using an antic-static powder tool. I stamped the image using Pinecone Versafine Clair. I stamped the image two times to ensure a dark and crisp image. I then added my first sparkle using Brutus Monroe Rainbow sparkle embossing powder. I love the subtle sparkle this embossing powder has, perfect for my winter scene. I followed the same process for the snowman from the Love into Giving stamp set. I love this cute snowman, he makes me smile!

I taped my stamped images to a board and enjoyed watercoloring with my Mission Gold watercolors. I started with my lightest colors and allowed them to dry, then added more color to add depth and dimension to both the trees and the sky. Once everything was watercolored, I set them aside to dry. I chose a sentiment from the October 2020 KOM and stamped this using Versafine Clair ink in Nocturne on a kraft cardstock. I then used my Tim Holtz distress tool to add a bit of a distressed edge to my sentiment strip.

Once my watercolor was completely dry, I wanted to add snow to the scene. To create the snow I used metallic watercolors in both white and silver. Once everything was dry, I fussy cut my snowman and assembled my card. I used a side folding card base, with a kraft card base. I popped up the sentiment using foam tape. I then added Stickles to the snowman’s hat and to parts of the tree as well for added shine and sparkles! I hope you enjoyed my watercolor scene with sparkles!

Thank you so much for stopping by today! I am so excited for this month over at Unity Stamp Company – we have so much more coming your way! It is an amazing time to shop – it is their biggest SALE of the year! No Coupon codes needed, just add items to your cart and watch the discounts appear – up to 55% off! I have listed all the products I used within my post. You can click on any of the links I have shared if you are interested in purchasing the products. The products listed are a compensated affiliate link, which means if you make a purchase I receive a small commission with no extra cost to you. I really appreciate your support.

Be sure to stop by to see all the items on SALE, including NEW stamp arrivals

Thank you for stopping by! I am truly thankful to have you stop over to my blog! It means so much to me!

Crafty Hugs,

Natasha

Simply Blessed – Unity Stamp Company

Hi Crafty friends! I hope you had a beautiful weekend! It was an awesome weekend here – the sun was shining, it was in the 70s, and my daughter came home from college for a family dinner! It was a GREAT weekend! I hope you had a nice weekend too! I wanted to stop in to share a card using one of the new released stamp sets from Unity stamp Company – Simply Blessed! I love this gorgeous new set by artist Graciellie Design. I love this gorgeous jar of blooms and the sentiments in this set! Graciellie has beautiful sentiments! I also wanted to stop in to share the AMAZING SALE that is happening over at Unity Stamp Company – it is their biggest SALE of the year! There are 10 new released stamp sets, an advent calendar, Unity Hoodies, and a discount on supplies! Be sure to head over and stock up now, add the item to your cart and watch the discounts appear! You will save 55% off on stamp sets! It is the best time to shop! Happy shopping!

It is an exciting month over at Unity stamp Company – I wanted to share a card using the new release Simply Blessed. I love this set by artist Graciellie Design.

I started by stamping the image onto Fabriano Hot Pressed watercolor paper. I love this paper for watercoloring – it is smooth and does well holding water! For today’s card I used my Zig Clean Color brush markers. I love the arrangement on this stamp. I just enjoyed the watercolor process for both the Eucalyptus and the Cotton Stems. I added several layers of color on these images and once it was complete I set is aside to dry.

I wanted to create a soft watercolor look for the my card, so I did the same for my background. I used a piece of Canson XL Watercolor card. I chose a few colors of Gansai Tambi watercolor to create the background. I used one of my favorite techniques to create the background – ink smooshing. I added the color to my glass mat with water and “smooshed” the paper on top of the ink. I completed this several times and then set it aside to dry. I love the natural look this gives!

To complete my card I trimmed down the panel to fit an A2 sized card and adhered this to my card base. I then die cut the floral jar using a Tim Holtz die. I chose a sentiment from the Aging Gorgeously sentiment kit. I heat embossed this on black card stock using white embossing powder. I love the sentiments in this kit – truly perfect for a birthday celebration! I used foam tape to adhere both the sentiment and the center die cut panel as well. I hope this card will bring cheer and happiness!

I am so excited to share 2 cards using two new SLIMLINE stamps at Unity Stamp Company! I just adore both of these new sets by artist Ann Corbiere-Scott. I am in love with these slimline stamps! They are perfect for a slimline card, as well as for creating an A2 card!

Here is an example using the new Funky Flowers. I used Peerless watercolors to complete the coloring on this card. Isn’t this stamp so much fun!

I am also loving the gorgeous new Let’s Get Merry slimline stamp! I love this large Poinsettia image – inside each section are tiny words – isn’t it just AMAZING!

Thank you so much for stopping by today! I am so excited for this month over at Unity Stamp Company – we have so much more coming your way! It is an amazing time to shop – it is their biggest SALE of the year! No Coupon codes needed, just add items to your cart and watch the discounts appear! I have listed all the products I used within my post. You can click on any of the links I have shared if you are interested in purchasing the products. The products listed are a compensated affiliate link, which means if you make a purchase I receive a small commission with no extra cost to you. I really appreciate your support.

Huge Site Wide SALE

Thank you for your support! I can’t wait to see your beautiful projects!

Crafty Hugs,

Natasha

Christmas Wishes – Unity Stamp Company

Hi Crafty friends! I hope you are having a great week! I wanted to stop in to share a gorgeous new release with you from Unity Stamp Company! Today I will share several cards with you using stamps and toner sheets from the new release! Its such a fun and sparkly release you will want to check it out! You can see the new stamp arrivals here

Christmas Wishes – Graciellie Design

For my first card I am using the beautiful new Christmas Wishes stamp set! This set has a large Holly stamp, as well as 5 beautiful sentiments! I love this set – I think it would be super fun to create a background using the holly too!

I started by stamping my image on Fabriano Hot Press watercolor paper. I have found this paper to be my new favorite paper – it can hold water, but it is also very smooth! I used my peerless watercolors for today’s stamp image. I began with my lightest shade of green, then added multiple layers using a deep green, as well as a purple and navy in the nooks and crannies. I like the shaded look this gives, as well as the added dimension. This was a fun and quick stamped image to water color. Once my coloring was complete I stamped my sentiment from the kit.

To complete my card I die cut the stamped image using a Hero Arts rectangle die. I then used patterned paper from my stash. I love plaid paper – so I chose red and green papers from my stash. Then I layered them, added foam tape behind my stamped image and my card was complete! It was super fun to water color, but also quick! This would be an easy image for mass producing! This set is also on SALE right now – be sure to check it out!

I also wanted to share here a few cards I have posted on my Instagram account over the last week, but also link them here for you as well! Unity Stamp Company also had a recent collaboration with Thermoweb and I had a chance to play with the new toner sheets, foils, and even an awesome new stamp set just released – Glimmering Greetings! There is still time to join the hop as well and a chance for prizes – be sure to start over at Unity Stamp Company’s Instagram account!

I am sharing a card here using the new Start Anew set designed by artist Graciellie Design just released in red rubber. This set is perfect to watercolor, copic color, or even use pencils on!

Start Anew

Our Gnome to Yours – isn’t this the cutest? I was so excited to add a gnomes set to my crafty stash! I love their sweet faces and their adorable hats! I combined this with a stencil from Unity as well – Star Confetti Stencil (Distress Oxide Ink, Glimmer paste). I can’t wait to create another holiday card with this set!

I also shared several cards this week using the new Unity Stamp Company and Thermoweb collaboration toner sheets. These are AMAZING!!!!! You can see all the sheets released here this week – there are 5 toner card fronts that were just released! Toner sheets …. These were AMAZING to work with and so easy! Such a fun and a fast way to add shine and sparkle to your holiday cards! Here are 3 examples using the new toner sheets….

Thank you for stopping by! I have listed all the products I used within my post. You can click on any of the links I have shared if you are interested in purchasing the products. The products listed are a compensated affiliate link, which means if you make a purchase I receive a small commission with no extra cost to you. I really appreciate your support.

Here are the NEW items and SALE categories at Unity Stamp Company

Thank you for stopping by today! It means so much to me! I can’t believe it is the end of October, that means new memberships at Unity will be revealed soon! I can’t wait! Be sure to keep checking the Unity Stamp Company website – NOVEMBER is going to be AWESOME!

Crafty Hugs,

Natasha

Sunflower – Sending Smiles

Hi crafty friends! I hope you had a nice weekend! It felt so good to have a weekend – I spent a lot of it in my craft room! I spent time organizing and creating! It felt so good! I was so excited to use the beautiful Simon Says stamp – Sunflower Background! I love this stamp and knew when I saw it released I had to add this to my stash! It is currently sold out, but you can check the store and have them notify you when it is back in stock!

I started by stamping this gorgeous background on Canson water color card stock. I used WOW embossing ink and Brutus Monroe Gilded Gold embossing powder! I love the added touches of gold for a fall card! I spent a couple of evenings working on watercoloring this beautiful stamp and working in layers! I used my Mijello Mission Gold watercolors on this card! I love these colors and they truly blend beautifully, but are also very vibrant! Which I love! In my leaves I did add some gold water color from my Gansai Tambi colors. I love adding touches of gold to my leaves!

I then chose to use the sentiment Sending Smiles from the Simon Says Stamp September card kit! I love this die! This die is sold separately as well – you can see it here. I die cut the background layer using vellum and then die cut the words using cardstock from my stash. I die cut the sentiment 2x and layered these together! I love how the die cuts out the heart shape as well! I thought they were so cute I added them to the (d & g) within the sentiment! I completed the card by die cutting the panel using a Hero Arts rectangle die. I had a small panel left over and I did adhere this inside the card as well!

Thank you so much for stopping by today! I hope you have a great week!

Crafty Hugs,

Natasha

Unity Stamp Company Release

Hi crafty friends! I wanted to pop in to say hi and share a new release with you from Unity Stamp Company! Unity released 5 new sets today and they are all adorable and amazing! I couldn’t wait to stop in quickly to share them with you! I am also linking to the amazing SALE they are having as well, by artists Graciellie Designs, Phyllis Harris, Angie Blom, as well as background stamps!

A Little Christmas Carol – Background Stamp

I love a background stamp and couldn’t wait to share this one with you! I am using the new A Little Christmas Carol. I love the small font and how this perfectly pairs with so many stamps! It’s the perfect addition to your holiday stamps! I paired this beautiful background with the beautiful Poinsettia from the KOM. What will you pair this background stamp with?

Card Details:

  • Stamp background on Hot press watercolor paper
  • Emboss Poinsettia image using clear embossing powder
  • watercolor stamped image using Peerless Watercolors
  • Add metallic splatters – Gansai Tambi
  • Stamp and heat emboss sentiment using clear embossing powder
  • Gina Marie Designs stitched Rectangle die for card panel
  • Foam tape behind sentiment, as well as gold string, sequins for embellishment

Holiday Dearies

For my second card I am using the adorable Holiday Dearies set! Aren’t these deer the cutest! I am also loving the font on these sentiments! I combined my stamped images with patterned paper from my stash for a fun and festive holiday card! Unity also has their pattern paper on SALE right now! I truly love the quality of their paper – check it out here too!

Card Details:

  • stamp images on Hot Press water color paper
  • color stamped images using Karin brush markers, add color pencils to the nooks and crannies
  • Pattern paper from stash to create holiday background
  • Gina Marie Designs stitched rectangle die
  • Distress Oxide ink to add shadows around stamped images

Thank you for stopping by today! I just wanted to say hi and I couldn’t wait to share these with you! If you have any questions, please let me know! Thank you for all your support! It truly means a lot to me!

Thank you for stopping by! I have listed all the products I used within my post. You can click on any of the links I have shared if you are interested in purchasing the products. The products listed are a compensated affiliate link, which means if you make a purchase I receive a small commission with no extra cost to you. I really appreciate your support.

Here is a link to the new release, as well as the SALE! I love the Mystery SALE…. add items to your cart to see the discounts appear! Have fun shopping!

Crafty Hugs,

Natasha

Make Merry – Simon Says Stamp release

Hi Crafty Friends! I hope this post finds you doing well! I am hoping to get back on track with my blog… I am excited to be here today to share a brand new release with you from Simon Says Stamp! It is an awesome and FESTIVE release – Make Merry! You can see the release here !

Today I am sharing 3 cards using the beautiful new stamp set Holiday Sparkle Greetings! I love this new stamp set – it has 4 beautiful greetings, they are perfect for an A2 sized card, as well as a slimline card. This set also has fun stamps to add more embellishments to use on your cards!

Card 1 – Holiday Sparkle Greetings

I had so much fun creating my cards today! My first 2 cards is a 2 for 1 card! I love when I can create 2 cards out of 1 background! In one of my recent orders from Simon Says stamp I ordered the Round and Round Background stamp! I love the versatility of this stamp and thought it would be a fun stamp to create a festive background! I started by stamping the image on Canson Water color card stock. I heat embossed the image using Gold embossing powder. To create the red background I used Nuvo Shimmer powders – in Catherine Wheel. I love these powders and when working with them you do not need very much. I added a bit of powder to my paper and then sprayed my paper with water. It is so fun to see the powders and water do all the work! I then set this aside to dry! I find these work best when you allow them to dry on their own.

I then chose a sentiment from the set – Joy! I prepped my area using my embossing buddy. I then stamped the Joy sentiment and all of the dot embellishment stamps and heat embossed these in gold. Once everything was dry, I trimmed down my Round and Round background panel and cut this in half. I then adhered my card together. I added a strip of glitter cardstock between the layers as well for added interest! My card was complete!

Card 2

For my 2nd card I followed the same steps as above. This 2nd card came together very quickly. I did add strips of gold cardstock to change this card up a bit. I still think it is fun and festive!

Card 3

For my last card I am using the Holiday Sparkle Greetings stamp set and 2 sets from Stamptember (Laugh in Flowers and Long Stem Flowers). I love the different sentiments in this new set – I chose to work with the happy sentiment to create a birthday card! I was so excited to use Laugh in Flowers – I have had this in my stash now for a couple weeks and I couldn’t wait to use it! I hope you enjoy it!

I started by creating a rainbow background using distress oxides. I then added splatters to the background using water and gold metallic watercolor. I then set this aside to dry. Once everything was completely dry, I stamped the sentiment Happy – Holiday Sparkle Greetings. I added a couple flowers from Laugh in Flowers and a birthday sentiment from the Stamptember collab/Long Stem Flowers. The flowers were stamped using Altenew ink cubes and a gold pigment ink.

I then trimmed down the panel using a Gina Marie Designs scalloped slimline die. I added a few sequins (September card kit – Simon says Stamp) and a bow using twine.

I hope my cards inspire you today to check out the amazing new release!

Have a great week!

Crafty Hugs,

Natasha

Gray Muse – Summer/Fall 2020 Blog Hop

Welcome to The Gray Muse Blog Hop featuring the 2020 Summer/Fall Stamp Collection! This release includes seven gorgeous floral stamp sets and one must-have sentiment set titled Social Distance! We have some amazing guests sharing inspiration using these stamp sets so grab your favorite drink and get to hopping!

Giveaway: The Gray Muse is giving away FIVE $25 gift codes to the shop so you can add some of these stamps (or enamel pins) to your collection. In order to qualify, leave comments on every post in the hop. The more posts you comment on, the greater your chances. The giveaway ends on Wednesday, September 30th at 11:59 pm Eastern Time. All winners will be selected at random and announced on The Gray Muse Blog within a week.  

I want to say thank you to Rubeena for having me join in her newest release blog hop! I discovered Rubeena as a crafter and have been a HUGE fan of her work! I was drawn to her beautiful cards and watercolor! She is extremely talented! I discovered her pins last year and have been hooked! They are amazing and I am happy to say I have a full enamel pin board now! I am always excited to add to my collection! Rubeena is such a talented women and is extremely kind! I have included a full list below of the blog hop order so you can hop to each crafter’s blog to find beautiful crafty inspiration! Come join in the fun – this is a gorgeous release!

Friend Stamp Set

For my first card I am using the beautiful new Friend stamp set! I love the big and bold font of the word friend, paired with the beautiful floral images! I started by stamping my image on Bristol smooth card stock and heat embossing it using clear embossing powder. I love to create bold and bright cards! For this card I used my zig markers. I work in layers when using my water based markers. I allow my project to dry on its own and continue to add layers of colors until I have the look I am going for. Once my coloring was dry I created an outline using 2 different shades of a tan/brown. I enjoy adding shading around the image as I feel it highlights my focal point. I added a few metallic splatters and adhered this to my card base!

I hope you enjoyed this one layer card! I can’t wait to use this stamp again and pair it with one of the Gray Muse sentiment sets! In Rubeena’s collection she has 3 sentiment stamp sets! You can see them here.

Lovely Lotus Stamp Set

For my second card I am using the beautiful Lovely Lotus stamp set designed by artist Alex Syberia. I love the floral images in this set, along with the sentiments.

I started by stamping the lotus image on Fabriano Hot Press watercolor card stock. I love this cardstock when I use my Karin markers. I have found this paper to work well with this medium. For this floral image I decided to keep the coloring simple by only using a few colors. For the floral image I used: Rose Pink 168, Magenta 359, Olive Black 447, Praline 385, and Gold 283. I work in layers as well allowing dry time between colors. Once my coloring was dry, I used my scan and cut to trim the image and set it aside.

To create my background I wanted to use patterned paper from my stash! I have a lot of beautiful paper and find I don’t use it enough! I chose this bright yellow paper for the background and a textured gray paper for the die cut circle. Both papers were trimmed down using dies. I assembled my card using the patterned paper and used foam tape behind my lotus flowers. I then chose a sentiment from the Lovely Lotus stamp and from the Social Distance stamp set 9the sentiments in this set are AWESOME – be sure to check them out). I heat embossed these using white embossing powder on the gray cardstock. Once my card was assembled I added a few sequins as well.

Pretty Pansies

I recently shared a card using the beautiful Pretty Pansies stamp set on Instagram. Just wanted to share a bit of inspiration using this new release as well!

Thank you so much for stopping by today on the hop! I hope you found some inspiration here today! Here is a full list of the blog hop! Be sure to hop and comment for a chance to win a gift certificate to the Gray Muse shop!

Blog Hop

Thank you so much for stopping by! Thank you to Rubeena for having me join her hop and to celebrate this GORGEOUS new release!

Crafty Hugs,

Natasha